How to Make a Game Like Jetpack Joyride using LevelHelper and SpriteHelper [Corona Edition] – Part 2
This is a post by special contributor Bogdan Vladu, an iOS application developer and aspiring game developer living in Bucharest, Romania. Welcome back to our Jetpack Joyride tutorial series! In this tutorial series, we are making a game similar to Jetpack Joyride using Corona SDK, and the LevelHelper and SpriteHelper tools. So far, we’ve got […] By .
Working With Sensors: Adding Coins
Now for the coins. Remember, we want to make the coins sensors so that the mouse can pass straight through them without bouncing off, but still allow us to detect when there is a collision.
To make the coins sensors, select the coin sprite from the sprites list inside LevelHelper, right click (or Control-Click) and choose Open SpriteHelper Scene.

With the SpriteHelper scene opened, select the coin sprite and check the Is Sensor, Is Circle and Can Sleep options on the Physics menu. Then save the scene.
- Is Sensor: makes the body trigger a collision, but not a collision response.
- Is Circle: makes the shape of the body circle-based.
- Can Sleep: speeds up simulation of the physics.

Now add the coin sprite to the level and place it as you see fit. Use the Clone Tool to easily clone the coin with the direction offset you prefer.
![]()
Now my level looks like this:

Add the coins to the parallax, set the ratio to 1 and 0 and save the level. Compile and run your project, and now you have coins!

Adding the Player
Now that we have a good-looking level with all the basic components, let’s create the player and its accompanying animations.
Open SpriteHelper and go to File\New to create an empty sprite sheet. Then in Finder, navigate to the directory where you saved the art for this game. Once you’re there, select and drag onto the SpriteHelper window all the mouse sprites and the rocket flames.

We now need to create one single image with the art we just imported. This is an essential step before creating the animation. All engines supported by LevelHelper and SpriteHelper expect that frames in an animation are part of the same image file.
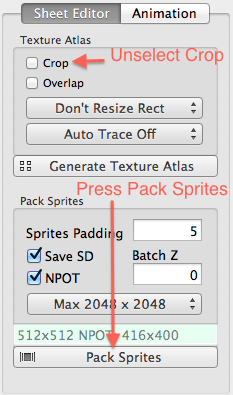
Switch to the Sheet Editor menu if you aren’t there already and deselect Crop, because we don’t want to trim the frames of the mouse animation. Click Pack Sprites to arrange all the sprites into the sprite sheet.
Next, switch to the Animation section of SpriteHelper. We’ll we’ll create all the animations we need here, exactly as we did for the laser.
Using the same technique you learned earlier, create five animations with the properties listed below.
If you forgot how to create animations, for each animation, click the + button, and double click to name it. Then select the required frames for that particular animation, set the speed, and make sure to check the Loop Forever option for the one that needs to loop.
1) Animation Name: mouseRun
Start At Launch: YES
Loop Forever: YES
Speed: 0.400 (default)
Repetition: 1.000 (default)
Frames: rocketmouse_1_run, rocketmouse_2_run, rocketmouse_3_run, rocketmouse_4_run

2) Animation Name: flame
Start At Launch: YES
Loop Forever: YES
Speed: 0.400 (default)
Repetition: 1.000 (default)
Frames: rocket_flame1, rocket_flame2

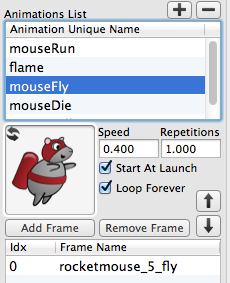
3) Animation Name: mouseFly
Start At Launch: YES
Loop Forever: YES
Speed: 0.400 (default)
Repetition: 1.000 (default)
Frames: rocketmouse_5_fly
4) Animation Name: mouseDie
Start At Launch: YES
Loop Forever: NO
Speed: 0.400 (default)
Repetition: 1.000 (default)
Frames: rocketmouse_7_die, rocketmouse_8_die

5) Animation Name: mouseFall
Start At Launch: YES
Loop Forever: NO
Speed: 0.400 (default)
Repetition: 1.000 (default)
Frames: rocketmouse_6_fall

Once you’re done, hit Command-S to save the scene. In the Save dialogue, navigate to the Images folder inside your Xcode project Resources folder, and save the scene as “mouse.”

Back in LevelHelper, we can find all of our new animations in the Animation section.
Drag the mouseRun animation onto the main screen (the one with a red border). Place it just to the left of the screen.
Then drag the flame sprite and place it right under the red tank on the back of the mouse.
The result should look something like this:

If you look closely, you’ll see that the flame sprite is on top of the red tank. Let’s put it behind the tank, so it looks more like the flame is coming out of the tank. Do this this, select the flame sprite and under General Properties, set Z Order to -1.

If you run the level at this point using Scene Tester (press Test Level button) you might or might not be able to see the mouse.
This is because the sprites are rendered using batch nodes (a special way of rendering sprites more efficiently). To make the mouse be on top of all the other sprites in the level, we need to change the Z Order of the batch node (the image file).
Inside LevelHelper go to the Images section and double click on the Z Order field for mouse.png. Enter a value of 4.
We want the player to always be on top of everything, and we’re going to add more images soon. That’s why we’re putting a larger value here.

Running the level now, you can see the mouse running on the scene, but it does not perform any collisions.
You can also simulate the Corona SDK rendering inside Scene Tester by selecting Scene Tester app while its running and going to “Actions” menu, then select “Simulate Corona SDK Drawing”

It actually is performing collisions with the dogs and cats, but because the mouse and other objects are all static, nothing happens.
Time to make the mouse and the flame sprites dynamic! Open the SpriteHelper scene for the mouse:

Then select all the sprites and make them dynamic. Because we don’t want the mouse to rotate when it collides with any other sprite, select the Fixed Rotation option also.

For the two rocket flame sprites, we also need to check the Is Sensor option. This is because later we’re going to be attaching the flame to the rocket tank.

Save the scene when you’re done!
Running Scene Tester again, we will see the mouse falling out of the screen. This is because the mouse is responding to gravity. Let’s make him stay on the screen.
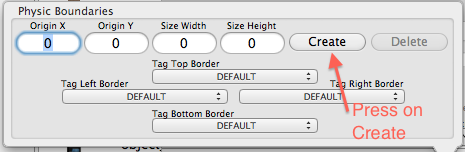
Click the Physic Boundaries button.

From the Physic Boundaries window, click Create.
We’ve now created the boundary, but we want to edit it so that it’s right under the mouse in the middle of the floor, where the mouse will walk. Inside the Physic Boundaries window, click Edit.

You will now see four red handles on the corners of the physic boundary. Drag any of the bottom handles to move the boundary so that it’s under the mouse’s feet.

You should have something similar to this:

When you’re satisfied with your physic boundary, press the Editing button to stop the editing process.

Running the level in Scene Tester, you will see the mouse collides with the dogs and cats and stays on the screen, but, alas, there is yet another problem!
This time, the flame is falling off the screen. That’s because it’s a sensor and so it does not collide with any object and isn’t attached to the mouse’s body. But w can connect the flame to the mouse by creating a distance joint.
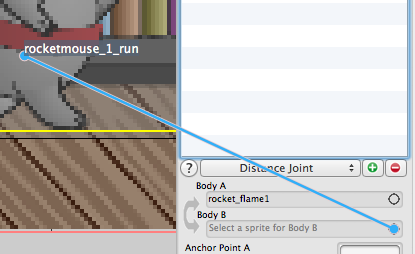
Go to the Joints section inside LevelHelper, select Distance Joint from the list and click the green + button.

Now let’s select the sprites we want the joint to connect.
Select the joint from the list (if not already selected), then on the Body A property, click and hold the circle icon. Then drag your mouse over the flame sprite. When the text says rocket_flame_1, release the mouse. (This is exactly the same process as connecting an outlet inside Interface Builder in Xcode.)

Now repeat the process for Body B, only this time select the mouse.
Now let’s put the joint’s anchor points closer together.
Select A in the joint property, drag the handle that shows the flame sprite, and put the anchor right on top of the tank.

Repeat the process for the other anchor point. Select anchor B, drag the handle and put the anchor point next to the other.

If you run the level in the Scene Tester, you’ll see the flame now stays attached to the mouse. w00t!
We now have almost everything we need in order to start coding the game!