Beginning Automated Testing With Xcode Part 2/2
Note from Ray: This is the tenth and final iOS 6 tutorial in the iOS 6 Feast! This tutorial comes from our new book iOS 6 By Tutorials. Charlie Fulton wrote this chapter – a friend of mine and one of the newest members of the Tutorial Team. Enjoy! This is a blog post by […] By Charlie Fulton.
Uploading the archive to TestFlight
One of the best things about the iOS development community is the variety of awesome frameworks and services that have emerged over the past few years.
Back in the day, it was quite an effort to get a beta build to your testers. You would have to get your IPA file to them by email, have them drag that to iTunes, then connect their device to sync up with iTunes just to get it on their device. You also had to send them an email asking for the UDID of their device, scribble that down or copy it up to create the new provisioning profile, then create the new build. It was a nightmare to keep track of which device belonged to what user, what iOS version they were running, etc.
Enter TestFlight! This is a website that makes distribution and testing of beta versions of apps a breeze. ☺ Before TestFlight, the only way to distribute builds to your beta testers was via ad hoc builds. The ad hoc builds still remain, since TestFlight works within the ad hoc mechanism, but it makes distribution and management of these builds much simpler.
Testflight will also allow you to set up their TestFlight SDK packaging in your app for crash log analysis, usage analysis, and more!
We are going to focus on the auto upload and distribution pieces that TestFlight offers.
PackageApplication
Here is a sweet little Perl script included by Apple in the Xcode.app bundle. You can take a peek at it (no touching!) by opening:
/Applications/Xcode.app/Contents/Developer/Platforms/iPhoneOS.platform/Developer/usr/bin/PackageApplication
This is the tool that will allow you to do the following from the latest archived build, the one you just created in the previous step. You will be modifying your Jenkins archive step to include:
- Creating the GuildBrowser.app bundle;
- Embedding your ad hoc provisioning profile;
- Codesign with your distribution certificate.
To make sure you’re ready, download your latest ad hoc provisioning profile from the iOS Provisioning Portal and add it to the top level of your project folder.
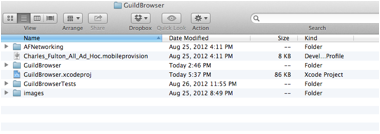
After downloading it, your project should look like the image below. Notice my ad hoc provisioning profile named Charles_Fulton_All_Ad_Hoc.mobileprovision:
Note: Your .mobileprovision file can be located anywhere. You just have to make sure to give it the full absolute path – no relative paths. For example:
~/Library/MobileDevice/Provisioning\ Profiles/
Must be:
/Users/charlie/Library/MobileDevice/Provisioning\ Profiles/
I like to keep mine in Git, so that when new devices are added, I just check in a new provisioning profile. Then I can do a manual build in Jenkins and it’s ready to go.
Make sure to commit and push to GitHub after adding the file, so Jenkins can see it.
If you are using Xcode to commit to Git, then note that you would need to add the mobile provisioning profile to your project before Xcode sees the new file. Otherwise, you will not be able to commit it to Git. If you use the command-line Git tools or a separate Git client, this issue should not arise.
Let’s edit your Jenkins job again. Go to the Jenkins Dashboard\GuildBrowser job\Configure. Add a new Build step of type execute shell:
export DEVELOPER_DIR=/Applications/Xcode.app/Contents/Developer

#
# Setup
#
# 1
PROJECT="GuildBrowser"
SIGNING_IDENTITY="iPhone Distribution: Charles Fulton"
PROVISIONING_PROFILE="${WORKSPACE}/Charles_Fulton_All_Ad_Hoc.mobileprovision"

# 2
# this is the latest archive from previous build step
ARCHIVE="$(ls -dt ~/Library/Developer/Xcode/Archives/*/${PROJECT}*.xcarchive|head -1)"
# 3
IPA_DIR="${WORKSPACE}"
DSYM="${ARCHIVE}/dSYMs/${PROJECT}.app.dSYM"
APP="${ARCHIVE}/Products/Applications/${PROJECT}.app"


#
# PackageApplication
#

# package up the latest archived build
/bin/rm -f "${IPA_DIR}/${PROJECT}.ipa"

# 4
/usr/bin/xcrun -sdk iphoneos PackageApplication \
-o "${IPA_DIR}/${PROJECT}.ipa" \
-verbose "${APP}" \
-sign "${SIGNING_IDENTITY}" \
--embed "${PROVISIONING_PROFILE}"

# zip and ship
/bin/rm -f "${IPA_DIR}/${PROJECT}.dSYM.zip"

# 5
/usr/bin/zip -r "${IPA_DIR}/${PROJECT}.dSYM.zip" "${DSYM}"
There is a lot going on in this build script. You know what that means.

Break it down!
This bit of shell trickery finds the latest archive build location. This gives you a sneaky way to get the latest archive result directory. To make more sense of this one, open a terminal and run the command:
You should see output like this:
- These are the settings for what certificate and provisioning profile to use when creating your IPA file. You should change the SIGNING_IDENTITY and PROVISIONING_PROFILE to use your ad hoc distribution profile.
-
ls -dt ~/Library/Developer/Xcode/Archives/*/GuildBrowser*.xcarchive|head -1
/Users/charlie/Library/Developer/Xcode/Archives/2012-08-27/GuildBrowser 8-27-12 10.37 AM.xcarchive/
- You can now use the ARCHIVE variable to create the variables APP and DSYM saving the absolute paths to send to PackageApplication. Take a peek inside by trying this command:
ls –l "/Users/charlie/Library/Developer/Xcode/Archives/2012-08-27/GuildBrowser 8-27-12 10.37 AM.xcarchive/Products/Applications/GuildBrowser.app"
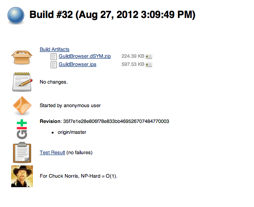
- Here you are calling the PackageApplication script. Notice that Jenkins gives you some nice environment variables in $WORKSPACE. The $WORKSPACE variable lets you get an absolute path to the Jenkins job. You can now create artifacts in Jenkins of exactly what gets sent to your users.
- Compress the dSYMs from the archive. dSYMs are used to symbolicate crash logs so that you can find out which source file, method, line, etc. had an issue instead of getting memory addresses that would mean nothing to you.
ls -dt ~/Library/Developer/Xcode/Archives/*/GuildBrowser*.xcarchive|head -1
/Users/charlie/Library/Developer/Xcode/Archives/2012-08-27/GuildBrowser 8-27-12 10.37 AM.xcarchive/
ls –l "/Users/charlie/Library/Developer/Xcode/Archives/2012-08-27/GuildBrowser 8-27-12 10.37 AM.xcarchive/Products/Applications/GuildBrowser.app"
Before saving and building the updated script, let’s add a step to create artifacts of all successfully-created .apps and dSYMs.
Go to the Post-build Actions section, and select Archive the artifacts from the Add post-build action menu.
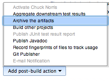
Enter *.ipa, *.dSYM.zip in the files to archive text field.
Click Save and select Build Now. Once the build completes, you should see this:
If something fails at this point, it usually is because the code signing information wasn’t correct, or because the ad hoc provisioning profile isn’t in the project root folder. So check the build logs to see what is going on.
Mission completion
OK, let’s send those artifacts to TestFlight and notify your users of the new build.
Note: This section assumes you already have a TestFlight (testflightapp.com) account. You will need your TestFlight team and API tokens.
You can get your API token here: https://testflightapp.com/account/#api
Your team token can be found by clicking on the team info button while logged into TestFlight.
Edit your Jenkins job again by going to the Jenkins Dashboard\GuildBrowser job\Configure. You will be editing the script you added in the previous step.
Add this code, filled out with your own TestFlight info, after the export DEVELOP_DIR line:
# testflight stuff
API_TOKEN=<YOUR API TOKEN>
TEAM_TOKEN=<YOUR TEAM TOKEN>
Add this to the end of the existing script:
#
# Send to TestFlight
#
/usr/bin/curl "http://testflightapp.com/api/builds.json" \
  -F file=@"${IPA_DIR}/${PROJECT}.ipa" \
  -F dsym=@"${IPA_DIR}/${PROJECT}.dSYM.zip" \
  -F api_token="${API_TOKEN}" \
  -F team_token="${TEAM_TOKEN}" \
  -F notes="Build ${BUILD_NUMBER} uploaded automatically from Xcode. Tested by Chuck Norris" \
  -F notify=True \
  -F distribution_lists='all'

echo "Successfully sent to TestFlight"
Click Save and do another Build Now.
Now when the job completes, your build should have been sent to TestFlight! And your users should have received an email telling them that a new build is available. This will allow them to install your app right from the email and begin testing for you!