Beginning Automated Testing With Xcode Part 2/2
Note from Ray: This is the tenth and final iOS 6 tutorial in the iOS 6 Feast! This tutorial comes from our new book iOS 6 By Tutorials. Charlie Fulton wrote this chapter – a friend of mine and one of the newest members of the Tutorial Team. Enjoy! This is a blog post by […] By Charlie Fulton.
Finalizing your Jenkins job
First off, make sure to commit all changes and push them to your origin/master branch on GitHub.
As a reminder, you will need to do the following:
- Go to File\Source Control\Commit (⌥⌘-C), then on the following screen, enter a commit message like “added test target” and click Commit.
- Push the local master branch to the remote origin/master branch. Go to File\Source Control\Push and click Push.
Now edit your Jenkins job again to include the tests you just set up. Go to the Jenkins Dashboard\GuildBrowser job\Configure. In the Build section, replace the existing code with this:
export DEVELOPER_DIR=/Applications/Xcode.app/Contents/Developer/

xcodebuild -target GuildBrowserLogicTests \
-sdk iphonesimulator \
-configuration Debug \
TEST_AFTER_BUILD=YES \
clean build
Click Save and then Build Now.
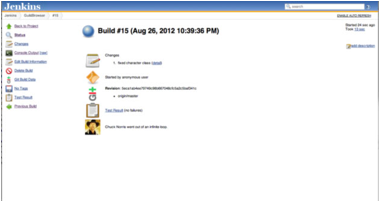
Ummm, RUN! You broke the build and Chuck Norris is going to find you! The gloves are on! This is serious, man. No one can escape him. :]
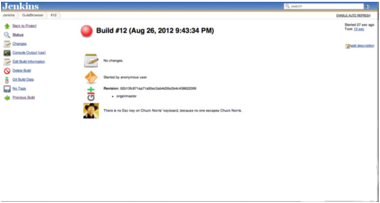
So what happened? You could scour the output logs of the build that put you on Mr. Norris’s radar, or… you could set up Jenkins to give you some test results reporting! I don’t know about you, but if I’m on that radar I want to be off it FAST! You should have also received an email telling you that you broke the build. Let’s get some reporting, stat!
Getting a unit test report
It would be quite tedious to pour through the logs after each build, and it sure would be nice if there were a handy report you could look at to see what passed and what failed.
Well, it turns out there is a script that does exactly that! Christian Hedin has written an awesome Ruby script to turn the OCUnit output into JUnit-style reports. You can find it on GitHub at https://github.com/ciryon/OCUnit2JUnit.
A copy of the Ruby script is included in the resources for this chapter. Work quickly; remember whose radar you are on!
Copy the ocunit2junit.rb file to somewhere that Jenkins can access it – I placed mine in /usr/local/bin. Make a note of the location, and use it below when updating the build job.
In the GuildBrowser Jenkins job, update the shell script to the following:
export DEVELOPER_DIR=/Applications/Xcode.app/Contents/Developer/

xcodebuild -target GuildBrowserLogicTests \
-sdk iphonesimulator \
-configuration Debug \
TEST_AFTER_BUILD=YES \
clean build | /usr/local/bin/ocunit2junit.rb
The only new bit is on the final line, where the output from the build is piped through to the Ruby script for processing.
Now you need to add another Post-Build Action to your job to capture these reports. At the bottom of the configure screen, click on the Add post-build action button and choose Publish JUnit test result report.
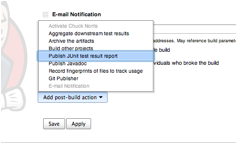
Enter test-reports/*.xml in the Test report XMLs text field.
Click Save and then Build Now. When the job is finished and you go to the main project area for the GuildBrowser job, you should see a Latest Test Result link. Work quickly; get on that link!
Now it’s really obvious what has angered “He who must not be named.”
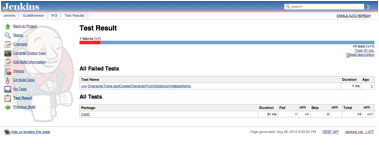
It looks like a bug has been found by the CharacterTests class. Let’s investigate this further by clicking on the link to the test name:
Error Message

"Vicious Pyrium Bracers" should be equal to "Girdle of the Queen"s Champion" name is wrong

Stacktrace

/Users/charlie/.jenkins/workspace/GuildBrowser/GuildBrowserLogicTests/testclasses/CharacterTests.m:58
OK, let’s go check out the test code. First look at line 76 from CharacterTests.m:
STAssertEqualObjects(hagrel.waistItem.name,@"Girdle of the Queen's Champion", @"name is wrong");
Interesting! Open the file character.json to see what you have; maybe your data was wrong, but surely not your code!
Remember character.json represents what’s returned from Blizzard’s real character web service. You’ll find this snippet:
{
    "thumbnail": "borean-tundra/171/40508075-avatar.jpg",
    "class": 1,
    "items": {
        …
        "wrist": {
            "icon": "inv_bracer_plate_dungeonplate_c_04",
            "tooltipParams": {
                "extraSocket": true,
                "enchant": 4089
            },
            "name": "Vicious Pyrium Bracers",
            "id": 75124,
            "quality": 3
        },
        "waist": {
            "icon": "inv_belt_plate_dungeonplate_c_06",
            "tooltipParams": {
                "gem0": 52231
            },
            "name": "Girdle of the Queen's Champion",
            "id": 72832,
            "quality": 4
        },
…
Hmmm, the plot thickens. Your test found “Vicious Pyrium Bracers”, the name of the wrist item, but was looking for “Girdle of the Queen’s Champion”, the name of the waist item. Now it’s looking more like a bug!
You can see in the test in CharacterTest.m that you create a Character like so:
Character *hagrel = [[Character alloc] initWithCharacterDetailData:characterDetailJson];
Open Character.m and let’s take a look at initWithCharacterDetailData:. Can you spot the bug?
_wristItem = [Item initWithData:data[@"items"][@"wrist"]];
_waistItem = [Item initWithData:data[@"items"][@"wrist"]];
You were using the wrong key for the waistItem property. Fix that by changing the last line to:
_waistItem = [Item initWithData:data[@"items"][@"waist"]];
OK, now commit your changes and push them to GitHub. Go to the Jenkins project and click on Build Now.
Test result: no failures! Chuck gives that a thumbs up – what a huge relief!
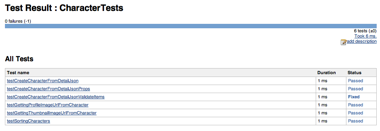
Drill down into the report by clicking on Latest Test Result\root and you will see all the tests that were run. By drilling further into the CharacterTests, you can see that you fixed the issue (look closely at the status on line three :]):
Polling for changes
Now let’s set up the Jenkins project to look for changes every 10 minutes, and if it finds any, to run the build. Edit your Jenkins job again by going to the Jenkins Dashboard\GuildBrowser job\Configure. In the Build Triggers section, check the
*/10 * * * *
Click Save. Now builds will happen if there is new code that has been pushed to the origin/master repo. Of course, you can still manually build like you’ve been doing with the Build Now button.
Automate archiving
Let’s update the build script to archive your app after successfully running the test script. Edit your Jenkins job again by, you guessed it, going to the Jenkins Dashboard\GuildBrowser job\Configure.
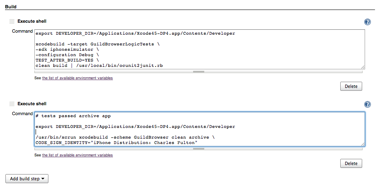
You are now going to add another shell step, which will happen after the test script step. In the Build section, click on the Add build step dropdown and select Execute shell.
Enter the following, replacing the CODE_SIGN_IDENTITY with your distribution certificate name:
# tests passed archive app

export DEVELOPER_DIR=/Applications/Xcode.app/Contents/Developer

/usr/bin/xcrun xcodebuild -scheme GuildBrowser clean archive \
CODE_SIGN_IDENTITY="iPhone Distribution: Charles Fulton"
Your build section should now look similar to this:
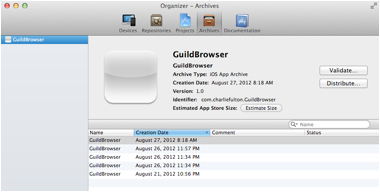
If you save your changes and build again via Jenkins, you should now see the latest archive in the Xcode organizer for this project. In Xcode, open Window\Organizer and switch to the Archives tab, and you should see the GuildBrowser project listed on the left.
When you click on the project, you will see all of your archived builds. This is great, because now you will know that you are building and testing the same archive that will be submitted to the App Store!
Note: If the archiving fails, you will not see an archive listed in the Xcode Organizer, nor will you see any immediate indication from Jenkins as to the archive failure. You would need to check the build logs to see if the archiving actually succeeded.
Usually, the archive process fails because the CODE_SIGN_IDENTITY is not correctly specified, or because it doesn’t match the Bundle ID for the project. So if you run into any archival failures, those would be the items to check. One solution here would be to set the CODE_SIGN_IDENTITY to iPhone Distribution, since that will match the default distribution profile.
Also remember that if you make any project changes to fix the above, you need to commit to Git and push to GitHub. Otherwise, Jenkins won’t pick up your changes for the next build. :)
Next you will add sending this archived build to TestFlight, and keeping track of the artifact (which is Jenkins terminology for the results of the build) in Jenkins.