Cocos2D-X Tutorial for iOS and Android: Space Game
In this Cocos2D-X tutorial, you will learn how to build a space game similar to the one was built in the How to Make a Space Shooter iPhone Game. There will be one major difference – this will be written in beautiful cross-platform C++, using Cocos2D-X! By .
Continuous Scrolling
However, you will notice that after the background scrolls offscreen, it doesn’t repeat, so you need to fix that.
In the Cocos2D space shooter tutorial, it’s implemented by extending the CCParallaxNode class via an Objective-C category. Unfortunately, categories doesn’t exist in C++, so you’ll have to resort to an alternative method: inheritance.
You’re going to define a CCParallaxNode extras class that extends the standard CCParallaxNode. This is not as elegant as an Objective-C category, but sometimes it’s needed to make some sacrifices for the sake of portability.
In Xcode, right click the Classes group and select New File. Select the iOS\C and C++\C++ Class template, click Next, name it CCParallaxNodeExtras.cpp, browse to the $PROJECT_HOME\Classes directory to save it, and click Create. This step will create the CCParallaxNodeExtras.h header file automatically.
Then replace CCParallaxNodeExtras.h with the following:
#ifndef Cocos2DxFirstIosSample_CCParallaxNodeExtras_h
#define Cocos2DxFirstIosSample_CCParallaxNodeExtras_h

#include "cocos2d.h"

USING_NS_CC;

class CCParallaxNodeExtras : public CCParallaxNode {

    public :

    // Need to provide a constructor
    CCParallaxNodeExtras();

    // just to avoid ugly later cast and also for safety
    static CCParallaxNodeExtras * node();

    // Facility method (it’s expected to have it soon in COCOS2DX)
    void incrementOffset(CCPoint offset, CCNode* node);
} ;

#endif
Here the class extends CCParallaxNode to add the new method incrementOffset that will be used to update the position of a child of the parallax node. This will be used when part of the background goes offscreen to the left – incrementOffset will move it offscreen to the right for continuous wrapping.
Next replace CCParallaxNodeExtras.cpp with the following:
#include "CCParallaxNodeExtras.h"

// Hack to access CCPointObject (which is not a public class)
class CCPointObject  : CCObject {
    CC_SYNTHESIZE(CCPoint, m_tRatio, Ratio)
    CC_SYNTHESIZE(CCPoint, m_tOffset, Offset)
    CC_SYNTHESIZE(CCNode *, m_pChild, Child)	// weak ref
};

// Need to provide a constructor
CCParallaxNodeExtras::CCParallaxNodeExtras() {
    CCParallaxNode(); // call parent constructor
}

CCParallaxNodeExtras * CCParallaxNodeExtras::node() {
    return new CCParallaxNodeExtras();
}

void CCParallaxNodeExtras::incrementOffset(CCPoint offset,CCNode* node){
    for( unsigned int i = 0; i < m_pParallaxArray->num; i++) {
        CCPointObject *point = (CCPointObject *)m_pParallaxArray->arr[i];
        CCNode * curNode = point->getChild();
        if( curNode->isEqual(node) ) {
            point->setOffset( ccpAdd(point->getOffset(), offset) );
            break;
        }
    }
}
Note that CCPointObject is unfortunately not a public class in Cocos2D, so you have to resort to a bit of a hack to use it (redefine it in your own class with the same signature). Although this works, the drawback is that if the CCPointObject structure ever changes, you’ll have to update it here as well or the program will crash.
The meat of the code is the incrementOffset method, and it’s implemented the same way the Cocos2D space shooter tutorial did it, just with different syntax.
Next, switch to HelloWorldScene.h and add this to the top of the file beneath the existing #include statement:
#include "CCParallaxNodeExtras.h"
Then change the _backgroundNode definition in the private section from a CCParallaxNode to a CCParallaxNodeExtras as follows:
CCParallaxNodeExtras *_backgroundNode;
Now switch over to HelloWorldScene.cpp and replace the first line in section #1 (the one where _backgroundNode is created) with the following:
_backgroundNode = CCParallaxNodeExtras::node();
Finally, add the following to the end of the update method:
CCArray *spaceDusts = CCArray::createWithCapacity(2);
spaceDusts->addObject(_spacedust1);
spaceDusts->addObject(_spacedust2);
for ( int ii = 0; ii <spaceDusts->count(); ii++ ) {
    CCSprite * spaceDust = (CCSprite *)(spaceDusts->objectAtIndex(ii));
    float xPosition = _backgroundNode->convertToWorldSpace(spaceDust->getPosition()).x;
    float size = spaceDust->getContentSize().width;
    if ( xPosition < -size/2 ) {
        _backgroundNode->incrementOffset(ccp(spaceDust->getContentSize().width*2,0),spaceDust);
    }
}

CCArray *backGrounds = CCArray::createWithCapacity(4);
backGrounds->addObject(_galaxy);
backGrounds->addObject(_planetsunrise);
backGrounds->addObject(_spacialanomaly);
backGrounds->addObject(_spacialanomaly2);
for ( int ii = 0; ii <backGrounds->count(); ii++ ) {
    CCSprite * background = (CCSprite *)(backGrounds->objectAtIndex(ii));
    float xPosition = _backgroundNode->convertToWorldSpace(background->getPosition()).x;
    float size = background->getContentSize().width;
    if ( xPosition < -size ) {
        _backgroundNode->incrementOffset(ccp(2000,0),background);
    }
}
You can see that the alternative to NSArray here is CCArray, which is based on the STL C++ template library. You use the createWithCapacity constructor which will release the object automatically for you.
One final change – since you added a new file, you need to add it to the Android project’s Makefile to get it to build correctly. So open jni\Android.mk in Eclipse, and modify the LOCAL_SRC_FILES line to read as follows:
LOCAL_SRC_FILES := hellocpp/main.cpp \
	           ../../Classes/AppDelegate.cpp \
                   ../../Classes/HelloWorldScene.cpp \
                   ../../Classes/CCParallaxNodeExtras.cpp
Compile and Run, and now the background will scroll endlessly!
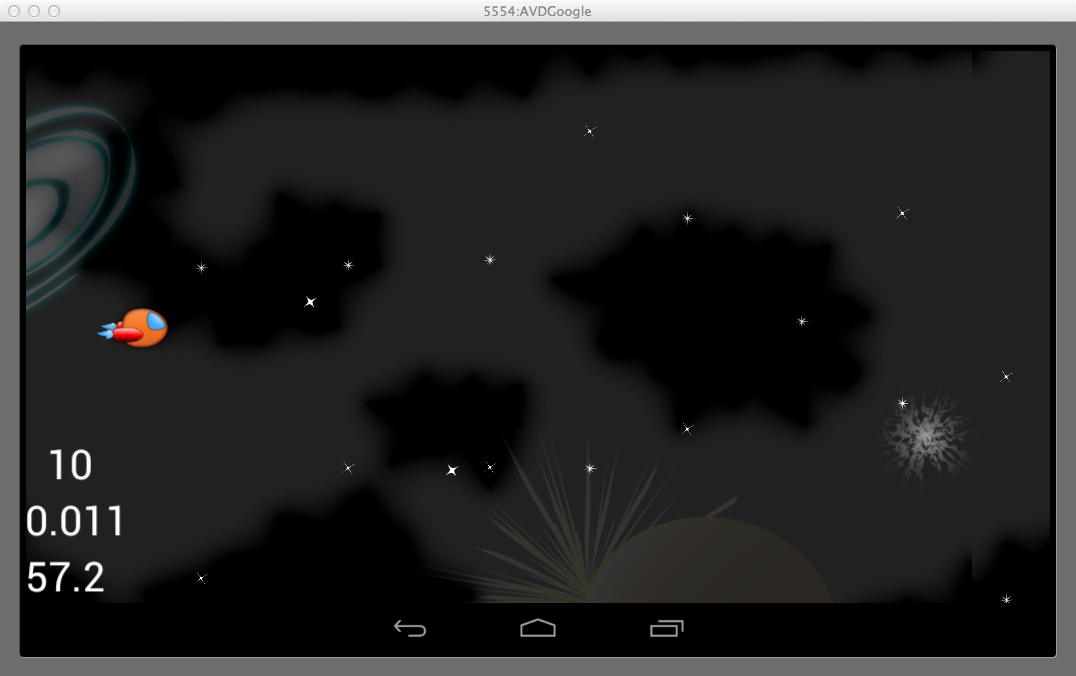
Adding Stars
Adding the stars is pretty straightforward. Just add this code to the init() method in HelloWorldScene.cpp, right before the return statement:
HelloWorld::addChild(CCParticleSystemQuad::create("Stars1.plist"));
HelloWorld::addChild(CCParticleSystemQuad::create("Stars2.plist"));
HelloWorld::addChild(CCParticleSystemQuad::create("Stars3.plist"));
Compile and Run, and pretty cool – it’s starting to look like a space game!

Moving the Ship with Accelerometer
The original Cocos2D space shooter tutorial used the iOS accelerometer API to detect accelerometer input. Obviously the iOS accelerometer API isn’t cross platform, so how to solve this problem?
Luckily, Cocos2D-X has provided an abstraction layer around accelerometer input. Let’s see how it works.
First, add a new private variable to HelloWorldScene.h:
float _shipPointsPerSecY;
Then, add a new public method definition:
virtual void didAccelerate(CCAcceleration* pAccelerationValue);
Then add the following code to the bottom of init() in HelloWorldScene.cpp, before the return:
this->setAccelerometerEnabled(true);
Next, add the following new method to the bottom of the file:
void HelloWorld::didAccelerate(CCAcceleration* pAccelerationValue) {
  #define KFILTERINGFACTOR 0.1
  #define KRESTACCELX -0.6
  #define KSHIPMAXPOINTSPERSEC (winSize.height*0.5)
  #define KMAXDIFFX 0.2

  double rollingX;

  // Cocos2DX inverts X and Y accelerometer depending on device orientation
  // in landscape mode right x=-y and y=x !!! (Strange and confusing choice)
  pAccelerationValue->x = pAccelerationValue->y;
  rollingX = (pAccelerationValue->x * KFILTERINGFACTOR) + (rollingX * (1.0 - KFILTERINGFACTOR));
  float accelX = pAccelerationValue->x - rollingX;
  CCSize winSize = CCDirector::sharedDirector()->getWinSize();
  float accelDiff = accelX - KRESTACCELX;
  float accelFraction = accelDiff / KMAXDIFFX;
  _shipPointsPerSecY = KSHIPMAXPOINTSPERSEC * accelFraction;
}
Finally, add the following to the bottom of update method:
CCSize winSize = CCDirector::sharedDirector()->getWinSize();
float maxY = winSize.height - _ship->getContentSize().height/2;
float minY = _ship->getContentSize().height/2;

float diff = (_shipPointsPerSecY * dt);
float newY = _ship->getPosition().y + diff;
newY = MIN(MAX(newY, minY), maxY);
_ship->setPosition(ccp(_ship->getPosition().x, newY));
The didAccelerate callback provides a CCAcceleration instance which contains x,y and z information about the acceleration data. For the purpose of this Cocos2D-X tutorial, you will only be interested in the x acceleration data so that you can move the spaceship when the phone rotates around its x axis.
Note: Cocos2D-X switches the accelerometer x and y values depending on whether the device is in portrait or landscape mode. In Landscape right (the tutorial case here), the received x is -y and received y is x. In Landscape left, the received x is y and the received y is -x. Confusing eh? :]
Compile and Run on your iPhone and Android devices, and you should now be able to move the ship by tilting your device! Of course, at this point, you’ll not be able to test the game on the simulator either for Android or iOS and would need to test on device.
Note: We have not supplied HD artwork, so the art might look a little odd if you’re on a retina device! We’ll talk a more about this at the end.