How To Build a Monkey Jump Game Using Cocos2d 2.X, PhysicsEditor & TexturePacker – Part 1
Learn how to make a fun 2D physics game called Monkey Jump in this 3-part tutorial series covering Physics Editor, Texture Packer, and Cocos2D. By .
Sign up/Sign in
With a free Kodeco account you can download source code, track your progress, bookmark, personalise your learner profile and more!
Create accountAlready a member of Kodeco? Sign in
Sign up/Sign in
With a free Kodeco account you can download source code, track your progress, bookmark, personalise your learner profile and more!
Create accountAlready a member of Kodeco? Sign in
Contents
How To Build a Monkey Jump Game Using Cocos2d 2.X, PhysicsEditor & TexturePacker – Part 1
65 mins
- Designing the game
- Handling iPhone 5
- Getting Started
- Creating Sprite Sheets
- Creating the Background Sprite Sheet
- Creating the Jungle Sprite Sheet
- Creating the Frame Spritesheet for iPhone5
- Creating Physics Shapes Manually
- A Little Magic: Creating Shapes with the Tracer
- Last But Not Least: the Monkey
- The Xcode Project: Overview
- Basic Setup in Xcode
- Dropping Objects
- Where to Go From Here?
Creating the Frame Spritesheet for iPhone5
You need one more sprite sheet – this one for iPhone 5, to contain the tree left and right which occupies the additional space.
You can’t simply add the tree to the jungle sprite sheet since the tree is more than 2048 pixels high. iPod 4G only allows a maximum texture size of 2048×2048. You could split the tree into 2 parts and join it by using sprites on the device – or create another sprite sheet which is only loaded on iPhone 5. I prefer the latter since it makes things easier and avoids loading additional bytes on most of the devices.
You’ll be using almost the same settings as for the jungle sprite sheet. To avoid re-configuring all the settings, you can set the settings you currently have in the jungle sprite sheet as your default settings.
To do this, click the Save defaults option in the toolbar while the jungle is opened. Then open a new sprite sheet, and it will contain the settings you just saved as defaults. Open AutoSD and clear Main extension and press the “-” button on all list items.
Then drag in the frame folder instead of the jungle folder, and make sure the Max Size W and H are set to 4096.
Save the file as frame.plist and frame.pvr.ccz.
Creating Physics Shapes Manually
Next you’ll set up the physics shapes with PhysicsEditor.
Launch PhysicsEditor, and start by setting the Exporter to Box2d Generic (PLIST). I made an Objective-C loader for this format that you can use in your Cocos2d projects. If you are not satisfied with the formats supported by PhysicsEditor, you can simply create your own custom data exporter.
Next set the PTM-Ratio to 170. This tells Box2d that 170 pixels are equal to 1 meter (39.37 inches), the internal measurement unit of Box2d. I chose 170 pixels because this is the monkey’s height, and he is going to be 1 meter tall in the simulation.
You’re going to create all the physics shapes for the high-res sprites only. This is okay, since you want the physics parameters to be identical on retina display and older displays.
Creating different shapes for different screen resolutions would create different masses for each object, resulting in different physics behavior – which you don’t want! The idea is to run the same simulation on all devices and only adjust the visuals.

Setting Up the Fixture
You’re now going to create your first shape by hand. Drag the jungle/floor/grassfront.png shape onto the left pane of PhysicsEditor. When you do this, the shape will also appear in the center pane, which is the main editor area.
Note the small blue circle with the cross inside: that is the anchor point of the shape. You’re going to leave the anchor point for this shape where it is, on the bottom left corner. Later on, I’ll show you how to change the anchor point.
First use the polygon tool from the top tool bar. As soon as you click on it, a small red triangle appears. You can drag this triangle with your mouse.
The handles allow you to change the triangle’s shape. Double-clicking somewhere near a line will add an additional vertex. Double-click the vertex to remove it.
You do not have to care about things like polygon orientation or convex or concave shapes. This is all handled by PhysicsEditor.
Now create a rectangular shape for the floor. It should cover the soil but not the grass, and look something like this:

Setting Up the Parameters
Since the floor is going to be a static shape, its parameters are going to be very basic.
Density affects the weight of a body/fixture. Since the floor will not move, the value of the density is of no importance and you can leave it at the default value (2.0). Restitution is the degree a colliding shape will rebound from another object. For the floor, you want to keep this at 0.
Friction is the only important value here, as it determines how much the sprites will slide on the floor. Set this to 0.7.
The next items to set up are the collision bits. PhysicsEditor lets you handle these parameters quite easily – that is, without doing hex math. First, give the bits useful names by setting up the names in the text fields associated with the bits:
- floor – both the floor and the walls
- monkey – what else?
- good_objects – objects that don’t hurt the monkey
- bad_objects – objects that hurt the monkey
Ignore the other bits – you don’t need them.

Cat. stands for Category – it describes the type of an object. An object can be part of multiple categories at once. Mask describes which objects it can collide with.
Two objects can collide only when Object B’s bit category is of a type that has been selected as a mask for Object A, and vice-versa. Tick the Category field for the floor bit since this shape is a floor, and then the Mask field for all the bits. This enables collision between all objects and the floor.
Save the project as shapes.pes inside the Assets folder.
A Little Magic: Creating Shapes with the Tracer
Creating shapes by hand isn’t always fun. So let’s use the magic wand tool and let PhysicsEditor do the work for you!
Drop the following objects onto the left pane: backpack, banana, bananabunch, canteen, hat, pineapple, and statue.

Select the backpack, and click the magic wand icon on the tool bar. This will open a new window, the tracer. The tracer shows the current shape with an overlay of the traced shape.

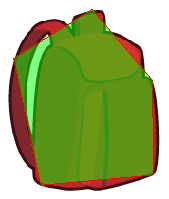
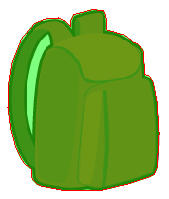
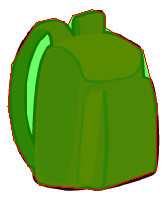
The most important setting is the Tolerance. This value tells the tracer how exactly the polygon should match the shape. It directly influences the number of vertices the polygon will have. For example, setting the Tolerance to 20 will result in a 5-vertex polygon that no longer fits the shape; setting it to 1 creates a perfectly-matching polygon with 39 vertices.
Not enough vertexes

Not enough vertexes
Too many vertexes

Too many vertexes
Good trace

Good trace
Set the Tolerance to 5, which gives you an acceptable match with about 15 vertices (the exact amount sometimes varies with the starting point of the tracer). That’s fine! Click OK to get back to the main screen. If you want you can fine-tune the shape, but don’t be too finicky!
Now set the backpack’s parameters. Set the Density to 5.00, the Restitution to 0.10 (so that the backpack bounces a little bit) and the Friction to 0.5. You might want to play around with these parameters later to get a better feel for how they work.
In the collisions section, tick the Cat. box next to bad_objects and make sure no other categories are selected. Also enable collision with all other objects by making sure all the Mask boxes are ticked.
Drag the anchor point (the blue circle with the cross inside) to the center of the backpack shape. Alternatively, you can set the anchor point to the exact center of the shape by setting the Relative anchor point values in the right sidebar to 0.5 and 0.5.

Now that you know how to create shapes, either by hand or using the tracer, go ahead and do the remaining ones yourself! Use the parameters indicted in the table below. And don’t forget to drag the anchor point for each shape to the position indicated in the images below.
