Text Kit Tutorial
Learn how to easily layout your text in iOS 7 in this Text Kit tutorial! By Colin Eberhardt.
Exclusion paths
Open TimeIndicatorView.h and add the following method declaration:
- (UIBezierPath *)curvePathWithOrigin:(CGPoint)origin;
This permits you to access curvePathWithOrigin: from within your view controller and define the path around which you’ll flow your text. Aha — that’s why the calculation of the Bezier curve is broken out into its own method!
All that’s left is to define the exclusion path itself. Open up NoteEditorViewController.m and add the following code block to the very end of updateTimeIndicatorFrame:
UIBezierPath* exclusionPath = [_timeView curvePathWithOrigin:_timeView.center];
_textView.textContainer.exclusionPaths  = @[exclusionPath];
The above code creates an exclusion path based on the Bezier path created in your time indicator view, but with an origin and coordinates that are relative to the text view.
Build and run your project and select an item from the list; the text now flows nicely around the time indicator view, as shown in the following screenshot:

This simple example only scratches the surface of the abilities of exclusion paths. You might have noticed that the exclusionPaths property expects an instance of NSArray; therefore each container can support more than one exclusion path.
Furthermore, exclusion paths can be as simple or as complicated as you want. Need to render text in the shape of a star or a butterfly? As long as you can define the path, exclusionPaths will handle it without problem!
As the text container notifies the layout manager when an exclusion path is changed, dynamic or even animated exclusions paths are possible to implement — just don’t expect your user to appreciate the text moving around on the screen as they’re trying to read!
Dynamic text formatting and storage
You’ve seen that Text Kit can dynamically adjust fonts based on the user’s text size preferences. But wouldn’t it be cool if fonts could update dynamically based on the actual text itself?
For example, what if you want to make this app automatically:
- Make any text surrounded by the tilde character (~) a fancy font
- Make any text surrounded by the underscore character (_) italic
- Make any text surrounded by the dash character (-) crossed out
- Make any text in all caps colored red

That’s exactly what you’ll do in this section by leveraging the power of the Text Kit framework!
To do this, you’ll need to understand how the text storage system in Text Kit works. Here’s a diagram that shows the “Text Kit stack” used to store, render and display text:
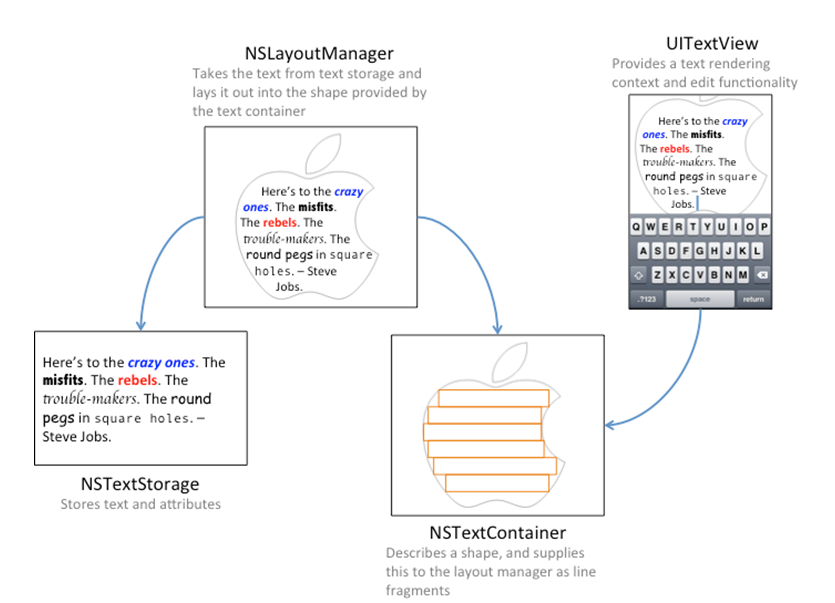
Behind the scenes, Apple creates these classes for you automatically when you create a UITextView, UILabel or UITextField. In your apps, you can either use these default implementations or customize any part to get your own behavior. Let’s go over each class:
-
NSTextStoragestores the text to be rendered as an attributed string and informs the layout manager of any changes to the text’s contents. You might want to subclassNSTextStoragein order to dynamically change the text attributes as the text is updated (as you will see later in this chapter). -
NSLayoutManagertakes the stored text and renders it on the screen; it serves as the layout ‘engine’ in your app. -
NSTextContainerdescribes the geometry of an area of the screen where text is rendered. Each text container is typically associated with aUITextView. You might want to subclassNSTextContainerto define a complex shape that you would like to render text within.
To implement the dynamic text formatting feature in this app, you’ll need to subclass NSTextStorage in order to dynamically add text attributes as the user types in their text.
Once you’ve created your custom NSTextStorage, you’ll replace UITextView’s default text storage instance with your own implementation. Let’s give this a shot!
Subclassing NSTextStorage
Right-click on the TextKitNotepad group in the project navigator, select New File…, and choose iOS\Cocoa Touch\Objective-C class. Name the class SyntaxHighlightTextStorage, and make it a subclass of NSTextStorage.
Open SyntaxHighlightTextStorage.m and add an instance variable and initializer as follows:
#import "SyntaxHighlightTextStorage.h"

@implementation SyntaxHighlightTextStorage
{
    NSMutableAttributedString *_backingStore;
}

- (id)init
{
    if (self = [super init]) {
        _backingStore = [NSMutableAttributedString new];
    }
    return self;
}

@end
A text storage subclass must provide its own ‘persistence’ hence the use of a NSMutabeAttributedString ‘backing store’ (more on this later).
Next add the following methods to the same file:
- (NSString *)string
{
    return [_backingStore string];
}

- (NSDictionary *)attributesAtIndex:(NSUInteger)location
                     effectiveRange:(NSRangePointer)range
{
    return [_backingStore attributesAtIndex:location
                             effectiveRange:range];
}
The above two methods simply delegate directly to the backing store.
Finally add the remaining mandatory overrides to the same file:
- (void)replaceCharactersInRange:(NSRange)range withString:(NSString *)str
{
    NSLog(@"replaceCharactersInRange:%@ withString:%@", NSStringFromRange(range), str);

    [self beginEditing];
    [_backingStore replaceCharactersInRange:range withString:str];
    [self  edited:NSTextStorageEditedCharacters | NSTextStorageEditedAttributes
              range:range
     changeInLength:str.length - range.length];
    [self endEditing];
}

- (void)setAttributes:(NSDictionary *)attrs range:(NSRange)range
{
    NSLog(@"setAttributes:%@ range:%@", attrs, NSStringFromRange(range));

    [self beginEditing];
    [_backingStore setAttributes:attrs range:range];
    [self edited:NSTextStorageEditedAttributes range:range changeInLength:0];
    [self endEditing];
}
Again, these methods delegate to the backing store. However, they also surround the edits with calls to beginEditing / edited / endEditing. This is required in order that the text storage class notifies its associated layout manager when edits are made.
You’ve probably noticed that you need to write quite a bit of code in order to subclass text storage. Since NSTextStorage is a public interface of a class cluster (see the note below), you can’t just subclass it and override a few methods to extend its functionality. Instead, there are certain requirements that you must implement yourself, such as the backing store for the attributed string data.
Note: Class clusters are a commonly used design pattern throughout Apple’s frameworks.
A class cluster is simply the Objective-C implementation of the Abstract Factory pattern, which provides a common interface for creating families of related or dependent objects without specifying the concrete classes. Familiar classes such as NSArray and NSNumber are in fact the public interface to a cluster of classes.
Apple uses class clusters to encapsulate private concrete subclasses under a public abstract superclass, and it’s this abstract superclass that declares the methods a client must use in order to create instances of its private subclasses. Clients are also completely unaware of which private class is being dispensed by the factory, since it only ever interacts with the public interface.
Using a class cluster certainly simplifies the interface, making it much easier to learn and use the class, but it’s important to note there’s been a trade-off between extensibility and simplicity. It’s often far more difficult to create a custom subclass of the abstract superclass of a cluster.
Now that you have a custom NSTextStorage, you need to make a UITextView that uses it.