Text Kit Tutorial
Learn how to easily layout your text in iOS 7 in this Text Kit tutorial! By Colin Eberhardt.
Responding to updates
Open up NoteEditorViewController.m and add the following code to the end of viewDidLoad:
[[NSNotificationCenter defaultCenter]
                              addObserver:self
                                 selector:@selector(preferredContentSizeChanged:)
                                     name:UIContentSizeCategoryDidChangeNotification
                                   object:nil];
The above code registers the class to receive notifications when the preferred content size is changed and passes in the method to be called (preferredContentSizeChanged:) when this event occurs.
Next, add the following method to NoteEditorViewController.m, immediately below viewDidLoad:
- (void)preferredContentSizeChanged:(NSNotification *)notification {
    self.textView.font = [UIFont preferredFontForTextStyle:UIFontTextStyleBody];
}
This simply sets the text view font to one based on the new preferred size.
Note: You might be wondering why it seems you’re setting the font to the same value it had before. When the user changes their preferred font size, you must request the preferred font again; it won’t be updated automatically. The font returned via preferredFontForTextStyle: will be different when the font preferences are changed.
Open up NotesListViewController.m and add the following code to the end of the viewDidLoad method:
[[NSNotificationCenter defaultCenter]
                              addObserver:self
                                 selector:@selector(preferredContentSizeChanged:)
                                     name:UIContentSizeCategoryDidChangeNotification
                                   object:nil];
Hey, isn’t that the same code you just added to NoteEditorViewController.m? Yes, it is — but you’ll handle the preferred font change in a slightly different manner.
Add the following method to NotesListViewController.m, immediately below viewDidLoad:
- (void)preferredContentSizeChanged:(NSNotification *)notification {
    [self.tableView reloadData];
}
The above code simply instructs UITableView to reload its visible cells, which updates the appearance of each cell.
Build and run your app; change the text size setting and verify that your app responds correctly to the new user preferences.
Changing layout
That part seems to work well, but when you select a really small font size, your table view ends up looking a little sparse, as shown in the left-hand screenshot below:

This is one of the trickier aspects of dynamic type. To ensure your application looks good across the range of font sizes, your layout needs to be responsive to the user’s text settings. Auto Layout solves a lot of problems for you, but this is one problem you’ll have to solve yourself.
Your table row height needs to change as the font size changes. Implementing the tableView:heightForRowAtIndexPath: delegate method solves this quite nicely.
Add the following code to NotesListViewController.m, underneath UITableViewDatasource:
- (CGFloat)tableView:(UITableView *)tableView
        heightForRowAtIndexPath:(NSIndexPath *)indexPath {

    static UILabel* label;
    if (!label) {
        label = [[UILabel alloc]
             initWithFrame:CGRectMake(0, 0, FLT_MAX, FLT_MAX)];
        label.text = @"test";
    }

    label.font = [UIFont preferredFontForTextStyle:UIFontTextStyleHeadline];
    [label sizeToFit];
    return label.frame.size.height * 1.7;
}
The above code creates a single shared — or static — instance of UILabel with the same font used by the table view cell. It then invokes sizeToFit on the label, which forces the label’s frame to fit tightly around the text, and results in a frame height proportional to the table row height.
Build and run your app; modify the text size setting once more and the table rows now size dynamically to fit the text size, as shown in the screenshot below:

Letterpress effects
Letterpress effects add subtle shading and highlights to text that give it a sense of depth — much like the text has been slightly pressed into the screen.
Note: The term “letterpress” is a nod to early printing presses, which inked a set of letters carved on blocks and pressed them into the page. The letters often left a small indentation on the page — an unintended but visually pleasing effect, which is frequently replicated in digital typography today.
Open NotesListViewController.m and replace the contents of tableView:cellForRowAtIndexPath: with the following code:
static NSString *CellIdentifier = @"Cell";
UITableViewCell *cell = [tableView dequeueReusableCellWithIdentifier:CellIdentifier
                                                        forIndexPath:indexPath];

Note* note = [self notes][indexPath.row];

UIFont* font = [UIFont preferredFontForTextStyle:UIFontTextStyleHeadline];

UIColor* textColor = [UIColor colorWithRed:0.175f green:0.458f blue:0.831f alpha:1.0f];
NSDictionary *attrs = @{ NSForegroundColorAttributeName : textColor,
                                    NSFontAttributeName : font,
                              NSTextEffectAttributeName : NSTextEffectLetterpressStyle};

NSAttributedString* attrString = [[NSAttributedString alloc]
                                       initWithString:note.title
                                           attributes:attrs];

cell.textLabel.attributedText = attrString;

return cell;
The above code creates an attributed string for the title of a table cell using the letterpress style.
Build and run your app; your table view will now display the text with a nice letterpress effect, as shown below:

Letterpress is a subtle effect — but that doesn’t mean you should overuse it! Visual effects may make your text more interesting, but they don’t necessarily make your text more legible.
Exclusion paths
Flowing text around images or other objects is a standard feature of most word processors. Text Kit allows you to render text around complex paths and shapes through exclusion paths.
It would be handy to tell the user when a note was created; you’re going to add a small curved view to the top right-hand corner of the note that shows this information.
You’ll start by adding the view itself – then you’ll create an exclusion path to make the text wrap around it.
Adding the view
Open up NoteEditorViewController.m and add the following line to the list of imports at the top of the file:
#import "TimeIndicatorView.h"
Next, add the following instance variable to NoteEditorViewController.m:
@implementation NoteEditorViewController
{
    TimeIndicatorView* _timeView;
}
As the name suggests, this houses the time indicator subview.
Add the code following to the very end of viewDidLoad in NoteEditorViewController.m:
_timeView = [[TimeIndicatorView alloc] initWithDate:_note.timestamp];
[self.view addSubview:_timeView];
This simply creates an instance of the new view and adds it as a subview.
TimeIndicatorView calculates its own size, but it won’t do this automatically. You need a mechanism to call updateSize when the view controller lays out the subviews.
Add the following code to the bottom of NoteEditorViewController.m:
- (void)viewDidLayoutSubviews {
    [self updateTimeIndicatorFrame];
}

- (void)updateTimeIndicatorFrame {
    [_timeView updateSize];
    _timeView.frame = CGRectOffset(_timeView.frame,
                          self.view.frame.size.width - _timeView.frame.size.width, 0.0);
}
viewDidLayoutSubviews calls updateTimeIndicatorFrame, which does two things: it calls updateSize to set the size of the subview, and positions the subview in the top right corner of the view.
All that’s left is to call updateTimeIndicatorFrame when your view controller receives notification that the size of the content has changed. Modify preferredContentSizeChanged: in NoteEditorViewController.m to the following:
- (void)preferredContentSizeChanged:(NSNotification *)n {
    self.textView.font = [UIFont preferredFontForTextStyle:UIFontTextStyleBody];
    [self updateTimeIndicatorFrame];
}
Build and run your project; tap on a list item and the time indicator view will display in the top right hand corner of the item view, as shown below:
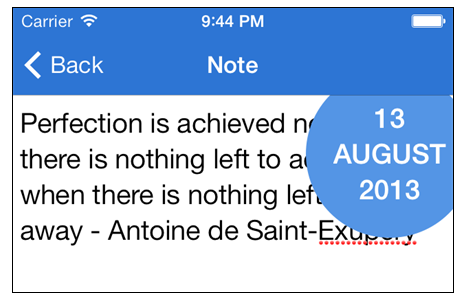
Modify the device Text Size preferences, and the view will automatically adjust to fit.
However, something doesn’t look quite right. The text of the note renders behind the time indicator view instead of flowing neatly around it. Fortunately, this is the exact problem that exclusion paths are designed to solve.