Beginning Auto Layout Tutorial in iOS 7: Part 2
An Auto Layout tutorial that is fully up-to-date with Xcode 5 and iOS 7! By Matthijs Hollemans.
Gallery example
You should now have an idea of what constraints are and how you can build up your layouts by forging relationships between the different views. In the following sections, you will see how to use Auto Layout and constraints to create layouts that meet real-world scenarios.
Let’s pretend you want to make an app that has a gallery of your favorite programmers. It looks like this in portrait and landscape:

The screen is divided into four equal quarters. Each quarter has an image view and a label. How would you approach this?
Let’s start by setting up the basic app. Create a new iPhone project using the Single View Application template and name it “Gallery”.
Open Main.storyboard. From the Object Library, drag a plain View object onto the canvas. Resize the view so that it is 160 by 284 points, and change its background color to be something other than white (for example, green):

Note: There are two main reasons why you would drop a plain UIView onto a storyboard: a) You’re going to use it as a container for other views, which helps with organizing the content of your scenes; or b) It is a placeholder for a custom view or control, and you will also set its Class attribute to the name of your own UIView or UIControl subclass.
Let’s give this view some constraints. You’ve already seen two ways to make constraints: the Editor\Pin and Align menus, and Ctrl-dragging between views. There is a third method that you’ll use here. At the bottom of the Interface Builder window is a row of buttons:

The four circled buttons are for Auto Layout. From left to right they are: Align, Pin, Resolve Auto Layout Issues, and Resizing Behavior. The first three perform the same functions as the corresponding items from the Editor menu. The Resizing Behavior button allows you to change what happens to the constraints when you resize views.
Select the green view and click the Pin button. A popup appears that lets you add a variety of constraints:
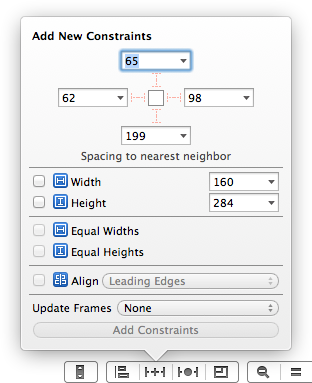
The Spacing to nearest neighbor section at the top is what you’ll use most often. Click the four T-bar thingies so they become solid red:

This will create four new constraints between the green view and its superview, one for each side of the view. The actual spacing values may be different for you, depending on where you placed the view. (You don’t have the change these values to match mine). Click Add 4 Constraints to finish.
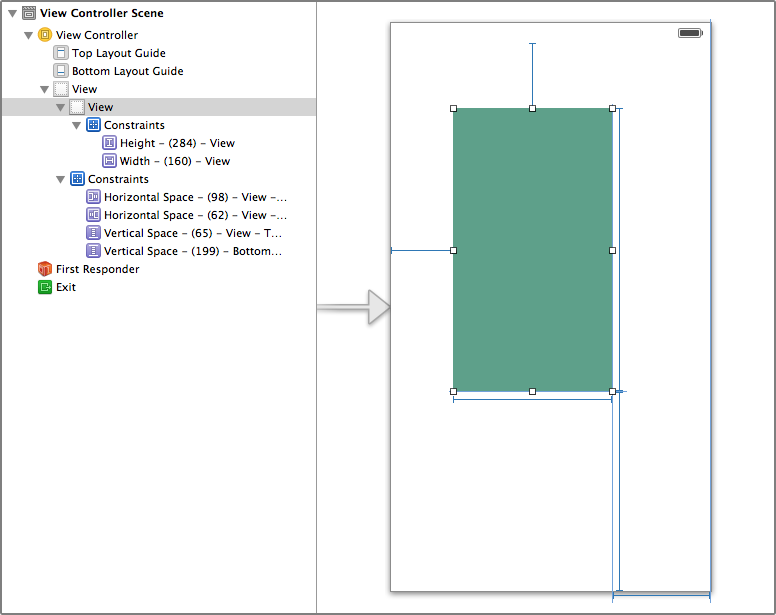
Your storyboard should now look something like this:

This view needs four constraints to keep it in place. Unlike a button or label, a plain UIView does not have an intrinsic content size. There must always be enough constraints to determine the position and size of each view, so this view also needs constraints to tell it what size it needs to be.
You may wonder, where are these size constraints? In this case, the size of the view is implied by the size of the superview. The constraints in this layout are two Horizontal Spaces and two Vertical Spaces, and these all have fixed lengths. You can see this in the Document Outline:

The width of the green view is calculated by the formula “width of superview minus (98 + 62)” and its height by the formula “height of superview minus (65 + 199)”. The space constraints are fixed, so the view has no choice but to resize. (Again, your values may be different depending on where you put the view.)
When you rotate the app, the dimensions of the superview change from 320×568 to 568×320. Plug this new width and height into these formulas, and you’ll get the new size of the green view (408×56).
You can see this for yourself when you run the app and flip to landscape, but you can also simulate it directly in Interface Builder. Open the Assistant editor (press the button in Xcode’s toolbar that looks like a butler/alien) and select Preview in the jump bar:

Click the arrow button at the bottom to change the orientation to landscape. This gives you an instant preview of what the storyboard’s layout will look like in landscape orientation. The green view has resized in order to satisfy its Horizontal and Vertical Space constraints.
You can leave this preview pane open as you design your UI and it will update automatically. You can also use it to toggle between the 3.5 and 4-inch form factors.
Note: Maybe you wondered why the constraint at the top of the view didn’t go all the way up to the top of the screen:

Instead it stops at the status bar. But in iOS 7 the status bar is always drawn on top of the view controller — it is no longer a separate bar — so what gives? When you created the constraint it didn’t actually attach to the top of the screen but to an invisible line called the Top Layout Guide.
On a regular view controller this guide sits at 20 points from the top of the screen, at least when the status bar is not hidden. In a navigation controller it sits below the navigation bar. Because the navigation bar has a different height in landscape, the Top Layout Guide moves with the bar when the device is rotated. That makes it easy to place views relative to the navigation bar. There is also a Bottom Layout Guide that is used for the tab bar and toolbars.
You may not always want your UIView to resize when the device rotates, so you can use constraints to give the view a fixed width and/or height. Let’s do that now. Select the green view and click the Pin button; in the popup put checkmarks in front of Width and Height.

Click Add 2 Constraints to finish. You have now added two new constraints to the view, a 160 point Width constraint and a 284 point Height constraint:
Because Width and Height apply to just this view, they are located in the Document Outline under the View itself. Usually, constraints express a relationship between two different views – for example, the Horizontal and Vertical Space constraints are between the green view and its superview – but you can consider the Width and Height constraints to be a relationship between the green view and itself.
Run the app. Yup, looks good in portrait. Now flip over to landscape. Whoops! Not only does it not look like you wanted – the view has changed size again – but the Xcode debug pane has dumped a nasty error message:
Gallery[39367:a0b] Unable to simultaneously satisfy constraints.
	Probably at least one of the constraints in the following list is one you don't want. Try this: (1) look at each constraint and try to figure out which you don't expect; (2) find the code that added the unwanted constraint or constraints and fix it. (Note: If you're seeing NSAutoresizingMaskLayoutConstraints that you don't understand, refer to the documentation for the UIView property translatesAutoresizingMaskIntoConstraints)
(
    "<NSLayoutConstraint:0xc1a1e80 V:[UIView:0xc1a2b10(284)]>",
    "<NSLayoutConstraint:0xc1a36c0 V:[_UILayoutGuide:0xc1a2d20]-(65)-[UIView:0xc1a2b10]>",
    "<NSLayoutConstraint:0xc1a36f0 V:[UIView:0xc1a2b10]-(199)-[_UILayoutGuide:0xc1a3230]>",
    "<_UILayoutSupportConstraint:0xc15dbd0 V:[_UILayoutGuide:0xc1a2d20(20)]>",
    "<_UILayoutSupportConstraint:0xc1a1510 V:|-(0)-[_UILayoutGuide:0xc1a2d20]   (Names: '|':UIView:0xc1a2930 )>",
    "<_UILayoutSupportConstraint:0xc1a3720 V:[_UILayoutGuide:0xc1a3230(0)]>",
    "<_UILayoutSupportConstraint:0xc1a30e0 _UILayoutGuide:0xc1a3230.bottom == UIView:0xc1a2930.bottom>",
    "<NSAutoresizingMaskLayoutConstraint:0x8c6c6a0 h=--& v=--& H:[UIView:0xc1a2930(320)]>"
)

Will attempt to recover by breaking constraint
<NSLayoutConstraint:0xc1a1e80 V:[UIView:0xc1a2b10(284)]>

Break on objc_exception_throw to catch this in the debugger.
The methods in the UIConstraintBasedLayoutDebugging category on UIView listed in <UIKit/UIView.h> may also be helpful.

. . .
Remember when I said that there must be enough constraints so that Auto Layout can calculate the positions and sizes of all the views? Well, this is an example where there are too many constraints. Whenever you get the error “Unable to simultaneously satisfy constraints”, it means that your constraints are conflicting somewhere.
Let’s look at those constraints again:

There are six constraints set on the green view, the four Spacing constraints you saw earlier (1-4) and the new Width and Height constraints that you have just set on it (5 and 6). So where is the conflict?
In portrait mode there shouldn’t be a problem because the math adds up. The width of the superview is 320 points. If you add the lengths of the Horizontal Space and Width constraints, then you should also end up at 320. The way I have positioned the view, that is: 98 + 160 + 62 = 320 indeed. Likewise, the vertical constraints should add up to 568.
But when you rotate the device to landscape, the window (and therefore the superview) is 568 points wide. That means 98 + 160 + 62 + ? = 568. There are 248 extra points that need to go somewhere in that equation and Auto Layout doesn’t know where to get them from. Likewise for the vertical axis.
The conflict here is that either the width of the view is fixed and one of the margins must be flexible, or the margins are fixed and the width must be flexible. You can’t have both. So one of these constraints has to go. In the above example, you want the view to have the same width in both portrait and landscape, so the trailing Horizontal Space has got to go.
Remove the Horizontal Space at the right and the Vertical Space at the bottom. The storyboard should look like this:

Now the view has just the right number of constraints to determine its size and position — no more, no less. Run the app and verify that the error message is gone and that the view stays the same size after rotating.
Note: Even though Interface Builder does its best to warn you about invalid layouts, it cannot perform miracles. It will warn you when there are too few constraints but it doesn’t fare so well at detecting layouts with too many constraints. At least Auto Layout spits out a detailed error message when something is wrong. You will learn more about analyzing these error messages and diagnosing layout problems in “Intermediate Auto Layout” in iOS 6 by Tutorials.