Storyboards Tutorial in iOS 7: Part 2
Storyboards tutorial to get you started with designing user interfaces for your iPhone apps on iOS 7. By Matthijs Hollemans.
The Game Picker Screen
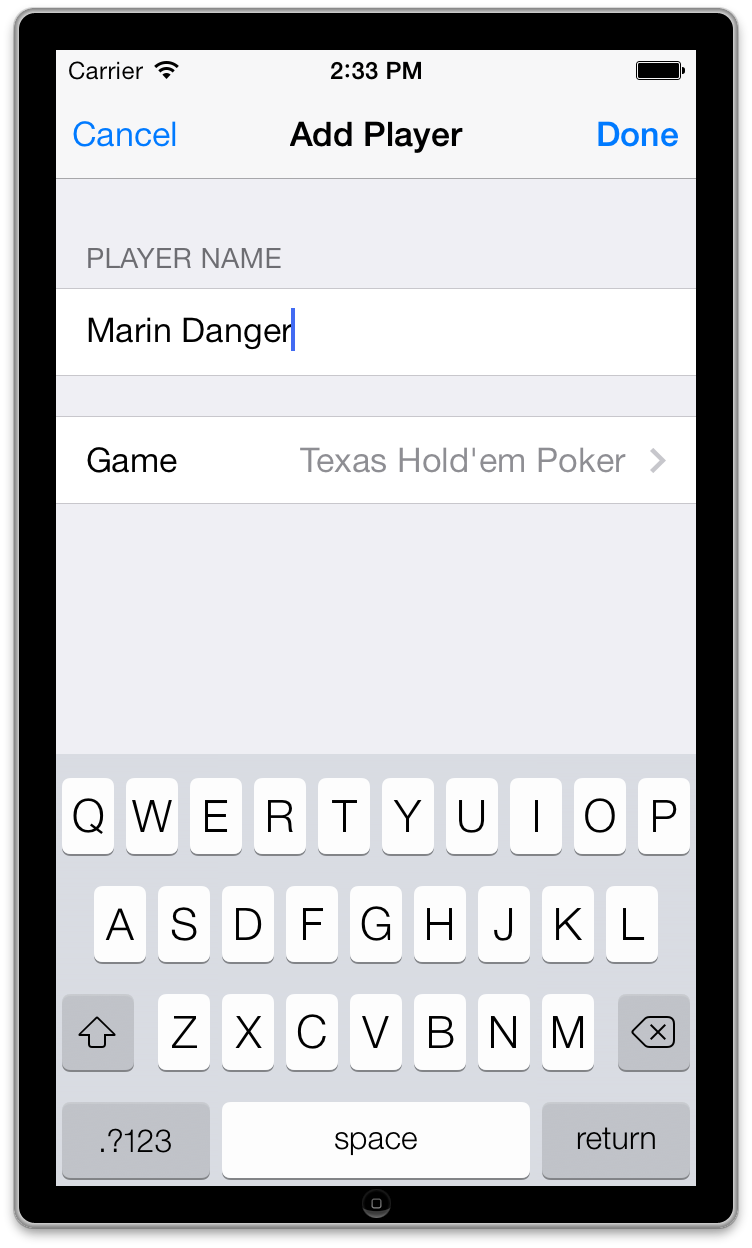
Tapping the Game row in the Add Player screen should open a new screen that lets the user pick a game from a list. That means you’ll be adding yet another table view controller, although this time you’re going to push it on the navigation stack rather than show it modally.
Drag a new Table View Controller into the storyboard. Select the Game table view cell in the Add Player screen (be sure to select the entire cell, not one of the labels) and ctrl-drag to the new Table View Controller to create a segue between them. Make this a Push segue (under Selection Segue in the popup, not Accessory Action) and give it the identifier PickGame.
Double-click the navigation bar and name this new scene Choose Game. Set the Style of the prototype cell to Basic, and give it the reuse identifier GameCell. That’s all you need to do for the design of this screen:

Add a new file to the project and name it GamePickerViewController, subclass of UITableViewController. Don’t forget to set the Class in the storyboard so that your new GamePickerViewController object is associated with the Table View Controller.
First let’s give this new screen some data to display. Add a new instance variable to GamePickerViewController.m:
@implementation GamePickerViewController
{
    NSArray *_games;
}
Fill up this array in viewDidLoad:
- (void)viewDidLoad
{
    [super viewDidLoad];

    _games = @[@"Angry Birds",
        @"Chess",
        @"Russian Roulette",
        @"Spin the Bottle",
        @"Texas Hold'em Poker",
        @"Tic-Tac-Toe"];
}
Replace the data source methods from the template with:
- (NSInteger)numberOfSectionsInTableView:(UITableView *)tableView
{
    return 1;
}

- (NSInteger)tableView:(UITableView *)tableView numberOfRowsInSection:(NSInteger)section
{
    return [_games count];
}

- (UITableViewCell *)tableView:(UITableView *)tableView cellForRowAtIndexPath:(NSIndexPath *)indexPath
{
    UITableViewCell *cell = [tableView dequeueReusableCellWithIdentifier:@"GameCell"];
    cell.textLabel.text = _games[indexPath.row];
    return cell;
}
That should do it as far as the data source is concerned. Run the app and tap the Game row. The new Choose Game screen will slide into view. Tapping the rows won’t do anything yet, but because this screen is presented on the navigation stack you can always press the back button to return to the Add Player screen.

This is pretty cool, huh? You didn’t have to write any code to invoke this new screen. You just ctrl-dragged from the static table view cell to the new scene and that was it.
Of course, this new screen isn’t very useful if it doesn’t send any data back, so you’ll have to add a new delegate for that. Replace GamePickerViewController.h with:
@class GamePickerViewController;

@protocol GamePickerViewControllerDelegate <NSObject>
- (void)gamePickerViewController:(GamePickerViewController *)controller didSelectGame:(NSString *)game;
@end

@interface GamePickerViewController : UITableViewController

@property (nonatomic, weak) id <GamePickerViewControllerDelegate> delegate;
@property (nonatomic, strong) NSString *game;

@end
You’ve added a delegate protocol with just one method, and a property that will hold the name of the currently selected game.
Add a new instance variable, _selectedIndex, to GamePickerViewController.m:
@implementation GamePickerViewController
{
    NSArray *_games;
    NSUInteger _selectedIndex;
}
Then add the following line to the bottom of viewDidLoad:
_selectedIndex = [_games indexOfObject:self.game];
The name of the selected game will be set in self.game. Here you figure out what the index is for that game in the list of games. You’ll use that index to set a checkmark in the table view cell. For this to work, self.game must be filled in before the view is loaded. That will be no problem because you will do this in the caller’s prepareForSegue:, which takes place before viewDidLoad.
Still in GamePickerViewController.m, change cellForRowAtIndexPath: to:
- (UITableViewCell *)tableView:(UITableView *)tableView cellForRowAtIndexPath:(NSIndexPath *)indexPath
{
    UITableViewCell *cell = [tableView dequeueReusableCellWithIdentifier:@"GameCell"];
    cell.textLabel.text = _games[indexPath.row];

    if (indexPath.row == _selectedIndex) {
        cell.accessoryType = UITableViewCellAccessoryCheckmark;
    } else {
        cell.accessoryType = UITableViewCellAccessoryNone;
    }
    return cell;
}
This sets a checkmark on the cell that contains the name of the currently selected game. Small gestures such as these will be appreciated by the users of the app.
Replace the placeholder didSelectRowAtIndexPath method from the template with:
#pragma mark - Table view delegate

- (void)tableView:(UITableView *)tableView didSelectRowAtIndexPath:(NSIndexPath *)indexPath
{
    [tableView deselectRowAtIndexPath:indexPath animated:YES];

    if (_selectedIndex != NSNotFound) {
        UITableViewCell *cell = [tableView cellForRowAtIndexPath:
                                    [NSIndexPath indexPathForRow:_selectedIndex inSection:0]];
        cell.accessoryType = UITableViewCellAccessoryNone;
    }

    _selectedIndex = indexPath.row;

    UITableViewCell *cell = [tableView cellForRowAtIndexPath:indexPath];
    cell.accessoryType = UITableViewCellAccessoryCheckmark;

    NSString *game = _games[indexPath.row];
    [self.delegate gamePickerViewController:self didSelectGame:game];
}
First this deselects the row after it was tapped. That makes it fade from the gray highlight color back to the regular white. Then it removes the checkmark from the cell that was previously selected, and puts it on the row that was just tapped. Finally, the method returns the name of the chosen game to the delegate.
Run the app now to test that this works. Tap the name of a game and its row will get a checkmark. Tap the name of another game and the checkmark moves along with it.

The screen ought to close as soon as you tap a row but that doesn’t happen yet because you haven’t actually hooked up the delegate.
In PlayerDetailsViewController.h, add an import:
#import "GamePickerViewController.h"
And add the delegate protocol to the @interface line:
@interface PlayerDetailsViewController : UITableViewController <GamePickerViewControllerDelegate>
In PlayerDetailsViewController.m, first add a new instance variable:
@implementation PlayerDetailsViewController
{
    NSString *_game;
}
You use this variable to remember the selected game so you can store it in the Player object later. It should get a default value. The initWithCoder: method is a good place for that:
- (id)initWithCoder:(NSCoder *)aDecoder
{
    if ((self = [super initWithCoder:aDecoder])) {
        NSLog(@"init PlayerDetailsViewController");
        _game = @"Chess";
    }
    return self;
}
Note: If you’ve worked with nibs before, then initWithCoder: will be familiar. That part has stayed the same with storyboards; initWithCoder:, awakeFromNib, and viewDidLoad are still the methods to use. You can think of a storyboard as a collection of nibs with additional information about the transitions and relationships between them. But the views and view controllers inside the storyboard are still encoded and decoded in the same way.
Change viewDidLoad to display the name of the game in the static table cell:
- (void)viewDidLoad
{
    [super viewDidLoad];
    self.detailLabel.text = _game;
}
Now add the prepareForSegue: method to open the game picker screen:
- (void)prepareForSegue:(UIStoryboardSegue *)segue sender:(id)sender
{
    if ([segue.identifier isEqualToString:@"PickGame"]) {
        GamePickerViewController *gamePickerViewController = segue.destinationViewController;
        gamePickerViewController.delegate = self;
        gamePickerViewController.game = _game;
    }
}
This is similar to what you did before. This time the destination view controller is the game picker screen. prepareForSegue: happens after GamePickerViewController is instantiated but before its view is loaded, so the self.game property already has the game’s name by the time GamePickerViewController gets to viewDidLoad.
All that remains is to implement the delegate method to close the game picker when the user is done with it:
- (void)gamePickerViewController:(GamePickerViewController *)controller didSelectGame:(NSString *)game
{
    _game = game;
    self.detailLabel.text = _game;

    [self.navigationController popViewControllerAnimated:YES];
}
This is pretty straightforward: you put the name of the new game into the _game instance variable and also the cell’s label, and then close the Choose Game screen. Because it’s a push segue, you have to pop this screen off the navigation stack to close it.
The done: method can now put the name of the chosen game into the new Player object, rather than the hardcoded value you’ve been using so far:
- (IBAction)done:(id)sender
{
    Player *player = [[Player alloc] init];
    player.name = self.nameTextField.text;
    player.game = _game;  // only this line is changed
    player.rating = 1;

    [self.delegate playerDetailsViewController:self didAddPlayer:player];
}
Awesome. You now have a functioning Choose Game screen!