Storyboards Tutorial in iOS 7: Part 2
Storyboards tutorial to get you started with designing user interfaces for your iPhone apps on iOS 7. By Matthijs Hollemans.
Static Cells
When you’re finished with this section, the Add Player screen will look like this:

That’s a grouped table view, of course, but the new thing is that you don’t have to create a data source for this table. You can design it directly in Interface Builder — no need to write cellForRowAtIndexPath for this one. The feature that makes this possible is called static cells.
Select the table view in the Add Player screen and in the Attributes inspector change Content to Static Cells. Change Style from Plain to Grouped and give the table view 2 sections.

When you change the value of the Sections attribute, the editor will clone the existing section. (You can also select a specific section in the Document Outline on the left and duplicate it.)
The finished screen will have only one row in each section, so select the superfluous cells and delete them.
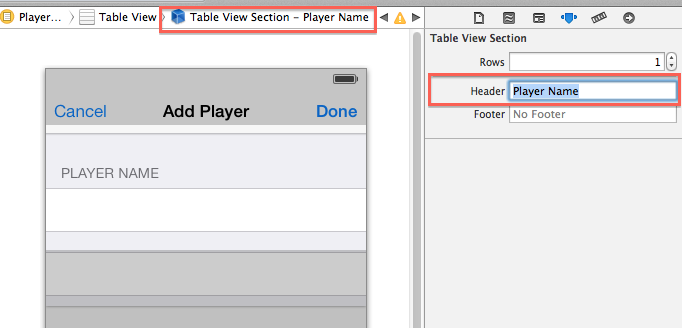
Select the top-most section (from the Document Outline). In its Attributes inspector, give the Header field the value Player Name.
Drag a new Text Field into the cell for this section. Remove its border so you can’t see where the text field begins or ends. Set the Font to System 17 and uncheck Adjust to Fit.
You’re going to make an outlet for this text field on the PlayerDetailsViewController using the Assistant Editor feature of Xcode. Open the Assistant Editor with the button from the toolbar (the one that looks like a tuxedo / alien face). It should automatically open on PlayerDetailsViewController.h (if it doesn’t, use the jumpbar in the right hand split window to select that .h file).
Select the text field and ctrl-drag into the .h file:

Let go of the mouse button and a popup appears:

Name the new outlet nameTextField. After you click Connect, Xcode will add the following property to PlayerDetailsViewController.h:
@property (weak, nonatomic) IBOutlet UITextField *nameTextField;
Creating outlets for views on your table cells is exactly the kind of thing I said you shouldn’t try with prototype cells, but for static cells it is OK. There will be only one instance of each static cell and so it’s perfectly acceptable to connect their subviews to outlets on the view controller.
Set the Style of the static cell in the second section to Right Detail. This gives you a standard cell style to work with. Change the label on the left to read Game and give the cell a Disclosure Indicator accessory.
Make an outlet for the label on the right (the one that says “Detail”) and name it detailLabel. The labels on this cell are just regular UILabel objects. You might need to click few times on the text “Detail” to select the only the label (and not the whole cell) like so:

The final design of the Add Player screen looks like this:

Tip: The screens you have designed so far in this storyboard all have the height of the 4-inch screen of the iPhone 5, which is 568 points tall as opposed to the 480 points of the previous iPhone models. You can toggle between these two form factors using the left-most button from the little floating panel that sits at the bottom of the canvas.

Obviously, your app should work properly with both screen sizes. You can accomplish this with autosizing masks or the new Auto Layout technology from iOS 6. For the Ratings app, you don’t have to do anything fancy. It only uses table view controllers and they automatically resize to fit the extra screen space on the iPhone 5.
Back to the Add Player screen. When you use static cells, your table view controller doesn’t need a data source. Because you used an Xcode template to create the PlayerDetailsViewController class, it still has some placeholder code for the data source and that will prevent the static cells from working properly.
Open PlayerDetailsViewController.m and delete anything from the following line down (except for any code that you added yourself):
#pragma mark - Table view data source
That should silence Xcode about the warnings it has been giving ever since you added this class to the project.
Run the app and check out the new screen with the static cells. All without writing a line of code — in fact, you threw away a bunch of code!
You can’t avoid writing code altogether, though. When you dragged the text field into the first cell, you probably noticed it didn’t fit completely. There is a small margin of space around the text field. The user can’t see where the text field begins or ends, so if they tap in the margin and the keyboard doesn’t appear, they’ll be confused.
To avoid that, you should let a tap anywhere in that row bring up the keyboard. That’s pretty easy to do, just add a tableView:didSelectRowAtIndexPath: method with the following:
- (void)tableView:(UITableView *)tableView didSelectRowAtIndexPath:(NSIndexPath *)indexPath
{
    if (indexPath.section == 0) {
        [self.nameTextField becomeFirstResponder];
    }
}
This just says that if the user tapped in the first cell, the app should activate the text field. There is only one cell in the section so you only need to test for the section index. Making the text field the first responder will automatically bring up the keyboard. It’s just a little tweak, but one that can save users a bit of frustration.
You should also set the Selection Style for that cell to None (instead of Blue) in the Attributes inspector, otherwise the row appears highlighted if the user taps in the margin around the text field.
All right, that’s the design of the Add Player screen. Now let’s actually make it work.
The Add Player Screen at Work
For now you will ignore the Game row and just let users enter the name of the player.
When the user presses the Cancel button the screen should close and whatever data they entered will be lost. That part already works. The delegate (the Players screen) receives the “did cancel” message and simply dismisses the view controller.
When the user presses Done, however, you should create a new Player object and fill in its properties. Then you should tell the delegate that you’ve added a new player, so it can update its own screen.
Inside PlayerDetailsViewController.m, first add an import:
#import "Player.h"
Then change the done: method to:
- (IBAction)done:(id)sender
{
    Player *player = [[Player alloc] init];
    player.name = self.nameTextField.text;
    player.game = @"Chess";
    player.rating = 1;
    [self.delegate playerDetailsViewController:self didAddPlayer:player];
}
The done: method now creates a new Player instance and sends it to the delegate. The delegate protocol currently doesn’t have this method, so change its definition in PlayerDetailsViewController.h file to the following:
@class Player;

@protocol PlayerDetailsViewControllerDelegate <NSObject>
- (void)playerDetailsViewControllerDidCancel:(PlayerDetailsViewController *)controller;
- (void)playerDetailsViewController:(PlayerDetailsViewController *)controller didAddPlayer:(Player *)player;
@end
The “didSave” method declaration is gone. Instead, there is now a “didAddPlayer”.
The last thing to do is to add the implementation for this method in the object that acts as the delegate, PlayersViewController.m:
- (void)playerDetailsViewController:(PlayerDetailsViewController *)controller didAddPlayer:(Player *)player
{
    [self.players addObject:player];
    NSIndexPath *indexPath = [NSIndexPath indexPathForRow:([self.players count] - 1) inSection:0];
    [self.tableView insertRowsAtIndexPaths:@[indexPath] withRowAnimation:UITableViewRowAnimationAutomatic];
    [self dismissViewControllerAnimated:YES completion:nil];
}
This first adds the new Player object to the array of players. Then it tells the table view that a new row was added (at the bottom), because the table view and its data source must always be in sync.
You could have just done [self.tableView reloadData] but it looks nicer to insert the new row with an animation. UITableViewRowAnimationAutomatic automatically picks the proper animation, depending on where you insert the new row. Very handy.
Try it out, you should now be able to add new players to the list!

If you’re wondering about performance of these storyboards, then you should know that loading a whole storyboard at once isn’t a big deal. The Storyboard doesn’t instantiate all the view controllers right away, only the initial view controller. Because your initial view controller is a Tab Bar Controller, the two view controllers that it contains are also loaded (the Players scene from the first tab and the scene from the second tab).
The other view controllers are not instantiated until you segue to them. When you close these view controllers they are immediately deallocated, so only the actively used view controllers are in memory, just as if you were using separate nibs.
Let’s see that in practice. Add these methods to PlayerDetailsViewController.m:
- (id)initWithCoder:(NSCoder *)aDecoder
{
    if ((self = [super initWithCoder:aDecoder])) {
        NSLog(@"init PlayerDetailsViewController");
    }
    return self;
}

- (void)dealloc
{
    NSLog(@"dealloc PlayerDetailsViewController");
}
You’re overriding the initWithCoder: and dealloc methods and making them log a message to the Xcode Debug pane. Now run the app again and open the Add Player screen. You should see that this view controller did not get allocated until that point.
When you close the Add Player screen, either by pressing Cancel or Done, you should see the NSLog() from dealloc. If you open the screen again, you should also see the message from initWithCoder: again. This should reassure you that view controllers are loaded on-demand only, just as they would if you were loading nibs by hand.
One more thing about static cells: they only work in UITableViewController. Even though Interface Builder will let you add them to a Table View object inside a regular UIViewController, this won’t work during runtime. The reason for this is that UITableViewController provides some extra magic to take care of the data source for the static cells. Xcode even prevents you from compiling such a project with the error message: “Illegal Configuration: Static table views are only valid when embedded in UITableViewController instances”.
Prototype cells, on the other hand, work just fine in a table view that you place inside a regular view controller. Neither work for nibs, though. At the moment, if you want to use prototype cells or static cells, you’ll have to use a storyboard.
It is not unthinkable that you might want to have a single table view that combines both static cells and regular dynamic cells, but this isn’t very well supported by the SDK. If this is something you need to do in your own app, then see this post on the Apple Developer Forums for a possible solution.
Note: If you’re building a screen that has a lot of static cells — more than can fit in the visible frame — then you can scroll through them in Interface Builder with the scroll gesture on the mouse or trackpad (2 finger swipe). This might not be immediately obvious, but it works quite well.