Unity 4.3 2D Tutorial: Getting Started
Learn how to make a cool 2D zombie game using Unity’s new built-in tools in this Unity 4.3 2D Tutorial! By Chris LaPollo.
Configure Your Game View
The artwork for Zombie Conga was created for an iPhone game, so it’s meant to look good in a specific resolution. To match that environment, set your Game view’s size to a fixed resolution of 1136 x 640.
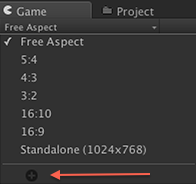
[spoiler title=”Not sure how? Find out here.”]You change the Game view’s aspect ratio or fixed resolution by using the drop down menu in the view’s control bar, highlighted in the image below:
![]()
Clicking the menu reveals several default options that differ based on the editor’s current player settings. If you happen to have an option for an 1136 x 640 resolution, choose it and you’re done. Otherwise, click the + button at the bottom of the menu, as shown below:
Create a new size option with a Type of Fixed Resolution, and Width and Height values of 1136 and 640, respectively, as shown below:
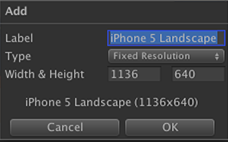
Click OK and then make sure your new setting is selected in the menu.
[/spoiler]
Your Game view now looks something like this:

Note: Your view may not look exactly like this image, because Unity resizes the Game view to maintain your chosen aspect ratio within the available space. Regardless of its scale, you should see the same amount of the scene in your view.
Obviously, that isn’t quite right. You’re seeing the results of three different problems here, and you’ll correct each one in turn:
- The scene’s camera is not set up properly, so the background doesn’t fill the view properly.
- The scene is rendering your game objects in the wrong order, so the cat and enemy are both buried in the sand.
- The image quality is not very good. This one might be hard to detect with the current camera settings, especially if you aren’t familiar with how the background image should look. But you can trust me, right?
Start by fixing the camera.
Fix Your Camera’s Projection
In 2D games, you’ll usually want the camera to use an orthographic projection rather than a perspective one. You already read about these two projections earlier in this tutorial regarding the Scene view’s 2D mode, but what you may not have realized is that Unity may default your game’s cameras to use a perspective projection.
Select Main Camera in the Hierarchy. Then, inside its Camera component, make sure the Projection is set to Orthographic.
Center the camera vertically on the scene by setting its Transform component’s Position to (0, 0, -10). Your Inspector now looks like this:

And your Game view now looks like this:

Right now it’s not much different from how it looked with a perspective projection. If sprites don’t change size based on their distance from the camera, how do you zoom in so that the background fills the screen? You could try scaling your GameObjects, but there’s a much better option – change the camera’s Size property.
The camera’s Size defines the dimensions of its viewport. It’s the number of units from the center of the view to the top of it. In other words, it’s half the height of the view. The width of the view is calculated at run time based on the view’s aspect ratio, as shown below:
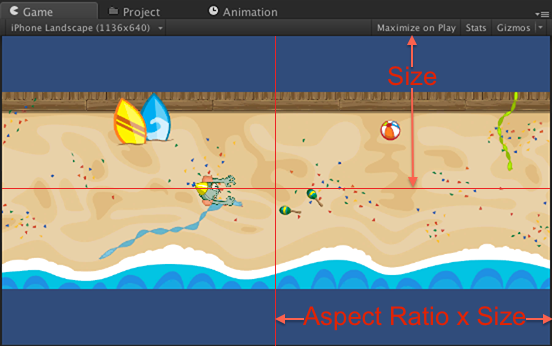
In this case, you want the background image to fill the screen perfectly from top to bottom, but allow it to scroll horizontally. The background image is 640 pixels tall, so half of that would be 320 pixels. So that’s your size, right?
Not quite.
Select the top-level background in the Project browser to see its Import Settings in the Inspector.
Look at the Sprite Renderer’s Pixels to Units property. It is currently set to the default value of 100, shown below:
![]()
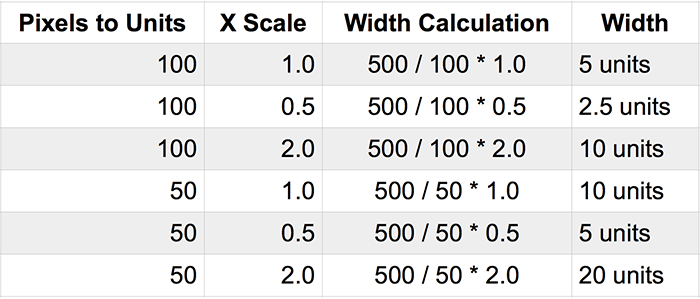
In Unity, units do not necessarily correspond to pixels on the screen. Instead, you usually size your objects relative to each other, possibly assuming a scale such as 1 unit = 1 meter. For Sprites, Unity uses Pixels to Units to determine their unscaled size in units.
For example, consider a Sprite imported from a 500 pixels wide image. The following table shows the different widths your GameObject would have when rendering that Sprite at different scales along the x-axis, using different values for Pixels to Units:
background.png is 640 pixels tall, and the background Sprite has a Pixel to Unit ratio of 100, so the background object in the Hierarchy will be 6.4 units tall. However, the orthographic camera’s Size property measures half the height of the screen, so it should be half the height of the background, in units, or 3.2.
Select Main Camera in the Hierarchy and set the Size property of the Camera component to 3.2, shown below:

Now your background fills the Game view properly, as shown below:
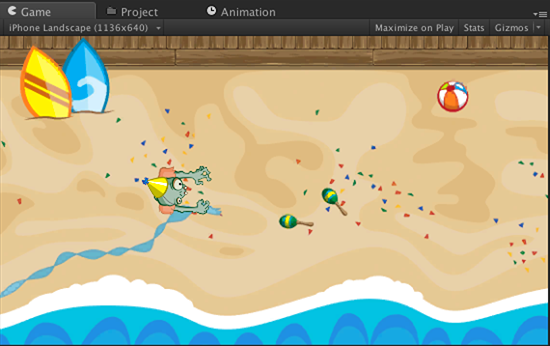
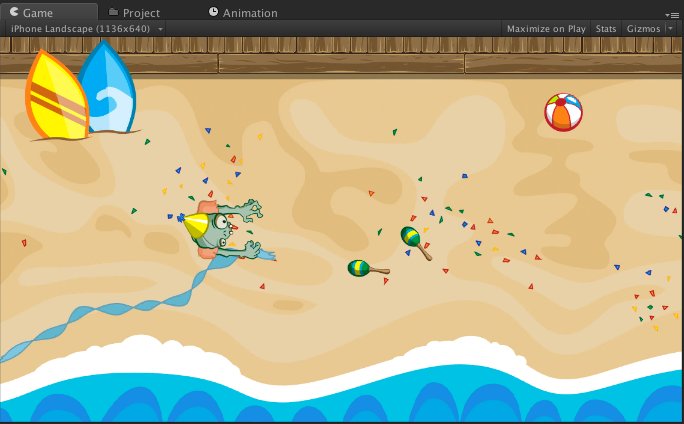
With the background image appearing properly, now you should be able to see problems with the image quality. The following two images point out some areas of the current view compared to what they should look like:
The beach with your current settings.

The beach with the desired settings.

The problems shown above are the result of over compressing the background texture during import. You can fix that by changing the file’s Import Settings.
Correct Your Import Settings
Select the top-level background in the Project browser to view its Import Settings again, but this time look at the Preview pane at the bottom of the Inspector.
The Preview pane displays the texture generated from the import, along with the texture’s dimensions, color information, and memory usage. As you can see in the screenshot below, the background texture is currently sized at 1024 x 320 pixels. But background.png is 2048 x 640 pixels! That means Unity shrank the original image by 50% in order to fit it in a 1024 x 1024 texture.

To fix your texture, look at the Max Size and Format settings in the tabs at the bottom of the Import Settings, shown below:

Max Size defines the maximum allowed size of the generated texture, defined as a square, and it defaults to 1024 pixels. Meanwhile, Format specifies the color depth of the image and defaults to Compressed.
You can set different values for each target platform (e.g. iOS, Web, Android), but for this app you’ll just deal with the Default tab.
In the Default tab, change Max Size to 2048 and click Apply. Your Import Settings should look like this:

Immediately you’ll notice both the Scene and Game views look nicer because the background is less compressed. The following image shows the Game view:
Notice in the Inspector‘s Preview area shown below that the background texture is now 0.6 MB, up from its earlier 160 KB:

Increasing the size of the texture increased its memory footprint by 4 times (the numbers you see are rounded a bit).
For some textures, you may want to adjust their Format value to improve their color quality, but that will increase the size even further. For example, if you try changing background‘s Format to 16 bits, you’ll see the texture grows to 2.5 MB, while changing it to Truecolor results in a texture of 3.8 MB.
However, if you look at the following two versions of the background, you’ll notice that the Compressed setting results in an image that looks pretty good compared to the Truecolor version:
Background with Compressed texture.

Background with Truecolor texture.

Because the compressed image looks good enough while saving so much memory, leave Format set to Compressed. In your own games, try different combinations of these settings and choose the one that results in the smallest texture that still produces your desired results.
Ok, the camera is set up and the background looks good. Now you need to find that old lady and her kitty cat.