Unity 4.3 2D Tutorial: Physics and Screen Sizes
Learn how to use Unity’s 2D physics engine for collision detection, and deal with different screen sizes and aspect ratios. By Chris LaPollo.
Swapping Colliders at Runtime
As you learned in part 3 of this series (on Animation Controllers), you can configure an Animation Clip to call methods on a GameObject at specific frames of the animation. You’ll take advantage of that feature to update the zombie’s collider.
Switch back to ZombieController.cs in MonoDevelop and add the following method to the class:
public void SetColliderForSprite( int spriteNum )
{
  colliders[currentColliderIndex].enabled = false;
  currentColliderIndex = spriteNum;
  colliders[currentColliderIndex].enabled = true;
}
This first disables the current collider, then it updates currentColliderIndex and enables the new Sprite’s collider.
Save the file (File\Save) and switch back to Unity.
The code you just wrote will take care of setting the zombie’s collider, so you want to make sure the zombie starts without any colliders enabled.
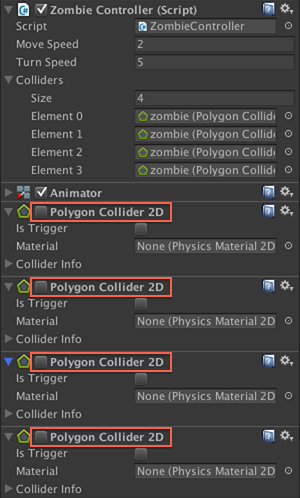
Select zombie in the Hierarchy and disable each of the Polygon Collider 2D components in the Inspector. Your zombie’s colliders should now look like this in the Inspector:
With its colliders disabled, you’ll need to call SetColliderForSprite each time the zombie’s Sprite changes to ensure the zombie’s current collider and Sprite match each other. To do so, you’ll set up ZombieWalk to fire Animation Events at each keyframe.
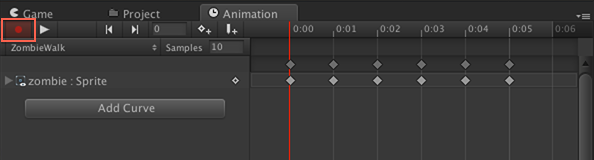
Select zombie in the Hierarchy and open the Animation view (Window\Animation). Be sure the clip drop-down menu in the Animation view’s control bar shows ZombieWalk.
Press the Animation view’s Record button to enter recording mode and move the scrubber to frame 0, as shown below:
Click the Add Event button shown below:

Choose SetColliderForSprite(int) from the Function combo box in the Edit Animation Event dialog that appears. Make sure the Int field listed under Parameters contains the value 0, as shown in the following image, and then close the dialog.

Now add similar events at frames 1, 2, 3, 4 and 5. When setting the parameters for each event, pass in the values 1, 2, 3, 2 and 1, respectively, to correspond with the Sprites shown at each keyframe.
When you’re done, ZombieWalk‘s events should be configured as shown below:

Play the scene with zombie selected in the Hierarchy. Pause the scene by pressing the Pause button in the Scene controls at the top of Unity’s interface, shown here:
![]()
Now step through the scene a frame at a time using the Frame Advance button to the right of the Pause button, shown here:
![]()
While stepping through the animation, you can see in the Scene view that the collider matches the current frame of animation, as demonstrated below:

Is there a solution? Yes, you could change the clip’s frame rate to something much higher, like 60, and then fire the SetColliderForSprite event exactly one frame before the keyframe that changes the Sprite.
Should you bother? Probably not. Zombie Conga’s players probably won’t notice any difference either way because the zombie’s various colliders are so similar. If any bad collision occurs, it will most likely be valid the next frame anyway and the player will probably never notice what happened.
The zombie looks ready, but it needs something to collide with. Hey, hasn’t that old lady been just sitting around doing nothing ever since she showed up in part 1 of this series? It’s time to put the elderly to work!
Collision Detection
For the old lady to participate in collisions, she’ll need a collider. Try attaching a polygon collider to her, checking the following Spoiler if you need help.
[spoiler title=”Still need help adding a collider?”]Select enemy in the Hierarchy and add the collider by choosing Component\Physics 2D\Polygon Collider 2D from Unity’s menu.
[/spoiler]
Run the scene and now the zombie…walks right through the old lady just like he always did.
The zombie and enemy each have colliders, but for colliders to actually have any effect during a collision, at least one of the GameObjects involved needs a RigidBody2D component, too. In this case, you’ll add one to the zombie.
Select zombie in the Hierarchy and choose Component\Physics 2D\Rigidbody 2D from Unity’s menu.
Run the scene now and let the zombie walk straight into the old lady. Hmm, there are a couple bad things happening here.
First, as soon as you pressed Play, the zombie slipped down a bit in the scene. Then, when the zombie hit the enemy, it seemed to actually bump into her, probably getting stuck for a bit before eventually walking around her.
The first problem is a result of the scene’s gravity acting on the zombie’s Rigidbody 2D component. It only happens when the scene first starts playing because after processing the gravity in the first frame, the code you wrote in ZombieController.cs starts setting the zombie’s position directly.
Fortunately, you have your choice of two easy fixes: you can turn off gravity for the entire scene, or just for the zombie. Because Zombie Conga doesn’t need any gravity, you’ll simply turn it off for the entire scene.
In Unity’s menu, go to Edit\Project Settings\Physics 2D and then change Gravity‘s Y value to 0 in the Inspector, as shown below:

The Gravity values simply accelerates all objects along the X and/or Y-axes by the specified amount. But setting them to zero, you have effectively disabled gravity.
Run again and the zombie doesn’t have that annoying dip when the scene starts.
That fixes the first problem, but the zombie is still bumping into the enemy. That’s because your zombie and the old lady are using colliders defined as solid objects, but what you really want are triggers.