Arduino Tutorial: Integrating Bluetooth LE and iOS
Learn how to control a servo wirelessly from your iPhone in this tutorial with Arduino, Bluetooth LE (low energy) and iOS. By Owen L Brown.
The Inner Workings of the BLE Shield
The BLE Shield V2.0.0 from Seeed Studio is based on Bluegiga’s BLE112 module which supports Bluetooth Low Energy 4.0. The BLE112, with or without the Shield component, is a great module for interfacing with iOS devices. It can be programmed with custom scripts to run without the need for an additional processor.
In this project, you’ll focus on using the BLE Shield as comes out of the box. It’s preprogrammed with a BLE Service and some characteristics geared toward basic communication.
What type of communication do you think will be used between the Arduino board and BLE Shield? Hint: The answer was mentioned earlier in the Serial Communication section.
[spoiler title=”Solution Inside”]The answer is: standard TTL communication. This type of communication uses a TX line and an RX line. It’s similar to RS232, but the voltage levels are much lower. Typically, TTL’s voltage will be from 0 to 5 volts.[/spoiler]
Here are the preprogrammed Service and Characteristics that come with this specific BLE device as found in the BLE-Shield firmware repository on GitHub:
- Service
Name: BLE Shield Service v2.0.0
UUID: B8E06067-62AD-41BA-9231-206AE80AB550 - Characteristic
Name: Bluetooth Device Address
UUID: 65C228DA-BAD1-4F41-B55F-3D177F4E2196 - Characteristic
Name: RX
UUID: F897177B-AEE8-4767-8ECC-CC694FD5FCEE
Description: The RX characteristic is used to receive data on the iOS Side. Data written to the BLE-Shield’s TX pin will be notified on the RX characteristic on the iOS device. - Characteristic
Name: TX
UUID: BF45E40A-DE2A-4BC8-BBA0-E5D6065F1B4B
Description: The iPhone sends data to the BLE-Shield’s TX characteristic which is then received on the RX pin of the BLE-Shield. The maximum amount of data which can be sent at once is 20 bytes due to BLE112 restrictions. - Characteristic
Name: Baudrate
UUID: 2FBC0F31-726A-4014-B9FE-C8BE0652E982
Supported baud rate values:
0×00 = 9600 Baud (default)
0×01 = 14400 Baud
0×02 = 19200 Baud
0×03 = 28800 Baud
0×04 = 38400 Baud
Since your project is based on one-way communication from your iOS device to the Arduino board, you’ll only make use of the TX characteristic.
Hardware Connections
Now it’s time to work on the hardware connections of the project. Be sure the USB cable is unplugged from the Arduino board before working with the hardware.
To make your life easier, gather the following parts below before you begin:
- Arduino Uno Board
- BLE-Shield
- Servo
- Three jumper wires
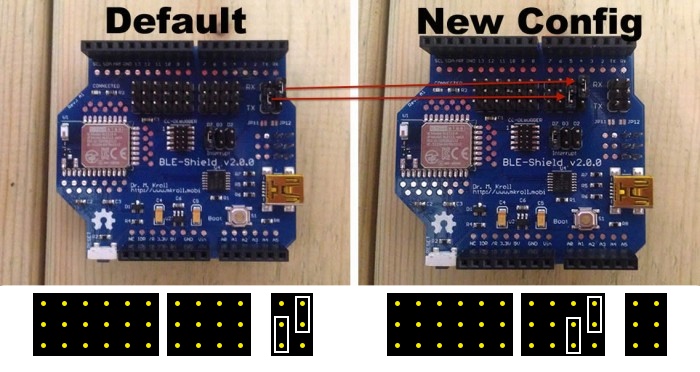
The first place to start is configuring the RX/TX jumpers. The BLE Shield default jumper position connects its RX to pin 0 and TX to pin 1. To match the Arduino code above, you’ll need to set RX to pin 4 and TX to pin 5.
Move the jumpers on the board to the appropriate pins as indicated in the image below:
Move BLE Shield Jumpers RX and TX to the indicated positions.
Assemble the BLE Shield onto the Arduino board as shown below:
Attaching BLE Shield to Arduino board
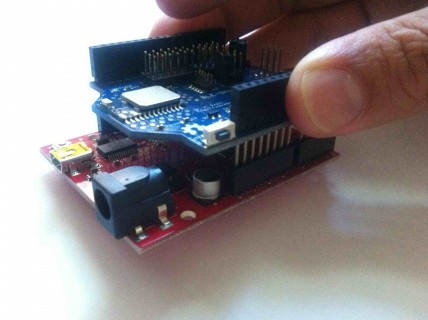
Be sure to match up the pins before applying any pressure to seat the BLE Shield. Inserting misaligned pins can cause damage to the hardware.
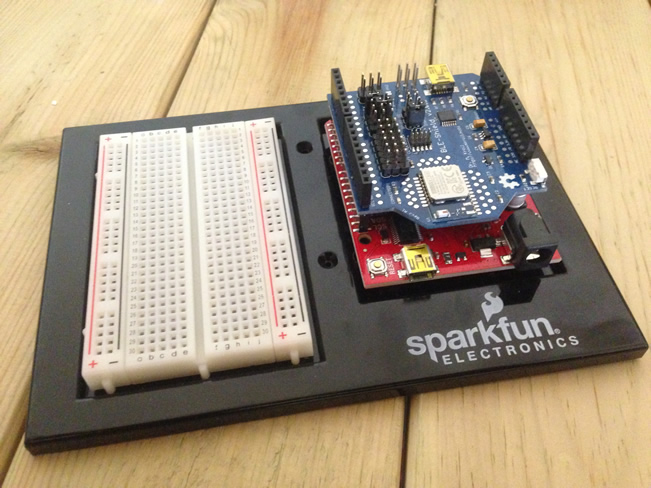
Once you’re done, the entire assembly should look like this:
BLE Shield Assembled!
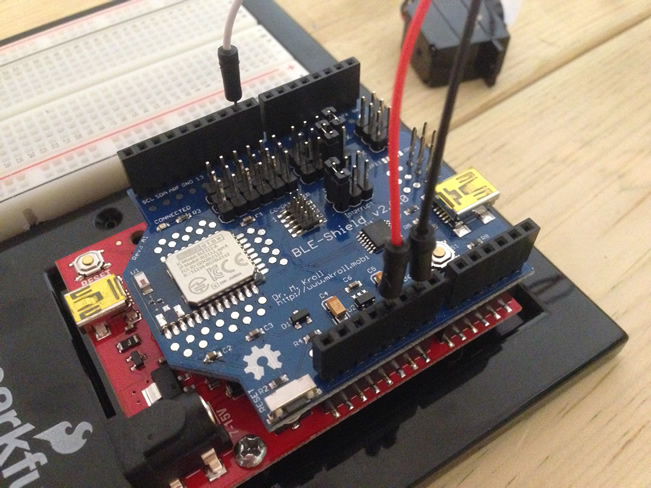
The servo motor requires three connections: +5v (red), Ground (black) and Position Signal (white). The +5v and Ground connections provide the servo with the power it needs to change and maintain its rotational position. The Position Signal connection is used to set the position of the servo. To prevent possible damage to the servo, ensure you don’t swap any of the connections.
Attach the three wires to the servo motor as shown in the image below:

It’s a good idea to use the same color wires as the servo leads so that you don’t get mixed up as to which wire goes where.
Connect the red wire to the BLE Shield’s 5v pin. Connect the black wire to the GND pin and the white wire to pin 9 as shown below:
Wires Connected to BLE Shield
Your hardware is connected and ready to go. All that’s left is to finish writing your iOS app to tie it all together!
Fleshing out the iOS App
The app uses a slider to wirelessly control the position of the servo. When you move the slider button up and down, the position data will be sent to the Arduino’s BLE Shield. The Connect/Disconnect icon at the bottom will indicate the Bluetooth connection status.
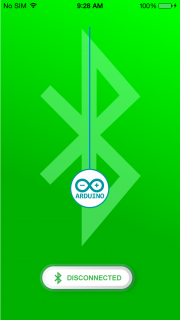
Open the downloaded starter project in Xcode, plug in your iPhone and build and run your app. The app will open and you will see an image similar to the one below:
Arduino Servo App
The app isn’t quite ready to communication with the Arduino, but that’s where you come in.
Click the Stop button in Xcode.
Starter Project Overview
When the app starts, RWTViewController creates an instance of BTDiscovery to begin searching for BLE devices in range with a specific Service UUID. BTDiscovery manages the discovery of and connections to Bluetooth devices. It also notifies the app when a Bluetooth device connects or disconnects.
RWTViewController has a vertical slider control that sends the slider’s position value to BTService and updates the Bluetooth image with the connection status. BTService handles the communication to the BLE shield module.
Before moving on, open BTService.h — there are a few important things in this file that help the app communicate with the BLE Shield, so it’s worth taking a minute to review them.
Towards the top of the file you’ll see a couple of UUID #defines.
RWT_BLE_SERVICE_UUID represents the 128-bit service UUID of the Arduino’s BLE Shield. You’ll notice that this UUID matches the BLE Shield Service v2.0.0 UUID listed earlier in the tutorial. Similarly, RWT_POSITION_CHAR_UUID matches the BLE Shield’s TX UUID. Both hex values must match in order for the app to discover and communicate with the BLE Shield.
Finally, RWT_BLE_SERVICE_CHANGED_STATUS_NOTIFICATION notifies the rest of the app when a peripheral connects or disconnectes from the app. The main view controller of your app uses this value to toggle the connection image on the home screen.
No code needs to be added here, so you can move on.
Open RWTViewController.m and replace the implementation of sendPosition: with the following:
- (void)sendPosition:(uint8_t)position {
  // Valid position range: 0 to 180
  static uint8_t lastPosition = 255;

  if (!self.allowTX) { // 1
    return;
  }

  // Validate value
  if (position == lastPosition) { // 2
    return;
  }
  else if ((position < 0) || (position > 180)) { // 3
    return;
  }

  // Send position to BLE Shield (if service exists and is connected)
  if ([BTDiscovery sharedInstance].bleService) { // 4
    [[BTDiscovery sharedInstance].bleService writePosition:position];
    lastPosition = position;

    // Start delay timer
    self.allowTX = NO;
    if (!self.timerTXDelay) { // 5
      self.timerTXDelay = [NSTimer scheduledTimerWithTimeInterval:0.1 target:self selector:@selector(timerTXDelayElapsed) userInfo:nil repeats:NO];
    }
  }
}
This method is called from positionSliderChanged: each time the user moves the slider. Here’s what happens in this method:
- Only continue if no other send occurred in the last 0.1 seconds to avoid flooding the BLE connection with too much data.
- Prevent the same value from being written multiple times. To keep traffic and power use to a minimum, you always want to take advantage of any opportunity to prevent sending duplicate data.
- Make sure that the values being sent are in the correct range. The Arduino’s Servo object accepts values between 0 and 180. If you take a peek at the storyboard file, you will see that the slider’s minimum and maximum values have been set to the same range.
- Ensure that the
BTServiceexists and is ready for action, then write the slider value to the position characteristic. - The timer prevents you from flooding the BLE Shield with data. First, you set
self.allowTXtoNOwhile sending data to the shield and then reset it back toYESafter the delay.
Now you have to implement the part of BTService to transmit the data. Open BTService.m and replace the implementation of writePosition: with the following:
- (void)writePosition:(UInt8)position {
  // See if characteristic has been discovered before writing to it
  if (!self.positionCharacteristic) {
    return;
  }

  NSData *data = nil;
  data = [NSData dataWithBytes:&position length:sizeof(position)];
  [self.peripheral writeValue:data
            forCharacteristic:self.positionCharacteristic
                         type:CBCharacteristicWriteWithResponse];
}
To start, the method will return immediately if the proper characteristic matching the UUID in BTService.h hasn’t been discovered yet. If it has, you need to wrap the data — simply the position value — in an NSData object. Then, you write the value out to the Core Bluetooth peripheral.
Since your positionCharacteristic UUID matches the BLE Shield’s TX characteristic, the BLE Shield transmits the data to the RX of the Arduino. The Arduino code written earlier uses this piece of data to set the servo’s position.
Build your app to make sure everything compiles. You app is now complete and ready for testing!