Accepting Credit Cards In Your iOS App Using Stripe
In this tutorial, you will to learn how to accept credit cards in iOS using Stripe, a pain-free, developer-centric way to handle purchases in your apps. By Lorenzo Boaro.
Getting Acquainted With Stripe’s iOS Library
There are different ways to add Stripe’s library. According to Stripe’s iOS Integration documentation, they support CocoaPods, Carthage, both Static and Dynamic Frameworks, as well as Fabric.
The starter project uses CocoaPods. In order to not lose the focus of this tutorial, all the dependencies have been set up for you. You don’t need to run any CocoaPod commands!
Note: If you haven’t used CocoaPods before, I encourage you to read CocoaPods Tutorial for Swift: Getting Started tutorial by Joshua Greene. It’s a real time-saver.
Now it’s time to start coding! You start by implementing the code for steps 1 and 2 above: submitting the credit card information to Stripe and getting a token.
Open Constants.swift. You will find an enum with a few constants. The first one is for the publishable API key that you got from Stripe when you signed up for an account.
Replace the value of publishableKey with your Test Publishable Key. It should be a random string of numbers and letters that starts with pk_test.
Note: If you accidentally use your secret key instead of your publishable key, the Stripe API methods that you access later will throw exceptions indicating you’ve made an error. Remember to use your test keys, not your live keys at this stage.
Ignore the baseURLString for now. You’ll get to that later.
Open AppDelegate.swift and at the top of the file, add the import below:
import Stripe
Next, replace the existing definition of application(_:didFinishLaunchingWithOptions:) with this:
func application(_ application: UIApplication,
                 didFinishLaunchingWithOptions launchOptions: [UIApplicationLaunchOptionsKey: Any]?)
                 -> Bool {
  STPPaymentConfiguration.shared().publishableKey = Constants.publishableKey
  return true
}
Here you are configuring Stripe with your publishable key.
Now, your next step is to collect credit card details from the user.
Accepting Credit Cards
At the moment, tapping on the Continue button on the checkout view controller does nothing. Open CheckoutViewController.swift and add this import just below the existing UIKit import at the top:
import Stripe
Then, complete the definition of continueDidTap(_:) Interface Builder action with this:
// 1
guard CheckoutCart.shared.canPay else {
  let alertController = UIAlertController(title: "Warning",
                                          message: "Your cart is empty",
                                          preferredStyle: .alert)
  let alertAction = UIAlertAction(title: "OK", style: .default)
  alertController.addAction(alertAction)
  present(alertController, animated: true)
  return
}
// 2
let addCardViewController = STPAddCardViewController()
addCardViewController.delegate = self
navigationController?.pushViewController(addCardViewController, animated: true)
If you build at this point, you’ll find a compilation error. Don’t worry about it; you’ll solve it in the next step.
Here’s what happening in the code above:
- Ensure the user has placed at least one puppy in the checkout cart. If not, show a warning message and return.
- Create an instance of
STPAddCardViewController, set its delegate and present it to the user.
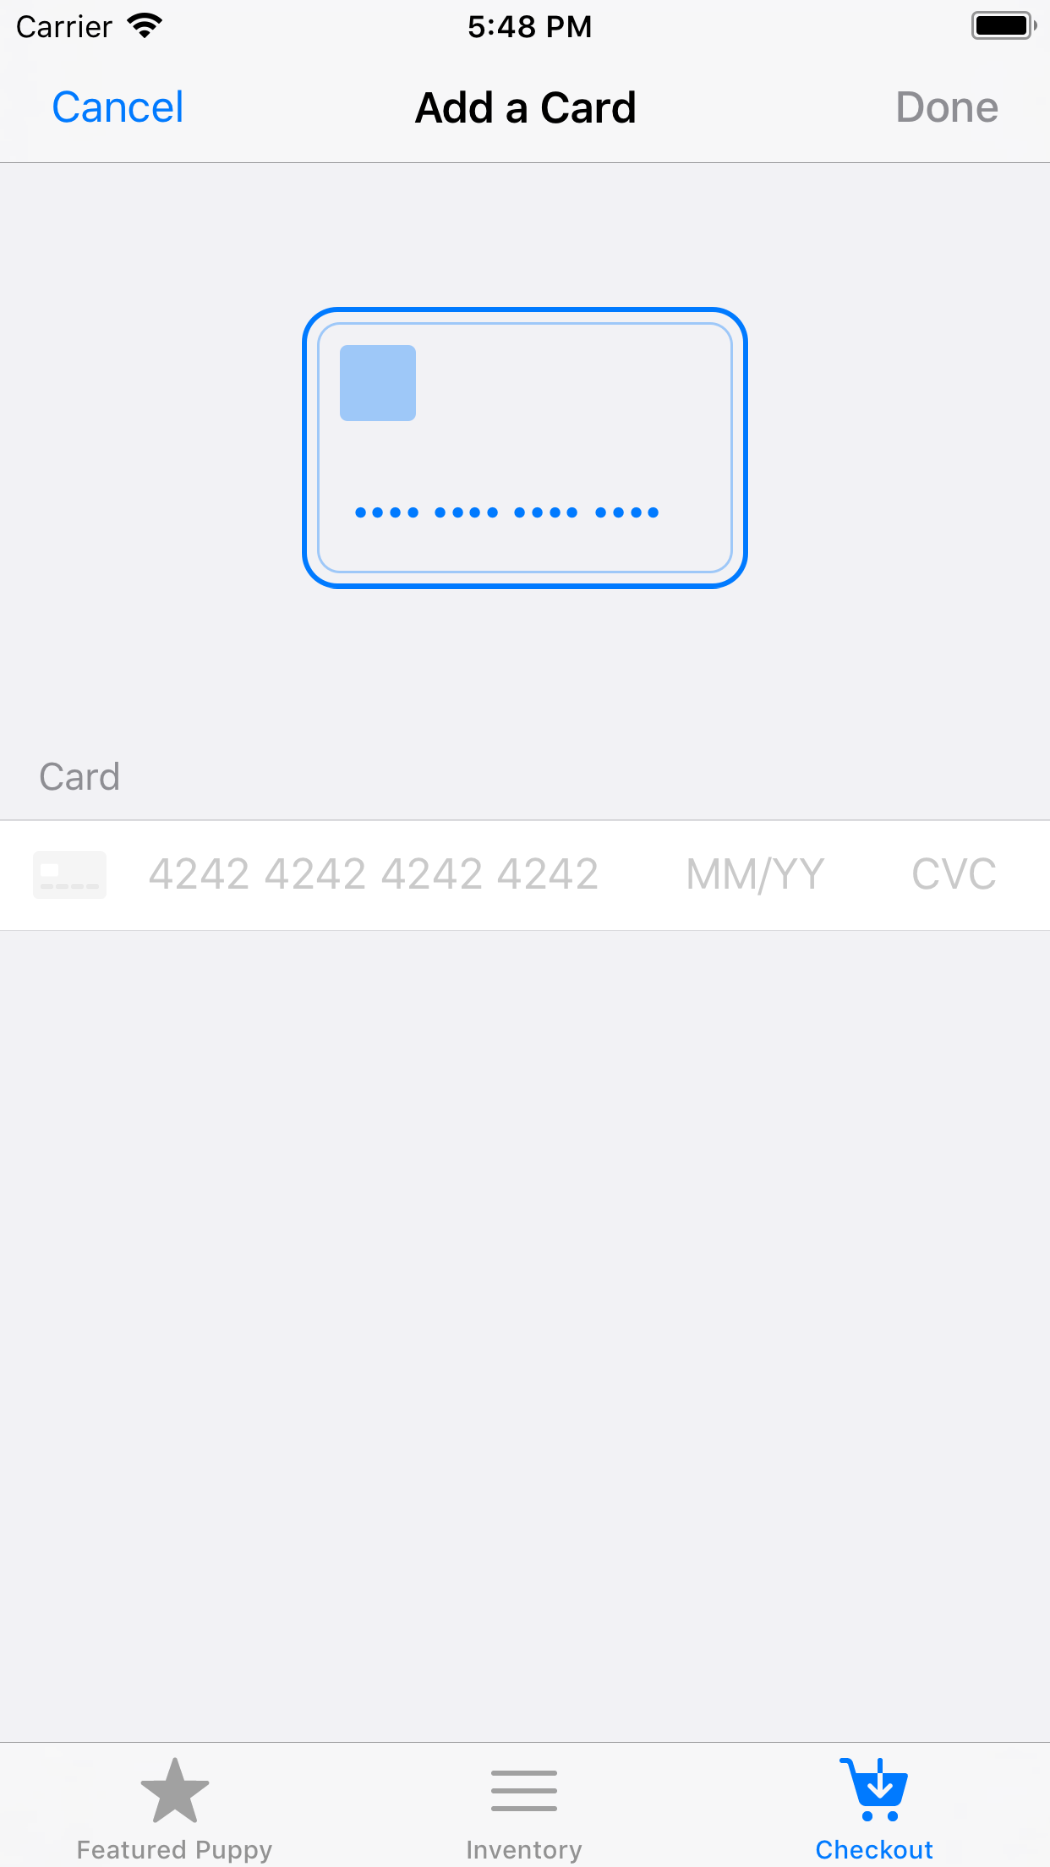
STPAddCardViewController is a view controller class included in Stripe’s framework. It handles both collecting and tokenizing the user’s payment information. Once presented, the user will see a screen to input the credit card details like the number, expiration date and CVC.
Since our checkout view controller has been set as a delegate of STPAddCardViewController, you must implement the required methods. In CheckoutViewController.swift, add the following code at the end of the file:
extension CheckoutViewController: STPAddCardViewControllerDelegate {

  func addCardViewControllerDidCancel(_ addCardViewController: STPAddCardViewController) {
    navigationController?.popViewController(animated: true)
  }

  func addCardViewController(_ addCardViewController: STPAddCardViewController,
                             didCreateToken token: STPToken,
                             completion: @escaping STPErrorBlock) {
  }
}
You’ve added two different methods.
-
addCardViewControllerDidCancel(_:)is called when the user cancels adding a card. -
addCardViewController(_:didCreateToken:completion:)is called when the user successfully adds a card and your app receives a token from Stripe.
Next, it’s time to finish the StripeClient component. It’s a singleton class that interacts with your back end.
Open StripeClient.swift. As usual, import Stripe module at the top of the file:
import Stripe
Now, add the following method:
func completeCharge(with token: STPToken, amount: Int, completion: @escaping (Result) -> Void) {
  // 1
  let url = baseURL.appendingPathComponent("charge")
  // 2
  let params: [String: Any] = [
    "token": token.tokenId,
    "amount": amount,
    "currency": Constants.defaultCurrency,
    "description": Constants.defaultDescription
  ]
  // 3
  Alamofire.request(url, method: .post, parameters: params)
    .validate(statusCode: 200..<300)
    .responseString { response in
      switch response.result {
      case .success:
        completion(Result.success)
      case .failure(let error):
        completion(Result.failure(error))
      }
  }
}
Here's the breakdown of the above code:
Next, build a dictionary containing the parameters needed for the charge API. token, amount and currency are mandatory fields.
The amount is an Int since Stripe API deals only with cents. When displaying amount values, your iOS app uses a currency number formatter.
- First, append the charge method path to the
baseURL, in order to invoke the charge API available in your back end. You will implement this API shortly. - Finally, make a network request using Alamofire to perform the charge. When the request completes, it invokes a completion closure with the result of the request.
Open CheckoutViewController.swift and locate addCardViewController(_:didCreateToken:completion:). Add the following code to it:
StripeClient.shared.completeCharge(with: token, amount: CheckoutCart.shared.total) { result in
  switch result {
  // 1
  case .success:
    completion(nil)

    let alertController = UIAlertController(title: "Congrats",
                          message: "Your payment was successful!",
                          preferredStyle: .alert)
    let alertAction = UIAlertAction(title: "OK", style: .default, handler: { _ in
      self.navigationController?.popViewController(animated: true)
    })
    alertController.addAction(alertAction)
    self.present(alertController, animated: true)
  // 2
  case .failure(let error):
    completion(error)
  }
}
This code calls completeCharge(with:amount:completion:) and when it receives the result:
- If the Stripe client returns with a success result, it calls
completion(nil)to informSTPAddCardViewControllerthe request was successful and then presents a message to the user. - If the Stripe client returns with a failure result, it simply calls
completion(error)lettingSTPAddCardViewControllerhandle the error since it has internal logic for this.
Build what you've got so far to make sure everything’s implemented correctly.
Note: If you see compiler warnings do not worry since Stripe SDK supports iOS versions back to iOS 8 while in this tutorial you are working with iOS 11.
Well done! Now it's time to set up the back-end script that is going to complete the credit card payment.
Setting Up Your Ruby Back End
Setting up a back-end development environment is beyond the scope of this tutorial, so you'll keep it as simple as possible. The back end is going to be a Sinatra web application that expects you to send the token id returned by STPAddCardViewController, along with a few other parameters.
Sinatra requires a Ruby environment greater or equal to 1.9.3. In order to check the version currently installed in your machine, open Terminal and paste the following command:
ruby --version
You should get something like:
ruby 2.4.0p0 (2016-12-24 revision 57164) [x86_64-darwin16]
If you have an older version, you need to update it to the latest. The best way to install a new Ruby version is through RVM, a command line utility tool which allows you to easily install, manage, and work with multiple Ruby environments from interpreters to sets of gems.
In Terminal, paste the following command:
curl -sSL https://get.rvm.io | bash -s stable --ruby
Note: Together with the installation of RVM, --ruby flag will install the newest version of Ruby.
Run ruby --version again. Now you should have all set up correctly.
At this point, you can install the Stripe, Sinatra and JSON gems.
Note: A gem is a pretty simple concept. You can think of a gem as a library or plugin. You can learn about them in What is a gem?.
Switch again to the Terminal and copy the following line:
gem install stripe sinatra json
Here you are instructing Ruby to install three gems into the current Ruby version. If you update your Ruby version, you'll need to repeat this process.
That's it! Now you are able to create your back end.