How to Create a Twitch Chat Game with Unity
Learn to integrate the Twitch Chat API into your Unity game, so viewers can interact with the game during streaming. By Harrison Hutcheon.
Creating Commands
You need to tell Vote what options are available for voting. To do this, you'll create a script called
In RW/Scripts/Battle, create a script called VoteOption.
Before you open VoteOption, navigate to RW/Prefabs/Battle in the Project pane. Open ActionButton.
Attach VoteOption to the prefab. Save the changes and close the Prefab Editor. Now all the ActionButtons in the scene have this script. You can find the ActionButtons in the scene hierarchy under UI/BattleCanvas/Player/Actions.
Open the VoteOption script.
Import UnityEngine.UI and add System.Serializable to VoteOption like this:
using UnityEngine.UI;
[System.Serializable]
public class VoteOption : MonoBehaviour
{
    //...
Using System.Serializable lets you store the class in a List.
Next, declare the following public variables inside VoteOption:
public int optionNumber; // 1
public Text voteCounter; // 2
public int voteCount; // 3
public Text optionNumberLabel; // 4
public bool voteActionExecuted; // 5
public IVoteAction voteAction; // 6
These fields store:
- The option's number used for voting. For example, in the command !vote 1, 1 is the
optionNumber. - A red label on the ActionButton, used to display the current number of votes for this option.
- The total number of votes for this option.
- A green label on the ActionButton, used to display the option number for this VoteOption.
- Whether this VoteOption executed its in-game action.
- An
IVoteAction that executes if this option receives the most votes.
IVoteActions for you. You'll find them in RW/Scripts/Battle.After Start, create a method called SetOptionNumberText:
public void SetOptionNumberText()
{
    optionNumberLabel.text = "#" + optionNumber.ToString();
}
This sets the option number label to the optionNumber.
Mark Start as private and implement it as below:
private void Start()
{
    SetOptionNumberText();
    voteAction = GetComponent<IVoteAction>();
}
Here, this code calls SetOptionNumberText and sets voteAction to the IVoteAction attached to the same VoteOption GameObject.
Now you need a method to call when VoteOption receives a vote. Create a method called AddVote:
public void AddVote()
{
    voteCount++;
    voteCounter.text = voteCount.ToString();
}
This method increases the voteCount by one and updates voteCounter.text with voteCount's value.
Nex, create a method called ClearVotes, which clears votes before a new vote phase:
public void ClearVotes()
{
    voteCount = 0;
    voteCounter.text = voteCount.ToString();
    voteActionExecuted = false;
}
This sets voteCount to 0, updates voteCounter.text and sets voteActionExecuted to false.
Finally, create a method called ExecuteOption, which checks if voteActionExecuted is false:
public void ExecuteOption()
{
    if (!voteActionExecuted)
    {
        voteAction.Execute();
        voteActionExecuted = true;
    }
}
If voteActionExecuted is false, this method calls voteAction.Execute and sets voteActionExecuted to true. Checking if voteActionExecuted is false prevents you from accidentally executing the same action twice.
Return to Unity. In the hierarchy, go through each ActionButton in UI/BattleCanvas/Player/Actions and give each a unique Option Number from 1 to 4. Expand each button and drag the Text inside OptionNumberLabel into Option Number Label. Drag the Text inside VoteCount into VoteCounter.

Leave Vote Count at 0 and Vote Action Executed as false.
Expanding the Vote Script
Time to expand Vote to use VoteOption.
Open Vote.
Import UnityEngine.UI:
using UnityEngine.UI;
Declare the following public variables underneath ShortString:
public float votePhaseLength; // 1
public bool isVotingOpen; // 2
public List<VoteOption> voteOptions; // 3
public GameObject voteTimerObject; // 4
public Text voteTimerLabel; // 5
public VoteOption selectedOption; // 6
public BattleManager battleManager; // 7
private float votePhaseTimer; // 8
Here's a variable breakdown:
- How long in seconds the audience has to submit a vote.
- Allow voting during the vote phase, as well as prevent voting after the vote phase ends.
- Available
VoteOptions. - Voting timer in the
VoteTimertext box, shown in the center of the scene. - Text UI element in
VoteTimer. - The
VoteOptionthat won the majority vote. - The
BattleManager. - Remaining time of the vote phase.
In Execute, replace what you currently have with:
public bool Execute(string username, List<string> arguments, GameManager gm = null)
{
    if (isVotingOpen) // 1
    {
        if(int.TryParse(arguments[0], out int optionVoted))  //2
        {
            foreach (VoteOption option in voteOptions) // 3
            {
                if (option.optionNumber == optionVoted)
                {
                    option.AddVote();
                }
            }
            return true; // 4
        }
    }
    return false; // 5
}
This updated code:
- Checks if
isVotingOpenis true. - If true, it gets the number of the option that received a vote by parsing the first argument into an int.
- For each
VoteOptioninvoteOptions, it checks if it'soptionNumbermatches the number submitted. If it does, it callsAddVotefor that option. - Outside the loop, it returns true to indicate that the command executed successfully.
- If a user submits a vote while voting is closed, or if the option passed in wasn't parsed to an int, you want
Executeto indicate that it failed. So, return false outside theisVotingOpencheck.
Create a method called OpenVoting:
public void OpenVoting()
{
    isVotingOpen = true; // 1
    voteTimerObject.SetActive(true); // 2
    foreach (VoteOption option in voteOptions)
    {
        option.ClearVotes(); // 3
    }
    votePhaseTimer = votePhaseLength; // 4
}
OpenVoting opens a new vote phase by:
Expanding BattleManageer
Next, create a method called CloseVoting and implement it as below:
Here's a code breakdown:
Finally, add the following code in Update:
Here, you:
Next, open RW/Scripts/Battle/BattleManager.cs. It has several commented out references to Vote. I didn't want them sending errors to the console while you worked on getting Vote ready.
Now Vote is ready, uncomment:
- Setting
isVotingOpento true. - Activating
voteTimerObject. - Clearing all votes.
- Resetting
votePhaseTimer. -
CloseVotingsetsisVotingOpento false to prevent counting new votes. - Then it also deactivates
voteTimerObject. - Next, it sorts the
VoteOptionsfrom highestvoteCountto lowest and selects the most voted option. - Finally, it sets the battle phase to 1. When
battlePhaseis 0,BattleManagerwaits for voting end. WhenbattlePhaseis 1,BattleManagerknows to proceed by announcing the chosen action. - Check if
battleManager.battlePhaseis 0 and ifisVotingOpenis false. If it is, you callOpenVoting. - Since voting is open, you check if
votePhaseTimeris greater than 0. If so, you reduce the time byTime.deltaTimeand updatevoteTimerLabel. - Then, if
votePhaseTimeris less than or equal to 0, you callCloseVoting.
public void CloseVoting()
{
    isVotingOpen = false; // 1
    voteTimerObject.SetActive(false); // 2
    voteOptions.Sort((VoteOption a, VoteOption b) => a.voteCount < b.voteCount ? 1 : -1);
    selectedOption = voteOptions[0];  // 3
    if (battleManager.battlePhase == 0)
    {
        battleManager.battlePhase = 1; // 4
    }
}
// count down vote phase timer
if (battleManager.battlePhase == 0 && !isVotingOpen) // 1
{
    OpenVoting();
}
if (isVotingOpen) // 2
{
    if (votePhaseTimer > 0)
    {
        votePhaseTimer -= Time.deltaTime;
        voteTimerLabel.text = votePhaseTimer.ToString("0");
    }
    else // 3
    {
        CloseVoting();
    }
}
-
CloseVotingsetsisVotingOpento false to prevent counting new votes. - Then it also deactivates
voteTimerObject. - Next, it sorts the
VoteOptionsfrom highestvoteCountto lowest and selects the most voted option. - Finally, it sets the battle phase to 1. When
battlePhaseis 0,BattleManagerwaits for voting end. WhenbattlePhaseis 1,BattleManagerknows to proceed by announcing the chosen action.
- Check if
battleManager.battlePhaseis 0 and ifisVotingOpenis false. If it is, you callOpenVoting. - Since voting is open, you check if
votePhaseTimeris greater than 0. If so, you reduce the time byTime.deltaTimeand updatevoteTimerLabel. - Then, if
votePhaseTimeris less than or equal to 0, you callCloseVoting.
public void CloseVoting()
{
    isVotingOpen = false; // 1
    voteTimerObject.SetActive(false); // 2
    voteOptions.Sort((VoteOption a, VoteOption b) => a.voteCount < b.voteCount ? 1 : -1);
    selectedOption = voteOptions[0];  // 3
    if (battleManager.battlePhase == 0)
    {
        battleManager.battlePhase = 1; // 4
    }
}
// count down vote phase timer
if (battleManager.battlePhase == 0 && !isVotingOpen) // 1
{
    OpenVoting();
}
if (isVotingOpen) // 2
{
    if (votePhaseTimer > 0)
    {
        votePhaseTimer -= Time.deltaTime;
        voteTimerLabel.text = votePhaseTimer.ToString("0");
    }
    else // 3
    {
        CloseVoting();
    }
}
- The
Votefield on line 38. -
AnnouncePlayerActionon lines 84-90/. -
ExecutePlayerActionon lines 95-102.
The BattleManager code shares a lot of functionality with Vote, but controls the opponent rather than the player character. It also controls the battle's pace and displays the current action of the player or opponent.
Save your scripts and go back into Unity. With the comments removed, BattleManager now has a public Vote field in the inspector.
Click BattleManager in the hierarchy. Then drag the GameManager object into the Vote field of the BattleManager script.

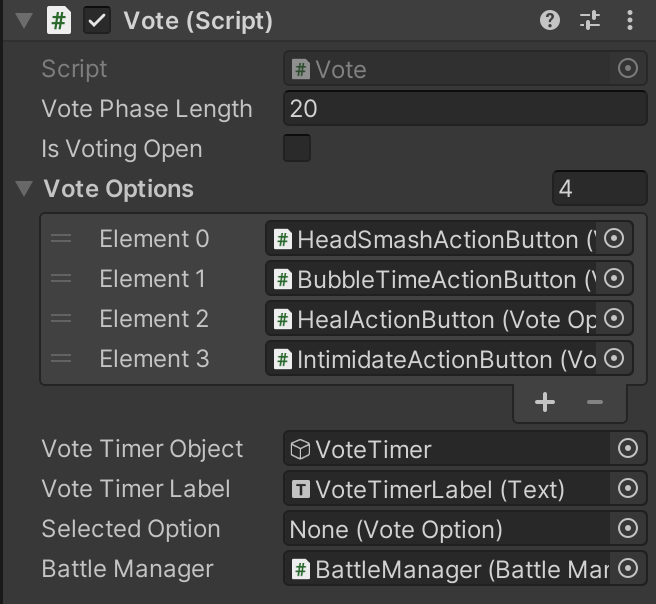
Select GameManager in the hierarchy and look at the Vote component. Set the following values:
- Vote Phase Length to 20. Feel free to play around with this value.
- Drag each of the VoteOption buttons you set up earlier onto the list of Vote Options.
- Vote Timer Object to UI/BattleCanvas/VoteTimer.
- Vote Timer Label to UI/BattleCanvas/VoteTimer/VoteTimerLabel.
- Battle Manager to Managers/BattleManager.