CloudKit JS Tutorial for iOS
Learn how to use CloudKit JS to create a web app to access the database of a CloudKit iOS app, making your app’s data available on the web! By Audrey Tam.
A Word About Knockout and Skeleton
Your web app will update its UI when users sign in or out and when the database changes by using knockout.js to create dynamic data bindings between the UI in index.html and the data model in TIL.js.
If you’re familiar with the MVVM design pattern, then know that the CloudKit database is the model, index.html is the view, and TIL.js is the view model.
Knockout provides data bindings for text, appearance, control flow and forms. You’ll inform Knockout of which view model properties can change by declaring them as observable.
You’ll also use the Skeleton responsive CSS framework to create a grid-based web UI. Each row contains 12 columns to use to display elements.
Configuring CloudKit JS
Inside the TIL Starter/Web folder are TIL.js and index.html. You’ll add JavaScript code to TIL.js to fetch and save Acronym records, and you’ll update index.html to display and get user input for Acronym records.
Open TIL.js and index.html in Xcode and go to Xcode\Preferences. In Text Editing\Indentation, uncheck Syntax-aware indenting: Automatically indent based on syntax. Xcode’s auto-indent doesn’t work well with JavaScript, but its Editor\Structure functions are still useful.
Take a look at the code in TIL.js:
// 1
window.addEventListener('cloudkitloaded', function() {
  console.log("listening for cloudkitloaded");
  // 2
  CloudKit.configure({
    containers: [{
      // 3
      containerIdentifier: 'iCloud.com.raywenderlich.TIL',
      apiToken: '1866a866aac5ce2fa732faf02fec27691027a3662d3af2a1456d8ccabe9058da',
      environment: 'development'
    }]
  });
  console.log("cloudkitloaded");
  // 4
  function TILViewModel() {
    var self = this;
    console.log("get default container");
    var container = CloudKit.getDefaultContainer();
  }
  // 5
  ko.applyBindings(new TILViewModel());
});
-
windowis the browser window. Apple recommends loading cloudkit.js asynchronously, sowindow.addEventListener('cloudkitloaded', function() { ... }attaches thefunctionas the event handler of thecloudkitloadedevent. The rest of the code in TIL.js is thecloudkitloadedevent handler. - After cloudkit.js loads, you configure the CloudKit containers by specifying each one’s identifier, API token and environment.
- Change the
containerIdentifierto match the value of the default container, which should be iCloud, followed by the iOS app’s bundle identifier you set earlier. - Next,
TILViewModel()simply renames JavaScript’sthistoself, which is more familiar to iOS developers, and gets the default container. - The last line applies Knockout bindings: there aren’t any bindings yet, but this also creates and runs
TILViewModel().
Create an API Token
In the CloudKit dashboard, create an API token for your container. Select Admin\API Access and then Add new API token. Name it JSToken, check Discoverability and click Save.
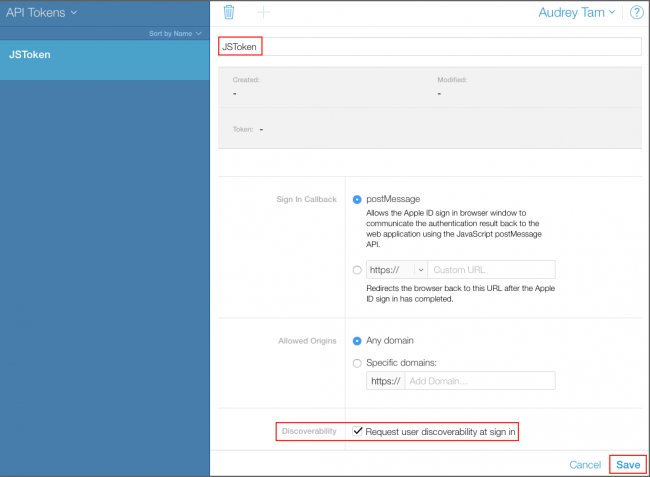
Copy the token.

Back in TIL.js, paste your new token in place of the current apiToken. Leave environment set to development and save.
Error Codes
TIL.js contains console.log statements that perform the same role as debug print statements in Swift. The messages appear in the browser’s console — Safari’s Error Console, Chrome’s JavaScript Console, or Firefox’s Browser Console.
Showing the Safari Error Console
Open index.html in Safari. To show the error console, select Safari\Preferences\Advanced, and check Show Develop menu in menu bar.
Close the preferences window and select Develop\Show Error Console. Refresh the page to see console.log messages.

Note: If you’re using Chrome, its console is in the View\Developer menu.
If you’re using Firefox, find it under the Tools\Web Developer menu.
Querying the Public Database
Anyone can view the public database, even without signing in to iCloud, as long as you fetch the public records and display them on a webpage. That’s what you’ll do in this section.
In TIL.js, add the following to TILViewModel(), right before the method’s ending curly brace:
console.log("set publicDB");
var publicDB = container.publicCloudDatabase;
self.items = ko.observableArray();
This little block gets you a reference to the public database via publicDB then it declares items as a Knockout observable array that contains the public records.
Add the following right after the lines you just added:
// Fetch public records
self.fetchRecords = function() {
  console.log("fetching records from " + publicDB);
  var query = { recordType: 'Acronym', sortBy: [{ fieldName: 'short'}] };

  // Execute the query.
  return publicDB.performQuery(query).then(function(response) {
    if(response.hasErrors) {
      console.error(response.errors[0]);
      return;
    }
    var records = response.records;
    var numberOfRecords = records.length;
    if (numberOfRecords === 0) {
      console.error('No matching items');
      return;
    }

    self.items(records);
  });
};
Here you define the fetchRecords function, which retrieves the public records sorted by the short field and stores them in items.
Note: If you want to create a web app to access someone else’s CloudKit container, you need to know how its databases are organized, namely record types, field names and field types.
TIL’s public database stores records of type Acronym, which has two String fields named short and long.
Lastly, add the following right after the previous lines:
container.setUpAuth().then(function(userInfo) {
  console.log("setUpAuth");
  self.fetchRecords();  // Don't need user auth to fetch public records
});
Here you run container.setUpAuth() to check whether a user is signed in, and then it presents the appropriate sign-in/out button. You don’t need authentication yet, but you still call fetchRecords() to get the Acronyms to display.
Save TIL.js.
Next, open index.html and scroll to the bottom. Add the following right above the End Document comment:
<div data-bind="foreach: items">
  <div class="row">
    <div class="three columns">
      <h5><span data-bind="text: fields.short.value"></span></h5>
    </div>
    <div class="nine columns">
      <p><span data-bind="text: fields.long.value"></span></p>
    </div>
  </div>
</div>
Here you iterate through the items array. Each element in items is an acronym record.
Knockout’s text binding displays the short and long text values. The foreach control flow binding duplicates the Skeleton row for each element in items, and it binds each row to the corresponding items element.
Because items is an observable array, this binding efficiently updates the displayed rows every time items changes.
Save index.html and reload it in the browser. Public database records appear in the browser window and console.log messages still show in the error console.

421 error appears when you initialize publicDB. Don’t worry, this won’t stop the list from appearing. Select Logs instead of All to see only log messages. If the list doesn’t appear, check the console messages to see if CloudKit failed to load, and if so, reload the web page.