Android GridView Tutorial
In this Android GridView tutorial, you will build an app using a GridView and learn how to customize it to create a beautiful user interface. By Brian Voong.
Selecting Items
Now you’ve got a pretty grid of books. Hooray! But what if your user wants to favorite a book by tapping on it? To allow this, set up an on-click listener for your GridView. Open MainActivity.java and add the following snippet at the bottom of onCreate():
gridView.setOnItemClickListener(new AdapterView.OnItemClickListener() {
  @Override
  public void onItemClick(AdapterView parent, View view, int position, long id) {
    Book book = books[position];
    book.toggleFavorite();

    // This tells the GridView to redraw itself
 	// in turn calling your BooksAdapter's getView method again for each cell
    booksAdapter.notifyDataSetChanged();
  }
});
A variable must be declared as final to be used inside an anonymous nested class (like our on-click listener), so to change the booksAdapter variable’s declaration to final, replace this line in onCreate():
BooksAdapter booksAdapter = new BooksAdapter(this, books);
with:
final BooksAdapter booksAdapter = new BooksAdapter(this, books);
To toggle the star icon in your cell, add this line of code in getView in BooksAdapter, right before you return the convertView:
imageViewFavorite.setImageResource(
  book.getIsFavorite() ? R.drawable.star_enabled : R.drawable.star_disabled);
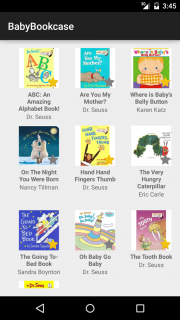
Build and run. You can now tap on each book to favorite your selections:
Screen Orientation Changes
You’ve happily selected some favorite books … but when you rotate the screen (CTRL + F11 for emulator rotation), the selections aren’t remembered. What!?

This is because Android Activities are destroyed and then recreated when the screen rotates. By default, the system uses the Bundle instance state to save information about each View object in your activity layout (such as the text displayed in the TextViews of your GridView). When your activity instance is destroyed and recreated, the state of the layout is restored to its previous state with no code required by you.
This means that to make the selections behave correctly, you need to save the selection information yourself. Thankfully, Android Activities have two useful methods for this:
-
onSaveInstanceState(): Android will call this method right before the activity is destroyed. -
onRestoreInstanceState(): Android will call this method when recreating the activity.
To remember the selected books, the app needs to save the selection information to a list, then use that list to select the books when the activity is recreated.
First, establish an identifying key for the list at the beginning of your class by adding the following line before onCreate() in MainActivity.java:
private static final String favoritedBookNamesKey = "favoritedBookNamesKey";
Add the following to MainActivity.java under onCreate():
@Override
protected void onSaveInstanceState(Bundle outState) {
  super.onSaveInstanceState(outState);

  // construct a list of books you've favorited
  final ArrayList<Integer> favoritedBookNames = new ArrayList<>();
  for (Book book : books) {
    if (book.getIsFavorite()) {
      favoritedBookNames.add(book.getName());
    }
  }

  // save that list to outState for later
  outState.putIntegerArrayList(favoritedBookNamesKey, favoritedBookNames);
}
To restore the selections when the activity is recreated, add the following to MainActivity.java under onSaveInstanceState():
@Override
protected void onRestoreInstanceState(Bundle savedInstanceState) {
  super.onRestoreInstanceState(savedInstanceState);

  // get our previously saved list of favorited books
  final ArrayList<Integer> favoritedBookNames =
            savedInstanceState.getIntegerArrayList(favoritedBookNamesKey);

  // look at all of your books and figure out which are the favorites
  for (int bookName : favoritedBookNames) {
    for (Book book : books) {
      if (book.getName() == bookName) {
        book.setIsFavorite(true);
        break;
      }
    }
  }
}
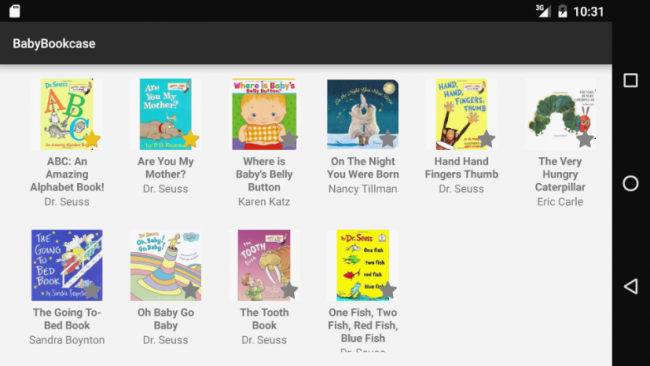
Build and run. Now when you rotate the screen, your books are still favorited!
Customizing GridView Properties
As you play around with the GridView component, you may run into situations where the layout doesn’t suit your design perfectly. Luckily, the great folks at Google have provided a few properties that allow you to tweak how each cell is rendered.
You can modify columnWidth, horizontalSpacing and verticalSpacing with a dimension value such as 14.5dp. These properties can be set programmatically or from the XML layout files.
To find properties to set, type gridView.set at the bottom of onCreate() in MainActivity.java and wait for Android Studio to show suggestions.
Alternatively, take a look at the GridView documentation for a list of available methods, some of which set these properties. You can also head back to app/res/layout/activity_layout.xml and play around with the properties within the GridView tag. The properties are fairly self-explanatory, so I definitely encourage you to experiment with different values.
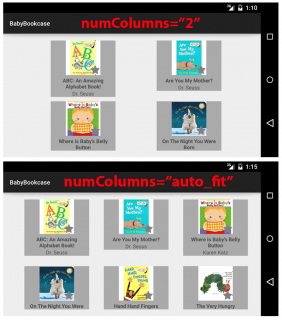
To specify the number of columns to render, provide an integer value for the property numColumns. If you want to display as many columns as possible to fill the available horizontal space, use numColumns="auto_fit". Here’s a comparison between the two options in landscape orientation (I’ve used darker grey cell backgrounds for clarity purposes):
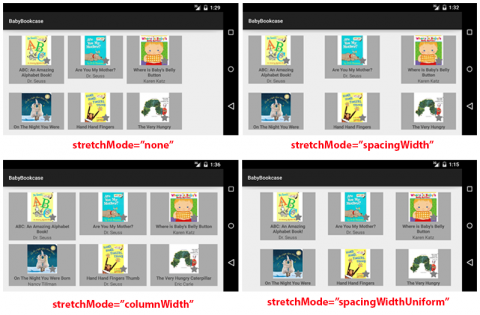
Finally, to control how your columns stretch to fill available space, specify stretchMode as one of the following:
-
none: Stretching is disabled. -
spacingWidth: Spacing between each column is stretched. -
columnWidth: Each column is stretched equally. -
spacingWidthUniform: Spacing between each column is uniformly stretched.
The following screenshot illustrates those options:
Using the customizable properties, you can easily get your GridView looking just the way you want it!
Performance Tips
Your first few implementations of GridView will likely be simple in terms of view layouts, but as your app scales and you get more content, the stress on your users’ devices can become quite high in terms of loading cells and maintaining smooth scrolling.
The current implementation of this sample app recycles each cell view as needed within BooksAdapter.getView(), so make sure to use this strategy whenever you need to provide views for your cells.
One technique to improve performance is called the ViewHolder design pattern. As the name suggests, you implement a class to “hold” the subviews inside of your cells. This avoids memory-expensive calls to findViewById().
To see what this pattern looks like, add this private class inside BooksAdapter, directly below getView(). Remember to paste inside the BooksAdapter class brackets!
  // Your "view holder" that holds references to each subview
  private class ViewHolder {
    private final TextView nameTextView;
    private final TextView authorTextView;
    private final ImageView imageViewCoverArt;
    private final ImageView imageViewFavorite;

    public ViewHolder(TextView nameTextView, TextView authorTextView, ImageView imageViewCoverArt, ImageView imageViewFavorite) {
      this.nameTextView = nameTextView;
      this.authorTextView = authorTextView;
      this.imageViewCoverArt = imageViewCoverArt;
      this.imageViewFavorite = imageViewFavorite;
    }
  }
Your ViewHolder is quite simple. It holds references to each subview and doesn’t bother with anything else.
To take advantage of your ViewHolder, change getView() to the following:
@Override
  public View getView(int position, View convertView, ViewGroup parent) {
    final Book book = books[position];

    // view holder pattern
    if (convertView == null) {
      final LayoutInflater layoutInflater = LayoutInflater.from(mContext);
      convertView = layoutInflater.inflate(R.layout.linearlayout_book, null);

      final ImageView imageViewCoverArt = (ImageView)convertView.findViewById(R.id.imageview_cover_art);
      final TextView nameTextView = (TextView)convertView.findViewById(R.id.textview_book_name);
      final TextView authorTextView = (TextView)convertView.findViewById(R.id.textview_book_author);
      final ImageView imageViewFavorite = (ImageView)convertView.findViewById(R.id.imageview_favorite);

      final ViewHolder viewHolder = new ViewHolder(nameTextView, authorTextView, imageViewCoverArt, imageViewFavorite);
      convertView.setTag(viewHolder);
    }

    final ViewHolder viewHolder = (ViewHolder)convertView.getTag();
    viewHolder.imageViewCoverArt.setImageResource(book.getImageResource());
    viewHolder.nameTextView.setText(mContext.getString(book.getName()));
    viewHolder.authorTextView.setText(mContext.getString(book.getAuthor()));
    viewHolder.imageViewFavorite.setImageResource(book.getIsFavorite() ? R.drawable.star_enabled : R.drawable.star_disabled);

    return convertView;
  }
The ViewHolder is stuffed into convertView‘s tag using setTag() and retrieved using getTag(). With your cells scrolling by, it helps them load quick quickly when they can skip over all the inflation, right to the getTag() call and the fun part of inserting content.
Build and run. Your app will look the same, but underneath the hood it is now capable of handling much faster view recycling.
For additional documentation, visit Google’s page on smooth scrolling here.