Using CLion as an IDE for Server-Side Swift Apps on Linux
One of the best Swift IDEs on Linux is CLion. In this tutorial, you’ll set up CLion for Swift on Linux and build a Swift server app with Vapor. By Andy Pereira.
Debugging
Finally, one of the most important things is knowing how to debug your code. CLion provides great debugging tools.
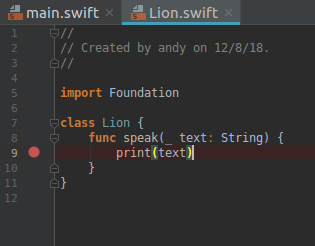
Open Lion.swift and add a breakpoint by clicking in the gutter next to print(text). You should now see a red dot:
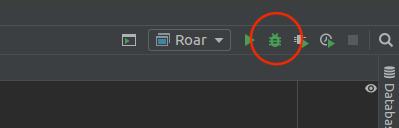
Now, select Debug in the upper-right of the project. The icon looks like a bug.
As your app runs, it will break, or pause, on the line of code from the previous step. This allows you to inspect your app as needed.
At the bottom of the screen, the debugger tool window will appear allowing you to see the state of your code and interact with LLDB.
On the left side of the debugger, you’ll see Frames, which allows you to see the progression of your code and any applicable threads.
On the right side of the debugger, you’ll find a tabbed window. First, you will see the Variables tab. You can press the arrows next to each variable to expand the information about them.

Next, select the tab that says Swift LLDB. Here, you can actually interact with the LLDB using commands you may be familiar with from Xcode. In the console, type:
po text
You should see it print the value of text in the console:

Yay — you’ve made your first Swift project using CLion!
Importing a Vapor Project
To conclude this tutorial, you’re going to take a project made using Vapor and import it into CLion. This gives you the flexibility to write server-side apps and deploy them, all from a Linux environment. The sample project, TIL, is a web app that creates and shows a list of acronyms and their meanings.
To start, download the project materials using the Download Materials button at the top or bottom of this tutorial.
Next, in CLion, select File ▸ Import Project… and select vapor-til-master. Select OK to continue and choose Open Existing Project

When CLion asks how you want to open the project, choose New Window.
CLion will recognize this as a Swift project, setting up everything you need. After the project opens, it will need to sync the dependencies found in Package.swift. This may take some time, so let it finish before continuing.

Next, edit the configuration for the target. Select Run ▸ Edit Configurations…. Change Working directory to the root directory of the project: That being the vapor-til-master folder you imported earlier. This needs to be set in order for Vapor to know where your resources (images, leaf templates) will be served from.
This project requires a few, easy-to-set-up environment variables. To start, in the Edit Configuration window, select the folder on the text field for Environment variables. Select + and add the following variables:
-
GOOGLE_CALLBACK_URL:localhost:8080 -
GOOGLE_CLIENT_ID:identifier -
GOOGLE_CLIENT_SECRET:secret
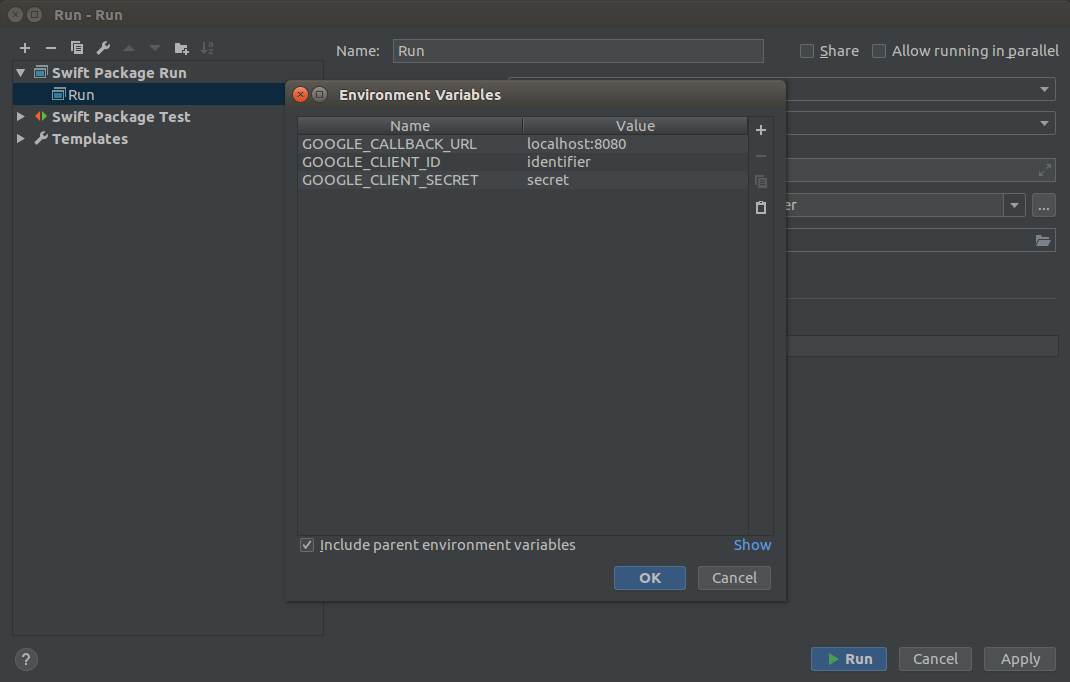
When finished, select OK.
Configuring the Database
This project requires you to have a PostgreSQL server running to save and retrieve data. To make it easy, Docker can deploy what you need in a short amount of time. Open Terminal and type the following command:
sudo docker run --name postgres -e POSTGRES_DB=vapor \
  -e POSTGRES_USER=vapor -e POSTGRES_PASSWORD=password \
  -p 5432:5432 -d postgres
If prompted, enter your computer’s password.
This command will:
- Download the docker container for PostgreSQL, if not already installed.
- Start a PostgreSQL database named vapor.
- Give the database a username/password of vapor/password.
- Run it on port 5432, and in the background.
If you are coming back to this project at a future time, you will not be able to run this command again. You can start the container again in Terminal using the following command:
sudo docker start postgres
If you’d like to stop it manually, run:
sudo docker stop postgres
Now that you have a valid database running, go back to CLion and press Run. As this is the first time running, it will take a while to compile all of the dependencies needed to make a Vapor project work.
This time, you should see in Messages that your app is running on http://localhost:8080.

Open a web browser and go to localhost:8080. You’ll see your app is up and running!

Navigate to Create An Acronym in the navigation bar. Log in with the following credentials:
- Username: admin
- Password: password
Once you’re logged in, navigate back to Create An Acronym and create anything you’d like.

You’ve successfully set up Swift, Vapor and CLion to run in a Linux environment! Feel free to add more features to the Vapor project and investigate how the code works with CLion’s debugging tools.
Where to Go From Here?
You can download the finished project using the Download Materials button at the top or bottom of this tutorial.
To learn more, check out these resources:
- Server-Side Swift with Vapor course
- JetBrains CLion Swift Support Information
- Linux Details From Swift.org
- Vapor Documentation
We hope you enjoyed this tutorial! If you have any questions or comments, please join the forum discussion below!