SceneKit Tutorial With Swift Part 3: Physics
In the third installment of our SceneKit With Swift tutorial, you’ll animate your Geometry Fighter game while learning about SceneKit physics. By Chris Language.
Forces
Think about objects in real life for a moment: to make something move — such as a spoon on top of a table — you have to apply some type of physical force on it. Unless you’re living inside the Matrix, your name is Neo and there isn’t even an actual spoon to begin with. :]
The SceneKit physics engine does a pretty good job mimicking real-life physics, so just as you’d apply a force to move an object in real life, you’ll need to apply a force on your physics body to move it around.
When you apply a force to a physics body, you use applyForce(direction: at: asImpulse:) and pass in an instance of SCNVector3 for both the force and the position where you want to apply that force, along with whether the force should be applied as an impulse. The force you apply affects both the linear and angular acceleration of the physics body.
An impulse applies the force only once to the physics body, such as when you kick a ball. Forces that aren’t impulses are applied at each step in the physics simulation. SceneKit will add up all applied forces on the object and accelerate the physics body according to the net result of those forces. This can simulate something like a booster rocket, where the force is continuous.
Earlier, you learned that a force is a vector with an x, y and z component. But what does that mean? Take a look at the diagram below:
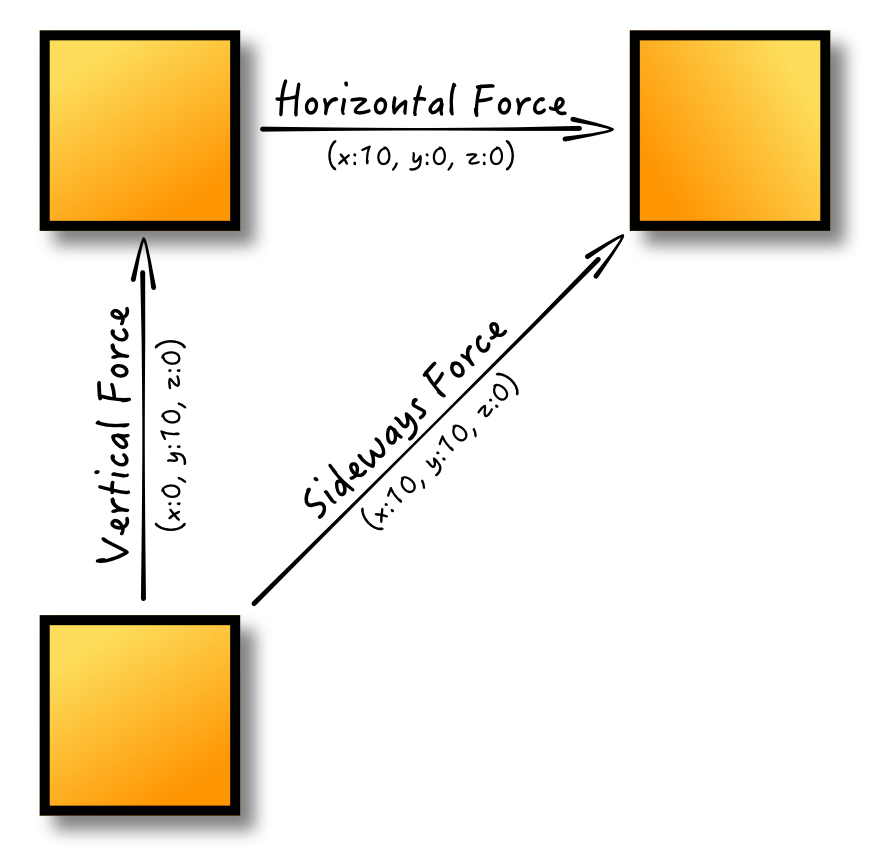
A force has both magnitude and direction, so the vector determines the magnitude of the force for each individual axis. In the example above, applying a force with a vector of (x:0, y:10, z:0) moves the body upwards with a vertical force.
To apply a horizontal force, you would only specify the magnitude of the force on the x axis using a vector of (x:10, y:0, z:0). To move the body left instead of right, you would apply a negative magnitude of force on the x axis. When you combine various vectors together like (x:10, y:10, z:0), you can control exactly how you want the body to move — in this case, diagonally.
Forces can also be applied at a specific position on a physics body to produce different movements:

Again, it helps to think of real-life examples. If you had a block in front of you and pushed it, the block would move differently depending on the spot you applied the push. Applying the same force to the left or right of the body’s center of mass, for example, at (x:1, y:0, z:0) would cause it to spin. Applying the force directly in line with the center of mass at (x:0, y:0, z:0) wouldn’t produce a spin.
Applying Force
Roll up your sleeves — it’s time to apply some force! :]
Add the following code after the line where you create the physics body for geometryNode inside spawnShape():
// 1
let randomX = Float.random(min: -2, max: 2)
let randomY = Float.random(min: 10, max: 18)
// 2
let force = SCNVector3(x: randomX, y: randomY , z: 0)
// 3
let position = SCNVector3(x: 0.05, y: 0.05, z: 0.05)
// 4
geometryNode.physicsBody?.applyForce(force,
  at: position, asImpulse: true)
Taking each commented line in turn:
-
This creates two random float values that represent the x- and y-components of the force. It uses an extension on
Floatfrom the utilities you added earlier in this tutorial. - Next, you use those random components to create a vector to represent this force.
- This creates another vector that represents the position to which the force will be applied. The position is slightly off-center so as to create a spin on the object.
-
Finally, using all those components, you apply the force to
geometryNode’s physics body usingapplyForce(direction: at: asImpulse:).
Build and run; as the object spawns out of thin air, some magical force kicks it up into the air instead of dropping like a dead bird:

As gravity takes its toll, the object eventually falls back down.
Torque
Torque is another rotational force you can apply to a body using applyTorque(torque: asImpulse:). Torque only affects the angular momentum (spin) of the physics body, not the linear momentum (x, y, z). Applying torque causes an object to spin around its center of mass.
To see how torque affects a physics body, take a look at the following illustration:

When applying a torque force, you specify a four-component vector using SCNVector4 rather than a three-component vector as you do with forces. The x-, y- and z-components determine the rotation axis, while the w-component determines the rotation angle, that is, the magnitude of the torque.
Just as you do with applyForce(direction: at: asImpulse:), you can choose whether or not to apply the torque as an impulse, which affects how the physics engine treats the vector.
If the torque is an impulse, the directional vector is treated as an instantaneous change in the angular momentum. Think of spinning a basketball on your finger; to keep the ball spinning, you have to quickly flick the side of the ball with you hand, which applies an a impulse with each flick that instantaneously increases the angular momentum of the ball.
When a torque is not applied as an impulse, it’s applied after each physics simulation step. SceneKit will sum all applied forces and torques, and accelerate the angular force of the physics body according to the net effect of those forces. Think of this as a planet spinning at a constant speed around its own axis.
Adding Flair
Now that you’ve got your geometric object moving, you may have noticed it spawns out of thin air right in the middle of the screen, which looks a bit awkward. To fix that, you’ll shift the camera on the y-axis a bit so that the object spawns off-screen.