How to Make a Waiting Game Like Farmville with SpriteKit and Swift
In this SpriteKit tutorial, you’ll learn how to make your very own waiting game — just like Farmville — with SpriteKit and Swift. By Kevin Colligan.
Introducing Customers
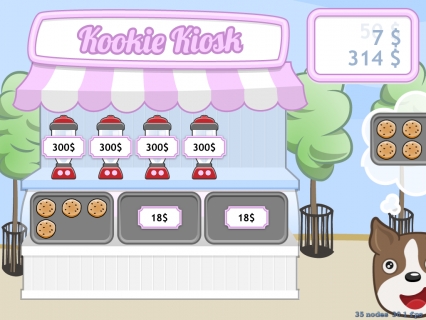
Many waiting games have events that trigger at random points. In Tiny Towers, specialists make the occasional appearance to dramatically boost progress. In Kookie Kiosk, your player will have to serve demanding customers who randomly appear.
Add the following property to GameScene.swift, right below the moneyLabel property:
var customer: Customer?
This stores the current customer using the Customer class already implemented in the starter project. For the moment you'll only serve one customer at a time.
Now you need to handle the timing of your customers' arrivals.
Add the following properties to GameScene.swift, right below the customer property:
var timeOfLastCustomer: CFAbsoluteTime = CFAbsoluteTimeGetCurrent()
var timeTillNextCustomer: CFTimeInterval!
Then add the following method:
func determineTimeTillNextCustomer() {
  timeTillNextCustomer = CFTimeInterval(Float((arc4random_uniform(UInt32(15)) + 15)) * TimeScale)
}
And call it at the bottom of didMove(to:):
determineTimeTillNextCustomer()
The time the last customer appeared will initially be the startup time of the app since no customers have appeared yet. You also store a time interval that indicates how many seconds it will take for the next customer to appear. For this, you use a random value between 15 and 30 seconds. You then multiply this interval by TimeScale so you can control the rate at which customers appear.
Add the following code to the end of update() in GameScene.swift:
// 1
let currentTimeAbsolute = CFAbsoluteTimeGetCurrent()
if customer == nil && currentTimeAbsolute - timeOfLastCustomer > timeTillNextCustomer {
  // 2
  var potentialWishes: [StockItem] = []
  for stockItem in stockItems {
    if stockItem.state == .selling || stockItem.state == .stocked {
      potentialWishes.append(stockItem)
    }
  }
  // 3
  if potentialWishes.count > 0 {
    let random = arc4random_uniform(UInt32(potentialWishes.count))
    let randomStockItem = potentialWishes[Int(random)]
    customer = Customer(type: randomStockItem.type, flavor: randomStockItem.flavor)
    customer!.position = CGPoint(x: frame.size.width + customer!.calculateAccumulatedFrame().size.width / 2, y: customer! .calculateAccumulatedFrame().size.height / 2)
    // 4
    let moveLeft = SKAction.move(by: CGVector(dx: -customer!.calculateAccumulatedFrame().size.width, dy: 0), duration: 1)
    customer?.run(moveLeft)
    addChild(customer!)
  }
}
This is a lot of code, but the logic is straightforward:
- First check how much time has passed since the last customer appeared. If it's greater than the generated time interval, it's time to spawn a new customer.
- Customer's wishes are limited to the types and flavors of items currently in-stock and not sold out. Add all items that match this criteria to the list of potential wishes.
- Select a random index from the list of potential wishes, then create a new customer that wishes for the type and flavor of the randomly selected item.
- Finally, make the customer appear from the right border of the screen. Using a simple
SKActionyou move it from the outside of the screen just until it's entirely on screen.
Build and run your app. When you have items available, a customer will appear randomly and place an order at your kiosk.
Serve me, serve me NOOOOOOW!

Next, you'll add code to serve the customer.
Declare the following method in GameDelegate.swift:
func serveCustomerWithItemOfType(type: String, flavor: String)
This changes the protocol and every class conforming to it should now complain that they no longer conform to the protocol. You should see an error in Xcode stating that Type 'GameScene' does not conform to protocol 'GameDelegate'.
To fix the error, implement the missing method inside the extension at the bottom of GameScene.swift as follows:
func serveCustomerWithItemOfType(type: String, flavor: String) {
  // 1
  if customer?.type == type && customer?.flavor == flavor {
    let _ = updateMoney(by: 50)
    let playSound = SKAction.playSoundFileNamed("coin.wav", waitForCompletion: true)
    run(playSound)
  } else {
    let playSound = SKAction.playSoundFileNamed("hit.wav", waitForCompletion: true)
    run(playSound)
  }
  if customer != nil {
    // 2
    let moveRight = SKAction.move(by: CGVector(dx: customer!.calculateAccumulatedFrame().size.width, dy: 0), duration: 1)
    customer!.run(moveRight, completion: {
      self.customer?.removeFromParent()
      self.customer = nil
    })
    // 3
    timeOfLastCustomer = CFAbsoluteTimeGetCurrent()
    determineTimeTillNextCustomer()
  }
}
Take a look at what happens here:
- First check if the type and the flavor of the item correspond to what the customer desires. If so, add $50 to the player's funds and play a sound effect. Otherwise, play a sound effect indicating that you haven't satisfied this customer's wish. That sound will also play if there's no customer at the current time.
- Next, remove the customer sprite using an instance of
SKActionthat moves the customer off to the right and off the screen. As soon as the customer sprite is off the screen, remove the sprite from the scene and set it tonil. - As soon as the customer leaves the scene you also need to schedule the time when the next customer will arrive. Set the time of the last customer to the current time, and determine how long it will be until the next customer appears.
All that's left to do is to call the new method from touchesBegan(_:with:) in StockItem.swift like so (add this inside the case statement right before the default case):
case .selling:
    gameDelegate.serveCustomerWithItemOfType(type: type, flavor: flavor)
To try this out, build and run and buy some cookies. When a customer arrives, tap the cookies once to start selling, and then again to give a cookie to the customer.
Serving your customers quickly is the key to success!
Sending User Notifications
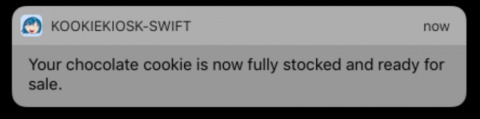
Your game now looks and plays great, but eventually the player will leave the game. Enticing the player with a one-liner notification should lure them back to your game:
Receiving a notification
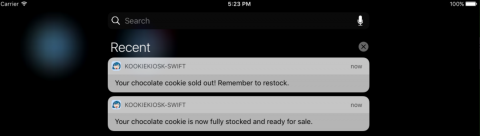
Players can see a list of missed notifications by pulling down the context menu from the top:
Hey you missed something!
You can also update the badge icon:
Pick me!
Local vs. Remote Notifications
There are two different ways to inform players about background changes in an app: local notifications and remote notifications.
While both look and sound the same, there are major differences from the viewpoint of a developer:
- Local Notifications are triggered directly on the device and are easy to implement.
- Remote Notifications are triggered by a remote server, and are more complicated.
Local notifications will work just fine for Kookie Kiosk.
Asking for User Permission
The first step is to ask the player to authorize your app to use notifications. Open AppDelegate.swift and add the following to the import statements at the top of the file:
import UserNotifications
Then add the following to application(_:didFinishLaunchingWithOptions:):
UNUserNotificationCenter.current().requestAuthorization(options: [.alert, .sound, .badge]) { (granted, error) in
  if granted {
    print("notifications granted")
  } else {
    print(error?.localizedDescription)
  }
}
The UserNotifications framework is new in iOS 10, replacing previous platform-specific interfaces for local and remote notifications. Using UNUserNotificationCenter, you ask for permission to send an alert, play a sound and add a badge number to the Kookie Kiosk app icon. The print statements are just for debugging purposes.
Build and run, and you'll see the following dialog:

Tap OK to allow notifications. (If you tap Don't Allow, notifications will not appear).
Note that after the first run, this dialog won't show up again. Instead, the app will use the value stored in the Settings app.