Self-sizing Table View Cells
In this tutorial, you’ll learn how to enable self-sizing table view cells, as well as how to make them resize on-demand and support Dynamic Type. By Kevin Colligan.
Configuring the Table View
First, you need to configure the table view to use properly your custom cell.
Open AuteurListViewController.swift (in the ViewControllers group) and replace tableView(_:cellForRowAt:) with the following:
func tableView(
  _ tableView: UITableView,
  cellForRowAt indexPath: IndexPath
) -> UITableViewCell {
  let cell = tableView.dequeueReusableCell(
    withIdentifier: "Cell",
    for: indexPath) as! AuteurTableViewCell
  let auteur = auteurs[indexPath.row]
  cell.bioLabel.text = auteur.bio
  cell.bioLabel.textColor = UIColor(red:0.75, green:0.75, blue:0.75, alpha:1.0)
  return cell
}
The code above is pretty straightforward: You dequeue a cell, set its information with a text color and return the cell.
In AuteurListViewController.swift, add these two lines of code at the bottom of viewDidLoad():
tableView.rowHeight = UITableView.automaticDimension
tableView.estimatedRowHeight = 600
When you set the row height as UITableViewAutomaticDimension, the table view is told to use the Auto Layout constraints and the contents of its cells to determine each cell’s height.
In order for the table view to do this, you must also provide an estimatedRowHeight. In this case, 600 is just an arbitrary value that works well in this particular instance. For your own projects, you should pick a value that better conforms to the type of data that you’ll display.
Build and run, and you should now see all of each auteur’s bio.

That looks better! But do you know what would make this app even more dramatic? A moody dark background.
Open Main.storyboard, select the cell in the table view of the Auteur scene. In the Attributes inspector find the Background color drop-down menu:
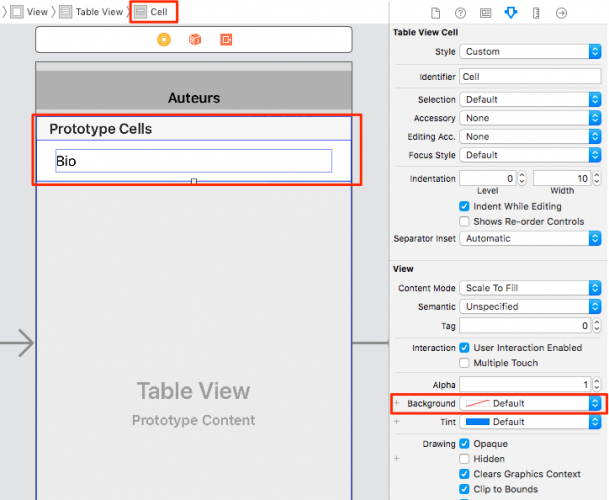
Click Background and select Custom. In the window that pops up, select the RGB Sliders tab and, in the Hex Color # field, enter 161616 — this will give you a nice black-ish background (pure black is not cool enough for auteurs :]).

Press Return; build and run your app. It should look like this:
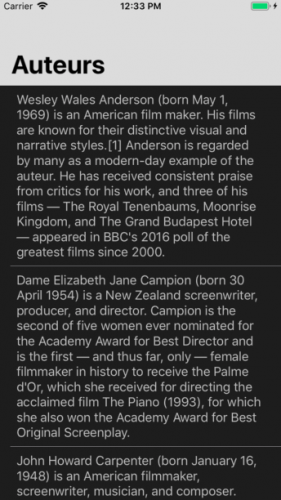
Such drama!
Adding Images
It’s nice that you can now read the entire bio of each artist, but there is still more data to show. Each artist has an image and a name. This app uses an external API to retrieve the information, so there’s a source label as well. Using these additional pieces of data will make the app look much better.
You will need to add an image view to AuteurTableViewCell, and another label for the auteur’s name. You should also add a source label to properly credit the photo. Open AuteurTableViewCell.swift and add the following properties:
@IBOutlet weak var nameLabel: UILabel!
@IBOutlet weak var source: UILabel!
@IBOutlet weak var auteurImageView: UIImageView!
auteurImageView rather than imageView because there is already an imageView property on UITableViewCell.Now, adjust the bio label. It’s tough to see in the Main.storyboard with the dark cell background. Open Main.storyboard, select the bio label and choose a lighter color for the text.

bioLabel color to in Main.storyboard because this code from AuteurListViewController.swift will override it at runtime:
cell.bioLabel.textColor = UIColor(red:0.75, green:0.75,
                                  blue:0.75, alpha:1.0)
cell.bioLabel.textColor = UIColor(red:0.75, green:0.75,
                                  blue:0.75, alpha:1.0)
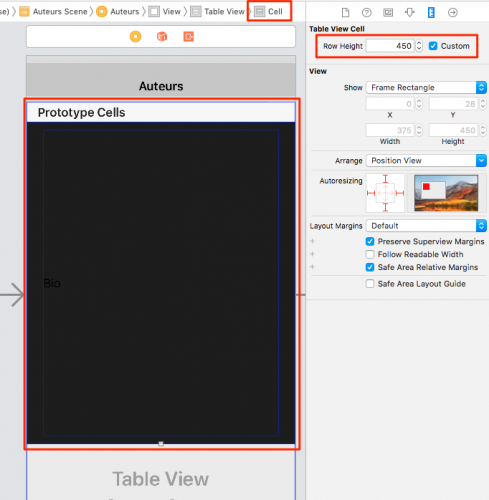
Now, remove the constraints from bio label so that you can add more elements to the cell and shift things around. In the Document Outline, find the Constraints under Bio Label. Select each of the four constraints (hold the Shift key to select them all) and press Delete. Ignore any Auto Layout warnings for now.

Before you add more elements, you’ll need some elbow room. Select the Cell from the Document Outline. Then, in the Size inspector, change the Row Height to 450.
Now, you’ll fill up that space:
- Drag an ImageView into the cell.
- Drag a Label into the cell. Then, set its text to Name and its color to white.
- Drag another Label into the cell. Then, set its text to Source, its Font to System 13.0 and its color to white.
Move the elements in the following order, from top to bottom (you’ll add constraints in a soon):
- ImageView
- Name
- Bio
- Source
Next, connect the outlets for the new image view and labels, using the same technique you used for the bio label:

Now, it’s time to setup more constraints. Starting with the source label moving up, use the Pin menu to add these vertical constraints:
- Pin the bottom edge of the source label to 16 points from the superview.
- Pin the top edge of the source label to 8 points from the bottom of the bio label.
- Pin the top edge of the bio label to 8 points from the bottom of the name label.
- Pin the top edge of the name label 8 points from the bottom of the image view.
- Pin the top edge of the image view 0 points from the top of the content view.
Now, add horizontal constraints. First, use the Pin menu to:
- Pin the leading edge of the name label to 8 points from the superview.
- Pin the trailing edge of the name label to 8 points from the superview.
- Shift-Click the name label, bio label and source label and choose Equal Width from the Pin menu.
- Set the image view to have a height and width of 300 points.
Then, use the Align menu to center all items:
- Shift-click the image view, name label, bio label and source label and choose Horizontally in Container from the Align menu
Finally (well, almost), you need to set the hugging vertical priorities for the name label and bio label. Select the nameLabel in the Size inspector and scroll down until you see Content Hugging Priority. Horizontal and Vertical will both be set to 251 by default. Change the name label’s Vertical priority to 253.

Now, select the bio label and set its Vertical priority to 252, and you’re done with the storyboard for now.
Not exactly. Setting a higher priority on content hugging means that the view will resist growing larger than its intrinsic size. You told the storyboard to make your cell with 450 points tall, which is larger than the intrinsic size of your views. Setting a vertical content hugging priority tells Xcode which view to expand if it needs to fill the space.
Open AuteurListViewController.swift and add the following two lines of code to tableView(_:cellForRowAt:), after you set the bioLabel‘s text:
cell.auteurImageView.image = UIImage(named: auteur.image)
cell.nameLabel.text = auteur.name
cell.source.text = auteur.source
Then, add these lines after you set the textColor:
cell.nameLabel.textColor = .white
cell.bioLabel.textColor = UIColor(red:0.75, green:0.75, blue:0.75, alpha:1.0)
cell.source.textColor = UIColor(red:0.74, green:0.74, blue:0.74, alpha:1.0)
cell.source.font = UIFont.italicSystemFont(ofSize: cell.source.font.pointSize)
cell.nameLabel.textAlignment = .center
cell.selectionStyle = .none
Build and run your app.

Looks pretty good. But auteurs aren’t square, so let’s tweak tableView(_:cellForRowAt:) to add the following code just before return cell:
cell.auteurImageView.layer.cornerRadius = cell.auteurImageView.frame.size.width / 2
Then, head back to Main.storyboard and select the image view. Then, select the Clip to Bounds option in the Attributes inspector:

Build and run your app once more to see your auteur images in a circular frame fit for the MGM lion:

You’re just about done with constraints on the AuteurListViewController, but eagle-eyed readers may have noticed Xcode throwing up a warning.
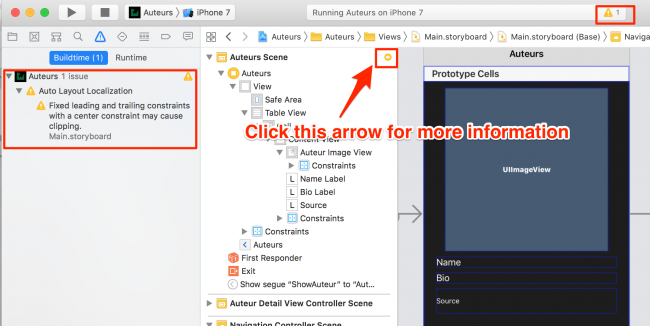
If you click on the warning, you’ll get more information. It turns out that the layout works fine in English, but you may have problems if you localize your app to use a language that reads from right to left.
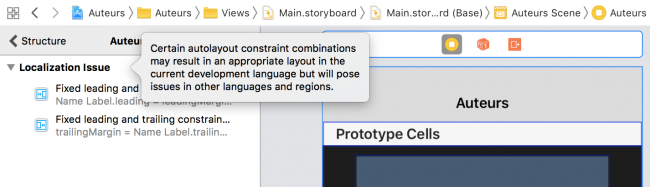
Xcode offers to fix the problem. But you can do it yourself by adjusting one of the name label constraints. Head back to Main.storyboard and select the name label. In the Size Inspector, find the Trailing Space constraint and click Edit.

Change the operator from equal to greater-than or equal.

And the Xcode warning is gone!