Couchbase Tutorial for Android: Getting Started
In this couchbase tutorial, you will learn how to use prebuilt Couchbase Lite databases, model, query, upload and sync data including attachments. By James Nocentini.
Aggregating Data
Data aggregation is a problem across many applications. Couchbase Lite lets you run those data queries using the full capabilities of map and reduce. To run aggregation queries on the rows emitted by the map function, you can use a reduce function to take several rows and aggregate them together in a single object.
You’ll write a view to query the number of answers for each possible choice. You’ll define a map function which returns the number of answers for each question, group them by their value and count the number of rows in each group.
The requirements for this query are:
- Get all answers that belong to a given question
- Count the number of answers for each possible choice
With that in mind, you can emit the question_id and user_answer fields as a compound key with a null value, while using a reduce function to count the number of emitted rows.
Add the following class method to Answer.java:
public static Query getAnswersForQuestion(Database database, String questionId) {
  View view = database.getView("app/answers");
  if (view.getMap() == null) {
    view.setMapReduce(new Mapper() {
      @Override
      public void map(Map<String, Object> document, Emitter emitter) {
        if (document.get("type").equals("answer")) {
          List<Object> keys = new ArrayList<>();
          keys.add((String) document.get("question_id"));
          keys.add((String) document.get("user_answer"));
          emitter.emit(keys, null);
        }
      }
    }, new Reducer() {
      @Override
      public Object reduce(List<Object> keys, List<Object> values, boolean rereduce) {
        return values.size();
      }
    }, "1");
  }
  Query query = view.createQuery();
  query.setGroupLevel(2);
  query.setStartKey(Arrays.asList(questionId));
  query.setEndKey(Arrays.asList(questionId, new HashMap<String, Object>()));
  return query;
}
Grouping is a powerful feature of Couchbase. It’s available on a Query using the numeric groupLevel property, which defaults to 0. It takes the entire range of rows from the query and coalesces together adjacent rows with the same key.
Notice that groupingLevel = 2 coalesces the rows by key. Keys that are arrays are called compound keys; a group level of 2 means the query will coalesce rows with the same question_id and user_answer.
You can read more about setStartKey() and setEndKey() in the Couchbase documentation for configuring queries.
Run the Query
Time to run the query and use the results. Add the following method to QuestionActivity.java:
private Map<String,Integer> getAnswerCounts(QueryEnumerator answers) {

  Map<String,Integer> answerCounts = new HashMap<String, Integer>();

  for (String option: mQuestion.getOptions()) {
    answerCounts.put(option, 0);
  }

  for (QueryRow row : answers) {
    LazyJsonArray<Object> key = (LazyJsonArray<Object>) row.getKey();
    String answer = (String) key.get(1);
    answerCounts.put(answer, (Integer)row.getValue());
  }

  return answerCounts;
}
The above method takes a QueryEnumerator returned from getAnswersForQuestion() and returns a Map that stores an answer count for each option. The map object makes it quick and easy to access answer counts for each option.
Add the following code to onCreate(), just before the line mQuestionOptions = (GridView) findViewById(R.id.question_options):
Query answers = Answer.getAnswersForQuestion(manager.database, mQuestion.get_id());
QueryEnumerator answersQuery = null;
try {
  answersQuery = answers.run();
} catch (CouchbaseLiteException e) {
  e.printStackTrace();
}
This code stores a QueryEnumerator to be used when calling getAnswerCounts() below.
Next, find the call to mQuestionOptions.setAdapter(new QuestionOptionsAdapter(mQuestion.getOptions(), null)); and replace it with this line:
mQuestionOptions.setAdapter(new QuestionOptionsAdapter(mQuestion.getOptions(),
    getAnswerCounts(answersQuery)));
This passes the Map returned from getAnswerCounts() into the GridView adapter, allowing it to display answer counts.
Add a LiveQuery
Next, you’ll add the method to set up a LiveQuery to keep the answer counts updated. A LiveQuery is a great way to keep your interface updated with database changes. It automatically refreshes any time Database changes affect your query.
In QuestionActivity.java, add the following method:
private void showAnswers() {
  DataManager manager = DataManager.getSharedInstance(getApplicationContext());
  Query answersQuery = Answer.getAnswersForQuestion(manager.database, mQuestion.get_id());
  LiveQuery liveQuery = answersQuery.toLiveQuery();

  liveQuery.addChangeListener(new LiveQuery.ChangeListener() {
    @Override
    public void changed(LiveQuery.ChangeEvent event) {
      QueryEnumerator result = event.getRows();

      Map<String,Integer> counts = getAnswerCounts(result);

      final QuestionOptionsAdapter adapter =
          (QuestionOptionsAdapter)mQuestionOptions.getAdapter();

      adapter.setAnswerCounts(counts);

      runOnUiThread(new Runnable() {
        @Override
        public void run() {
          adapter.notifyDataSetChanged();
        }
      });
    }
  });
  liveQuery.start();
}
This code starts by creating a LiveQuery from Answer.getAnswersForQuestion.
You then add a ChangeListener to the liveQuery object. The liveQuery object calls the changed method when required, and passes to it a ChangeEvent object.
Next, you use the previously created getAnswerCounts to return the map of answer counts, which is passed to the GridView adapter to refresh the counts in the UI.
Activity.runOnUiThread updates the GridView on the UI thread.
Add the following line to the end of onCreate in QuestionActivity.java.
showAnswers();
Build and run your app; open a question and answer it (note that you can answer it more than once).

Great job! You can now see your own answers, but what about those from other users?
By running two instances of the app at the same time, both accessing the same Sync Gateway, you will have real-time visibility into other user’s answers!
Simulating Multiple Users
In order to simulate other users answering the questions, you can run the app on a second emulator.
From Android Studio, you can deploy the app on multiple devices simultaneously using the Run button and Shift key :

If your using the reverse proxy method, you will need to make sure it is enabled for both devices. List the running emulators with the following:
$ adb devices

List of devices attached
emulator-5556	device
emulator-5554	device
With more than one emulator device, you must specify the device in ADB commands. Enable the reverse proxy for access to Sync Gateway on both devices:
$ adb -s emulator-5554 reverse tcp:4984 tcp:4984
$ adb -s emulator-5556 reverse tcp:4984 tcp:4984
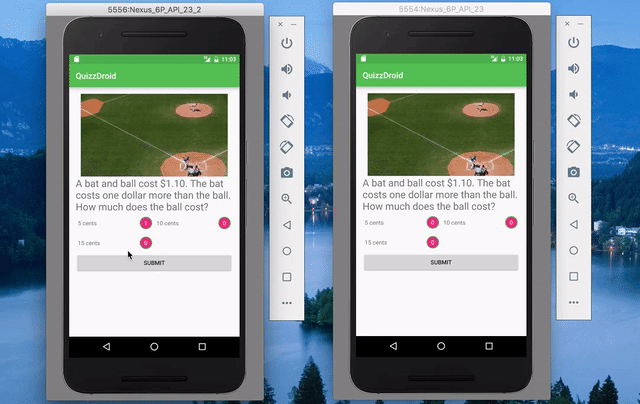
Now you can start answering questions on both devices. Notice the answers are updated automatically across emulators due to the live query.
Well done! You’ve built a shareable quiz application that works equally well when it’s offline.
Where to Go From Here?
You can get the full source code for this project as a downloadable zip or as a repo on GitHub.
The Couchbase Lite Guides have detailed explanation for every concept covered in this Couchbase tutorial. Also check out PhotoDrop, a peer-to-peer photo sharing application and ToDoLite Android, a multi-user todo list application, both built on Couchbase.
If you found this tutorial interesting, you might want to try adding peer-to-peer sync capabilities. Start by replacing the remote URL pointing to a Sync Gateway instance with one from another device on the same local network. The challenge in this case is discovering the IP addresses of peer devices. One solution that works well is to use NsdManager, the Android implementation of mDNS.
Feel free to share your feedback, findings and ask any questions in the comments below or in the forums!