Couchbase Tutorial for Android: Getting Started
In this couchbase tutorial, you will learn how to use prebuilt Couchbase Lite databases, model, query, upload and sync data including attachments. By James Nocentini.
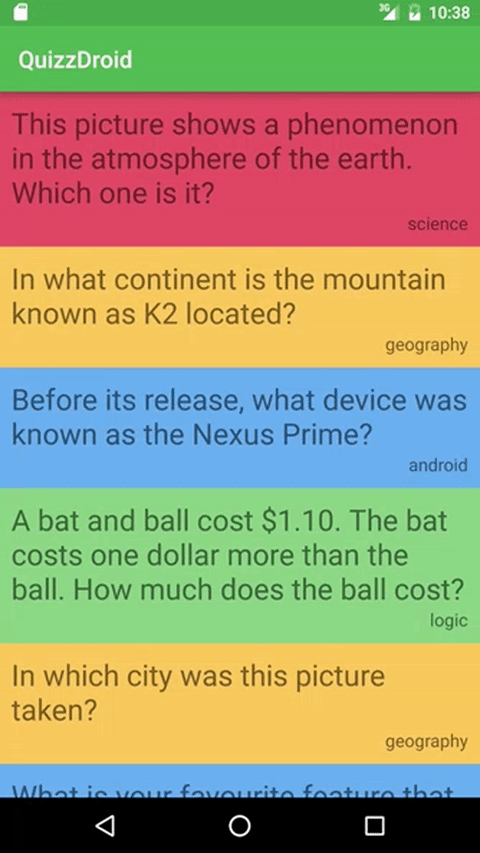
The Home Screen
Couchbase Mobile is a schemaless database, which means there are no restrictions on the database schema. This lets you be quite flexible during development because you don’t need to run database migrations every time the schema changes. Nonetheless, the application code must know about the data structures underneath.
Data Modeling
Below is the data model for this application:
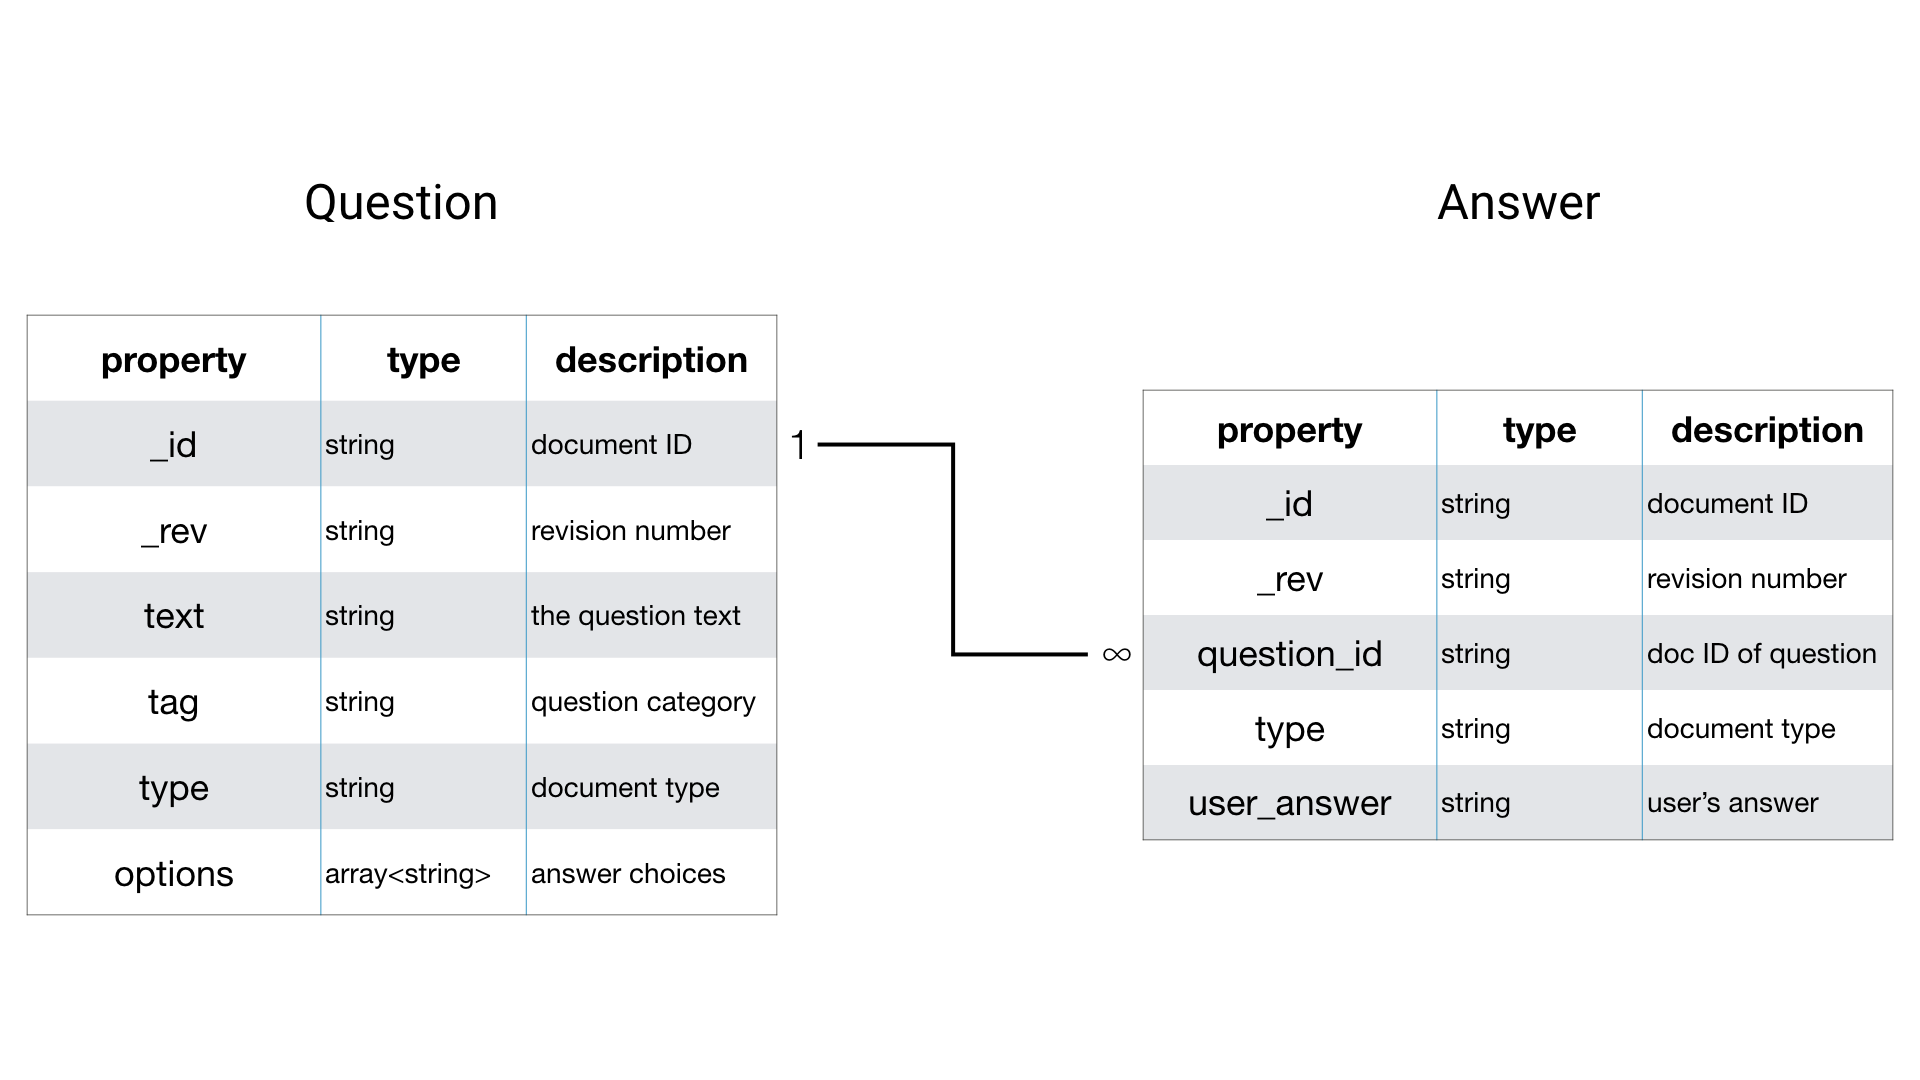
Data records are called documents, and there are two document types: question and answer. The underlying data format is JSON. You can think of a document as a set of key-value pairs. There is a one-to-many relationship between the question and answer documents.
POJO Classes
In order to manage the Couchbase documents, you will create POJO (Plain Old Java Object) classes to map the Couchbase documents to Java objects.
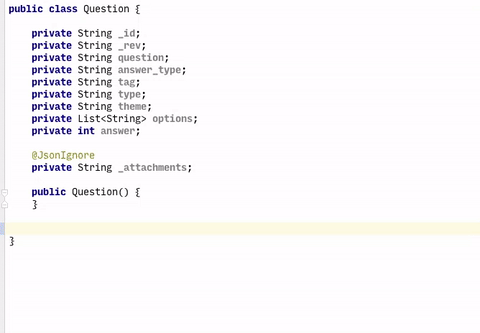
Open model/Question.java and add the following instance variables:
private String _id;
private String _rev;
private String text;
private String tag;
private String type;
private List<String> options;

@JsonIgnore
private String _attachments;
Notice the instance variables are the same as the ones listed in the data model table. These variables represent the keys in the question document type. You will use the Jackson library to convert between POJOs and JSON.
All the properties reserved for Couchbase Lite are prepended with _, such as _id, _rev, and _attachments. The _attachments property is only present if the document contains attachments. You will load attachments through another API method, so it’s marked with the @JsonIgnore annotation, telling Jackson to ignore the variable.
Use the Android Studio CTRL+Enter shortcut to add getter and setter methods for each instance variable.
With the Question model in the application, you can now write a view to index question documents.
Indexing Data
The way to query data in Couchbase Lite is by registering a View and then running a Query on it with QueryOptions. The first thing to know about Couchbase Views is that they have nothing to do with the user interface views.
A View in Couchbase is a persistent index of documents in a database, which can be queried to find data. The main component of a View is its map function. It takes a document’s JSON as input, and emits any number of key-value pairs to be indexed.
First, you will define the view to index the documents of type question. The diagram below shows the result of that map function.

Remember that a view index is a list of key-value pairs, sorted by key. The view’s logic is written in the native language of the platform you’re developing on.
Add the following static method to models/Question.java:
public static Query getQuestions(Database database) {
  // 1
  View view = database.getView("app/questions");
  if (view.getMap() == null) {
    // 2
    view.setMap(new Mapper() {
      @Override
      // 3
      public void map(Map<String, Object> document, Emitter emitter) {
        // 4
        if (document.get("type").equals("question")) {
          emitter.emit(document.get("_id"), null);
        }
      }
    }, "1");
  }
  Query query = view.createQuery();
  return query;
}
This method returns a query from a database View. Walking through the code:
- Request a database view named questions. This will create the view if it doesn’t exist.
- If the view does not already have a mapping, create one with a new
Mapperobject. The second parameter tosetMapis a version number. If your code for the map changes in the future, the version number should be incremented as well. - The Mapper object calls
mapfor each document in the database. - If the document type equals
question, then emit the key-value pair for the view.
Querying and Displaying Data
With the view now defined, you are ready to run a Query on it. The result of a query is an instance of QueryEnumerator, which provides a list of QueryRow objects, each one describing a single row from the view’s index.
Add the following code to the end of the onCreate method in HomeActivity.java:
// 1
QueryEnumerator questions = null;
try {
  questions = Question.getQuestions(manager.database).run();
} catch (CouchbaseLiteException e) {
  e.printStackTrace();
}

// 2
List<Question> data = new ArrayList<>();
for (QueryRow question : questions) {
  Document document = question.getDocument();
  Question model = ModelHelper.modelForDocument(document, Question.class);
  data.add(model);
}

// 3
final HomeAdapter adapter = new HomeAdapter(data);
mRecyclerView.setAdapter(adapter);
This code does the following:
- Runs the query and saves the result in a
questionsvariable. - Loops over the query rows and deserializes the
Questionmodel objects. - Connects the questions to the RecyclerView
Notice the call to ModelHelper.modelForDocument. Open ModelHelper.java, and take a look at modelForDocument. It uses the Jackson library to convert the properties in the question QueryRow object to the Question object.
If you run the app, the screen will still be blank because the Recycler View isn’t drawing the rows. In adapter/HomeAdapter.java, add the following code to onBindViewHolder:
// 1
Question question = mQuestions.get(position);

// 2
switch (question.getTag()) {
  case "science":
    holder.itemView.setBackgroundColor(Color.parseColor("#EC5766"));
    break;
  case "geography":
    holder.itemView.setBackgroundColor(Color.parseColor("#FFC857"));
    break;
  case "android":
    holder.itemView.setBackgroundColor(Color.parseColor("#63ADF2"));
    break;
  case "logic":
    holder.itemView.setBackgroundColor(Color.parseColor("#86CD82"));
}

// 3
holder.mQuestion.setText(question.getText());
holder.mTag.setText(question.getTag());

// 4
holder.itemView.setOnClickListener(new View.OnClickListener() {
  @Override
  public void onClick(View v) {
    if (mOnItemClickListener != null) {
      mOnItemClickListener.OnClick(v, position);
    }
  }
});
This code does the following:
- Retrieves the
questionobject for the requested row position. - Uses the category returned by
getTagto set the background colors. - Sets the content to display in the TextViews for the question text and category.
- Assigns an
onClicklistener to respond when the user taps a question.
Build and run your app; you should now see six questions on the home screen.

Well done! In the next section, you’ll add a row click handler to open the Question activity.
Home Activity → Question Activity
Head back to HomeActivity.java and add the following code to the end of onCreate:
adapter.setOnItemClickListener(new HomeAdapter.OnItemClickListener() {
  @Override
  public void OnClick(View view, int position) {
    Intent intent = new Intent(getApplicationContext(), QuestionActivity.class);
    Question selected = adapter.getQuestions().get(position);
    intent.putExtra(EXTRA_INTENT_ID, selected.get_id());
    startActivity(intent);
  }
});
This code assigns an item click listener to the adapter. When you click an item, an Android intent is created containing the document ID of the selected question as an extra, which is then passed along to start the QuestionActivity.
Build and run. Click on any row to open the question activity. The Question activity is blank, but the next section will take care of that.