Object Pooling in Unity
In this tutorial, you’ll learn how to create your own object pooler in Unity in a fun 2D shooter. By Mark Placzek.
Get Back in the Pool
Instead of destroying bullets when they're no longer required, you'll return them to the pool.
There are two methods that destroy unneeded player bullets:
-
OnTriggerExit2D()in theDestroyByBoundaryscript removes the bullet when it leaves the screen. -
OnTriggerEnter2D()in theEnemyDroneControllerscript removes the bullet when it collides and destroys an enemy.
Open DestroyByBoundary in MonoDevelop and replace the contents of the OnTriggerExit2D method with this code:
if (other.gameObject.tag == "Boundary") {
  if (gameObject.tag == "Player Bullet") {
    gameObject.SetActive(false);
  } else {
    Destroy(gameObject);
  }
}
Here's a generic script that you can attach to any number of objects that need removal when they leave the screen. You check if the object that triggered the collision has the Player Bullet tag -- if yes, you set the object to inactive instead of destroying it.
Similarly, open EnemyDroneController and find OnTriggerEnter2D(). Replace Destroy(other.gameObject); with this line of code:
other.gameObject.SetActive(false);
Wait!
Yes, I can see you hovering over the play button. After all that coding, you must be itching to check out your new object pooler. Don't do it yet! There is one more script to modify -- don't worry, it's a tiny change. :]
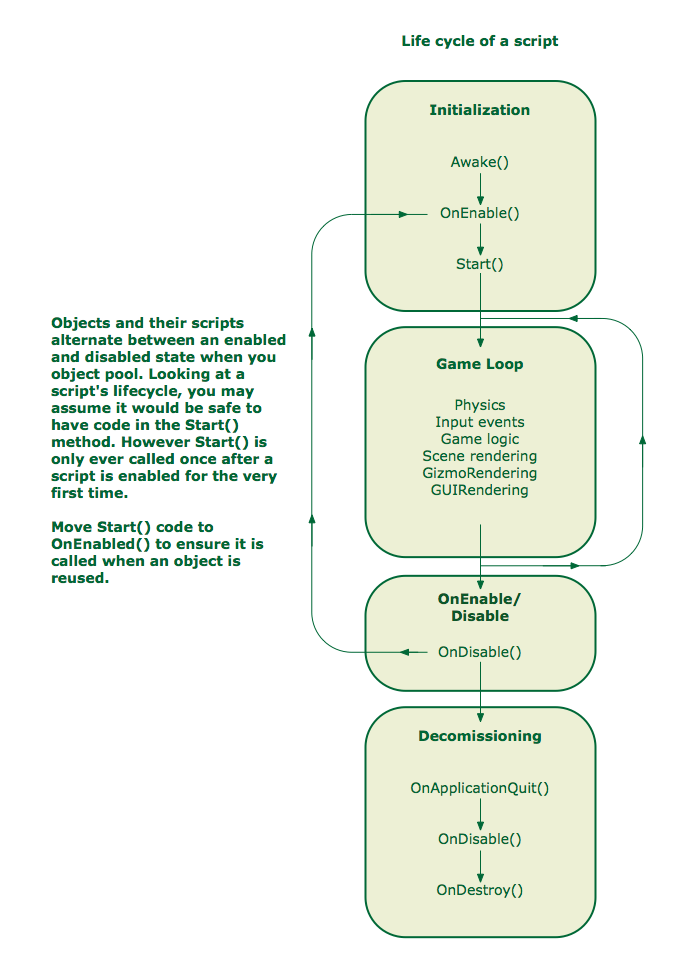
Open the BasicMovement script in MonoDevelop and rename the Start Method to OnEnable.
One gotcha when you use the object pool pattern is remembering that the lifecycle of your pooled object is a little different.
Ok, now click play. :]
As you shoot, the inactive player bullet clones in the Hierarchy become active. Then they elegantly return to an inactive state as they leave the screen or destroy an enemy drone.
Well Done!

But what happens when you collect all those power-ups?
Running out of ammo eh?

As the game designer, you enjoy supreme powers, such as limiting players' firepower to encourage a more focused strategy as opposed to just shooting everything and everywhere.
You could exert your powers to do this by adjusting the number of bullets you initially pool to get this effect.
Conversely, you can also go in the other direction pool a huge number of bullets to cover all power-up scenarios. That begs a question: why would you pool 100 bullets for the elusive ultimate power-up when 90 percent of the time 50 bullets is adequate?
You would have 50 bullets in memory that you would only need rarely.

The Incredible Expanding Object Pool
Now you'll modify the object pool so you can opt to increase the number of pooled objects at runtime if needed.
Open the ObjectPooler script in MonoDevelop and add this new public variable:
public bool shouldExpand = true;
This code creates a checkbox in the Inspector to indicate whether it's possible to increase the number of pooled objects.
In GetPooledObject(), replace the line return null; with the following code.
if (shouldExpand) {
  GameObject obj = (GameObject)Instantiate(objectToPool);
  obj.SetActive(false);
  pooledObjects.Add(obj);
  return obj;
} else {
  return null;
}
If a player bullet is requested from the pool and no inactive ones can be found, this block checks to see it's possible to expand the pool instead of exiting the method. If so, you instantiate a new bullet, set it to inactive, add it to the pool and return it to the method that requested it.
Click play in Unity and try it out. Grab some power-ups and go crazy. Your 20 bullet object pool will expand as needed.

Object Pool Party
Invariably, lots of bullets mean lots of enemies, lots of explosions, lots of enemy bullets and so on.
To prepare for the onslaught of madness, you'll extend the object pooler so it handles multiple object types. You'll take it a step further and will make it possible to configure each type individually from one place in the Inspector.
Add the following code above the ObjectPooler class:
[System.Serializable]
public class ObjectPoolItem {
}
[System.Serializable] allows you to make instances of this class editable from within the Inspector.
Next, you need to move the variables objectToPool, amountToPool and shouldExpand into the new ObjectPoolItem class. Heads up: you'll introduce some errors in the ObjectPooler class during the move, but you'll fix those in a minute.
Update the ObjectPoolItem class so it looks like this:
[System.Serializable]
public class ObjectPoolItem {
  public int amountToPool;
  public GameObject objectToPool;
  public bool shouldExpand;
}
Any instance of ObjectPoolItem can now specify its own data set and behavior.
Once you've added the above public variables, you need make sure to delete those variables from the ObjectPooler. Add the following to ObjectPooler:
public List<ObjectPoolItem> itemsToPool;
This is new list variable that lets you hold the instances of ObjectPoolItem.
Next you need to adjust Start() of ObjectPooler to ensure all instances of ObjectPoolItem get onto your pool list. Amend Start() so it looks like the code below:
void Start () {
  pooledObjects = new List<GameObject>();
  foreach (ObjectPoolItem item in itemsToPool) {
    for (int i = 0; i < item.amountToPool; i++) {
    GameObject obj = (GameObject)Instantiate(item.objectToPool);
    obj.SetActive(false);
    pooledObjects.Add(obj);
    }
  }
}
In here, you added a new foreach loop to iterate through all instances of ObjectPoolItem and add the appropriate objects to your object pool.
You might be wondering how to request a particular object from the object pool – sometimes you need a bullet and sometimes you need more Neptunians, you know?
Tweak the code in GetPooledObject so it matches the following:
public GameObject GetPooledObject(string tag) {
  for (int i = 0; i < pooledObjects.Count; i++) {
    if (!pooledObjects[i].activeInHierarchy && pooledObjects[i].tag == tag) {
      return pooledObjects[i];
    }
  }
  foreach (ObjectPoolItem item in itemsToPool) {
    if (item.objectToPool.tag == tag) {
      if (item.shouldExpand) {
        GameObject obj = (GameObject)Instantiate(item.objectToPool);
        obj.SetActive(false);
        pooledObjects.Add(obj);
        return obj;
      }
    }
  }
  return null;
}
GetPooledObject now takes a string parameter so your game can request an object by its tag. The method will search the object pool for an inactive object that has a matching tag, and then it returns an eligible object.
Additionally, if it finds no appropriate object, it checks the relevant ObjectPoolItem instance by the tag to see if it's possible to expand it.