NSCollectionView Tutorial
In this NSCollectionView tutorial for macOS, you’ll learn how to add a collection view to your app and populate it with a data source – using Swift! By Gabriel Miro.
Creating a Collection View Item
Now you need to create an NSCollectionViewItem subclass to display your data elements.
Go to File/New/File…, select macOS/Source/Cocoa Class and click Next.
Set the Class field to CollectionViewItem, the Subclass of field to NSCollectionViewItem, and check Also create XIB for user interface.
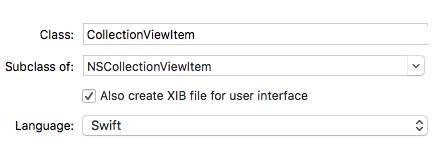
Click Next, and in the save dialog, select Controllers from Group and click Create.
Open CollectionViewItem.swift and replace the entire class with this:
import Cocoa
class CollectionViewItem: NSCollectionViewItem {

  // 1
  var imageFile: ImageFile? {
    didSet {
      guard isViewLoaded else { return }
      if let imageFile = imageFile {
        imageView?.image = imageFile.thumbnail
        textField?.stringValue = imageFile.fileName
      } else {
        imageView?.image = nil
        textField?.stringValue = ""
      }
    }
  }

  // 2
  override func viewDidLoad() {
    super.viewDidLoad()
    view.wantsLayer = true
    view.layer?.backgroundColor = NSColor.lightGray.cgColor
  }
}
In here, you do the following:
- Define the
imageFileproperty that holds the model object to be presented in this item. When set, itsdidSetproperty observer sets the content of the item’s image and label. - Change the background color of the item’s view.
Add Controls to the View
When you created CollectionViewItem.swift you selected “Also create a XIB” which produced the CollectionViewItem.xib nib file. For sake of order, drag the nib to the Resources group just below Main.storyboard.
The View in the nib is the root view for a subtree of controls to be displayed in each item. You’re going to add an image view for the slide and a label for the file name.
Open CollectionViewItem.xib.
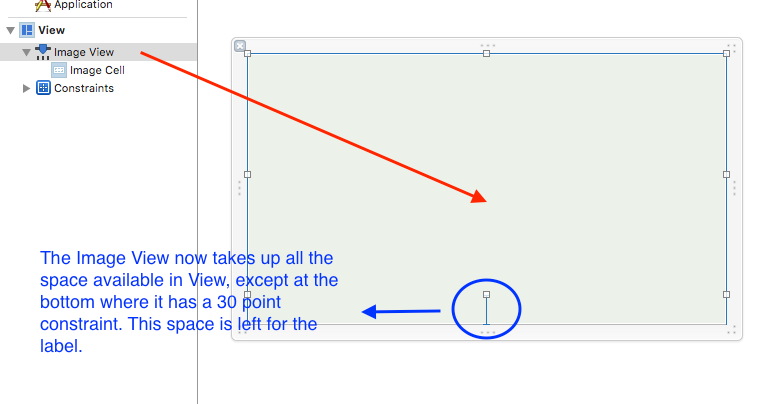
Add an NSImageView:
- From the Object Library, add an Image View to View.
- Click Pin from the Auto Layout toolbar to set its constraints.
- Set the top, leading and trailing constraints to 0, the bottom to 30. Choose Update Frames: Items of New Constraints and click Add 4 Constraints.

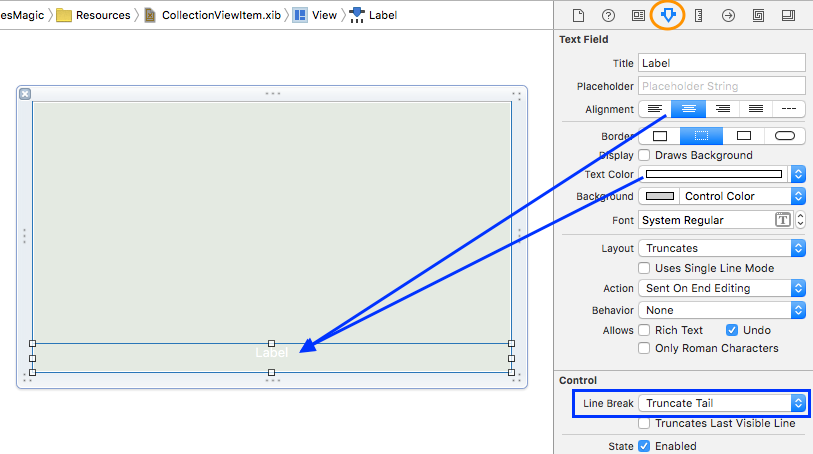
Add a label:


- From the Object Library, add a Label below the Image View.
- Click the Pin button. Set the top, bottom, trailing and leading constraints to 0. Choose Update Frames: Items of New Constraints and click Add 4 Constraints.
Select the Label, and in the Attributes Inspector set the following attributes:
- Alignment to center
- Text Color to white
- Line Break to Truncate Tail
Add a CollectionViewItem to the Nib and Connect the Outlets
Though the File’s Owner in the nib is of the type CollectionViewItem, it is simply a placeholder. When the nib is instantiated, it must contain a “real” single top-level instance of NSCollectionViewItem.
Drag a Collection View Item from the Object Library and drop it into Document Outline. Select it, and in the Identity Inspector, set its Class to CollectionViewItem.

In the CollectionViewItem.xib, you need to connect the view hierarchy to the outlets of CollectionViewItem. In the xib:
- Select Collection View Item and show the Connections Inspector.
- Drag from the
viewoutlet to the View in the Document Outline - In the same way, connect the
imageViewandtextFieldoutlets to Image View and Label in the Document Outline

Populate the Collection View
You need to implement the data source protocol so the view knows the answers to these questions:
- How many sections are in the collection?
- How many items are in each section?
- Which item is associated with a specified index path?
Open ViewController.swift and add the following extension at the end of the file:
extension ViewController : NSCollectionViewDataSource {

  // 1
  func numberOfSections(in collectionView: NSCollectionView) -> Int {
    return imageDirectoryLoader.numberOfSections
  }

  // 2
  func collectionView(_ collectionView: NSCollectionView, numberOfItemsInSection section: Int) -> Int {
    return imageDirectoryLoader.numberOfItemsInSection(section)
  }

  // 3
  func collectionView(_ itemForRepresentedObjectAtcollectionView: NSCollectionView, itemForRepresentedObjectAt indexPath: IndexPath) -> NSCollectionViewItem {

    // 4
    let item = collectionView.makeItem(withIdentifier: "CollectionViewItem", for: indexPath)
    guard let collectionViewItem = item as? CollectionViewItem else {return item}

    // 5
    let imageFile = imageDirectoryLoader.imageFileForIndexPath(indexPath)
    collectionViewItem.imageFile = imageFile
    return item
  }

}
- When your app doesn’t support sections, you can omit this method because a single section will be assumed.
- This is one of two required methods for
NSCollectionViewDataSource. Here you return the number of items in the specified section. - This is the second required method. It returns a collection view item for a given
indexPath. - This method instantiates an item from a nib where its name equals the value of the
identifierparameter. It attempts to reuse an unused item of the requested type, and if nothing is available it creates a new one. - Gets the model object for the given
IndexPathand sets the content of the image and the label.
Set the Data Source
Your next step is to define the data source.
Open Main.storyboard and select the collection view.
Open the Connections Inspector and locate dataSource in the Outlets section. Drag from the adjacent button to the View Controller in Document Outline View.

Build and run, and your collection view should display images from the Desktop Pictures folder:

Voilà! It was worth all that work!
Troubleshooting
If you don’t see images, then you probably just missed something small.
- Are all the connections in the Connections Inspector set as instructed?
- Did you set the
dataSourceoutlet? - Did you use the right type for custom classes in the Identity Inspector.
- Did you add the top level
NSCollectionViewItemobject and change its type toCollectionViewItem? - Is the value for the
identifierparameter inmakeItemWithIdentifieridentical to the nib name?
Loading Items When the Model Changes
To display images from a folder other than the system’s Desktop Pictures folder, select File/Open Another Folder… and choose a folder that has image formats such as jpg or png.
But nothing seems to change in the window — it still displays the images from the Desktop Pictures folder. Although when you look at the console log, you can see the file names are from the new folder.
To refresh the collection view’s visible items, you need to call its reloadData() method.
Open ViewController.swift and add this code to the end of loadDataForNewFolderWithUrl(_:):
collectionView.reloadData()
Build and run. You’ll now have the correct images displayed in the window.