Introduction to Unity: Getting Started – Part 1/2
Learn about the Unity Interface and how to create your first game in Unity with this Unity Tutorial for Beginners. By Brian Moakley.
4.8 (220) · 1 Review
7. Play Buttons
The Play Buttons let you start and stop your game. The first button is the Play button:

A few things happen when you click the Play button. First, your game will start, as expected. The button set will also turn blue to indicate that the game is in motion.
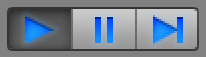
The entire design interface dims as well to indicate that the game is active.
The top image is the editor while making the game whereas the lower image is the game being played.

Remember, any changes you make on-the-fly will be lost once you stop the game. It’s a common mistake for Unity beginners and regulars alike to run the game and make a pile of changes – which all disappear when the game stops!
The interface dimming is supposed to remind you of this unfortunate fact, but I find the color shade is too subtle to remind me all the time.
Thankfully, you can change this shading to suit.

The Playmode tint field controls the dimming color of the interface.

- Select Edit ► Preferences to open the Unity Preferences window.
- Select the Colors tab on the left hand side and you’ll see a list of colors in the Colors section that you can customize in your interface.
- You can choose any color by clicking in the indicated area.
- To reset to the the original color, click the Use Defaults button.
Next up is the Pause button:

This pauses and lets you make modifications to the game.
Just like in play mode, those modifications will be lost once you stop the game. Editing GameObjects during play and pausing is a cheat and balancing system that allows you to experiment on your game without the danger of permanently breaking it.
Finally, there’s the Step button:
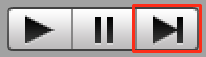
This lets you step through your game one frame at a time. This is handy when you want to observe animations on a frame-by-frame basis, or when you want to check the state of particular GameObjects during gameplay.

8. Miscellaneous Editor Settings
The final controls handle miscellaneous aspects of the editor. The first is the Collab drop-down, found on the right hand side of the toolbar.

This is one of Unity’s latest services that helps big teams collaborate on a single project seamlessly.
The next button is the Services button. The services button is where you can add additional Unity services to the game. Clicking on the button will prompt you to create a Unity Project ID.

Once you add a Project ID, you will be able to add services to your project.
For instance, you can add cloud builds to your project. This automatically builds your project for you so you don’t have to wait for each project build.
You can also add:
- Analytics
- In-Game Ads
- Multiplayer Support
- In-App Purchasing
- Performance Reporting
- Collaborate
You can also add team members to the project, set age restrictions, and change some important project settings.
Next up is the Account button. This lets you manage your Unity account. It allows you to view your account data, sign in and out, and upgrade.

The fourth button is the Layers button.

You can use Layers for such things as preventing the rendering of GameObjects, or excluding GameObjects from physics events like collisions.
The final button, Layouts, lets you create and save the layout of views in your editor and switch between them. Unity is wonderfully customizable. Each of the different views in a layout can be resized, docked, moved, or even removed from the editor altogether.
Watch as windows auto snap and dock as you drag them. Alternatively you can keep them floating or drag them onto another monitor if you have a multi-monitor setup!
Don’t worry though — you can always add views you’ve removed back to the interface. This lets you customize the editor for a specific task. For example, you may not want to have the Game view open when working with an animation, but you’d prefer to have the Animator and Animation views open side-by-side.
Rearranging the windows every time you want this specific layout would become tiresome very quickly.
Unity saves you from this tedium by letting you save your layouts, which you can switch to at any time via the Layouts button. You can easily open a new window using the Window menu item.
Layouts can be saved and recalled using the Layout button. Unity comes with a few pre-defined layouts, such as the 2 by 3 layout and Wide layouts. The Window option from the menubar provides a list of views that you can add to your editor.

As you work on games in Unity, you’ll find yourself creating many different layouts to support your various development tasks.
That covers the majority of the views you’ll use when making games, but there are many more views beyond just these. You can see an overview of all of them in the Unity documentation.
Where to Go From Here?
You made it through the introduction to Unity. In Part 2 of this tutorial you’ll put these concepts into practice as you create a small space shooter. You’ll learn how to build games the “Unity” way, and gain a deeper understanding of the various tools and techniques you can leverage to create your very own game.
Do you have any questions about this tutorial, the Unity editor, or any of its associated views? Join the discussion below and I’ll get back to you!