Intermediate Debugging with Xcode 8
Learn some intermediate debugging techniques with Xcode 8, such as breakpoint logging, conditional breakpoints, basic LLDB usage, and more. By George Andrews.
MARKs, TODOs, FIXMEs, oh my!
The next thing to do is to create some friends so you can keep a list of gift suggestions for them.
Build and run the app. When the app starts, press the Add a friend cell. The app loads another view controller with a name text field and a date picker. Enter a name and select a birthday, then press the OK button.
You’ll be returned back to the root controller with your new friend added to the table. Click Add a friend once again.
Enter the name of another friend, only this time select February 31st, 2010 for the birthday.
In a typical date picker, such a date would not be selectable. This is not the case with this amazing app! In a fit of delirium, I decided to be ambitious and use a regular picker, instead of the date picker. This meant I was forced to rewrite all of the date validation logic which, of course, created some new bugs.
Press the OK button. Tragically, the invalid date is recorded. It’s time to do a little debugging to see what is wrong.
Open AddFriendViewController.swift and add a breakpoint at the start of the method saveFriend.
Note: Finding methods in large files can take a lot of time. The long way is to manually scan each line until you stumble into it. The second way is to use the jump bar, then scroll through the list of method names. I actually prefer to do a search, although not in the search navigator, but in the jump bar itself. To do so, click on the jump bar then just start typing. Your method name should show up like it were in a regular search field.

In the simulator, press the Add a friend button, like your previous entry, and add an invalid date. Step down the method until you reach this line:
if name.hasText, isValidDateComposedOf(month: selectedMonth, day: selectedDay, year: selectedYear) {
|
if name.hasText, isValidDateComposedOf(month: selectedMonth, day: selectedDay, year: selectedYear) {
Step into isValidDateComposedOf. The validation code failure is clear — there isn’t any! There’s just a comment promising to do it sometime in the future.
Comments are a nice way to describe the particular meaning of code chunks, but using them for task management is futile. Even on tiny projects, there are just too many items to juggle, and comment tasks will be forgotten.
The best way to prevent them from being lost is to really make them stand out. One way to make them stand out is to leave messages in the jump bar.
Open the jump bar. You should see something like this:

You can also write FIXME: or MARK:.
MARK:, TODO:, and FIXME: comments you add to your code will appear in the jump bar. In addition, if you add a hyphen to a MARK: comment after the colon (e.g. MARK: - UIPickerViewDataSource), the jump bar message will add a horizontal rule above the comment to make it even easier to read!
These statements don’t have the same emphasis as a compiler warning or error, but they at least have a greater visibility than a lone comment at the bottom of a method. It’s best to leave comments for, well, comments and keep a list of required tasks outside of the codebase.
Now, wouldn’t it be great if Xcode gave you a compiler warning whenever you have TODO: or FIXME: comments in your code? I thought so!
To do this, you’ll add a build script to the project that will search the code for all TODO: and FIXME: comments and then flag them as compiler warnings.
To add a build script, choose the project from the Project Navigator and select Build Phases. From here click on the + button to add a New Run Script Phase.

Next, add the following code to your build script:
TAGS="TODO:|FIXME:"
find "${SRCROOT}" \( -type f -name "*.swift" \) -print0 | xargs -0 egrep --with-filename --line-number --only-matching "($TAGS).*\$" | perl -p -e "s/($TAGS)/ warning: \$1/"
Your Run Script code should look like this:

Now build your project and show the issue navigator:

The TODO: comment now shows up as a Shell Script Invocation Warning and you won’t be able to forget about it! :]
Variables View & Return Values
Now let’s take a quick look at a nice little feature included since Xcode 4.4.
Restart the app, keeping the breakpoint fixed in the empty validation method.
Add a new friend and press the OK button. The application should stop at the breakpoint and show the debugger with the Variables & Console view displayed.
Now, step out of the code. Look at the Variables view in the debugger. You should see this:

Displaying the return value is a feature that hasn’t received much attention, but it makes your life so much easier. Consider that the code was being called from here:
if name.hasText, isValidDateComposedOf(month: selectedMonth, day: selectedDay, year: selectedYear) {
|
if name.hasText, isValidDateComposedOf(month: selectedMonth, day: selectedDay, year: selectedYear) {
The code that calls isValidDateComposedOf immediately uses the return value in an expression.
Before this was added to Xcode, you needed to break apart the line, then log out the value if you wanted to inspect return values. Now, you can simply step out of a method and see the return value right in the debugger.
Conditions for Successful Debugging
There are times when it’s necessary to change the state of your program at certain intervals. Sometimes these changes occur in the middle of large sequences of events, which makes normal debugging quite difficult. That’s where conditions come into play.
Now that you have some friends listed in the app, tap one of their names in the root view controller to bring up the gift interface. It’s just a simple grouped table that can be sorted on whether the gift can be purchased or not.
Press the add button on the navigation bar to add a new item. For the name, put shoes. For the price, put 88.00. Tap the OK button. The shoes should now appear in the gift table.
Now add the following items:
- Candles / 1.99
- Sleigh / 540.00
- XBox / 299.99
- iPad / 499.99
Yikes. You realized that you actually wanted to record a PS4 instead of an XBox. You could simply tap the cell to edit it, but for the sake of demonstration, you will edit it through the debugger.
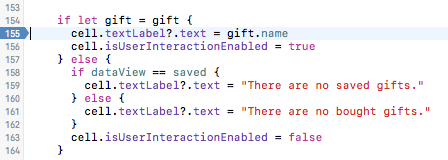
Open up GiftListsViewController.swift and look for cellForRowAtIndexPath. Add a breakpoint on the line underneath the code that reads:
if let gift = gift {
Like so:
Now right-click or Control-click the breakpoint, and select Edit Breakpoint.
It’s time to add your condition. Think of this like a simple if statement. Add the following code:
gift.name == "Xbox"

Now, press the Bought segmented control button. The table reloads new data, but the breakpoint doesn’t trip.
Press the Saved segmented control button. This time everything should pause with the highlighted item selected in the debugger console.
In the debugger console, add the following:
expression gift.name = "PS4"
Now, press the Run button and the table will continue to load. The PS4 replaces the XBox in the gift results.
You can get the same results by setting the number of iterations. Control-click or right-click the break point, and select Edit Breakpoint. This time, remove the condition from its text field, and select the number 2. Click Done.

Now press the Bought segmented control then the Saved segmented control. You should hit the same breakpoint.
To confirm that you are at the correct object, type:
(lldb) po gift
Now revert the object back to its previous state:
(lldb) expression gift.name = "Xbox"
The table should now reflect the update. Isn’t real-time editing just great?