GameplayKit Tutorial: Entity-Component System, Agents, Goals, and Behaviors
In this GameplayKit tutorial, you will learn how to create flexible and scalable games by using the Entity-Component system with Agents, Goals and Behaviors. By Ryan Ackermann.
Adding Your Castles
Open GameScene.swift and add this property to the bottom of your list of properties:
var entityManager: EntityManager!
This is to store an instance of the helper class you just created.
Next add this code to the bottom of didMove(to:):
// 1
entityManager = EntityManager(scene: self)

// 2
let humanCastle = Castle(imageName: "castle1_atk")
if let spriteComponent = humanCastle.component(ofType: SpriteComponent.self) {
  spriteComponent.node.position = CGPoint(x: spriteComponent.node.size.width/2, y: size.height/2)
}
entityManager.add(humanCastle)

// 3
let aiCastle = Castle(imageName: "castle2_atk")
if let spriteComponent = aiCastle.component(ofType: SpriteComponent.self) {
  spriteComponent.node.position = CGPoint(x: size.width - spriteComponent.node.size.width/2, y: size.height/2)
}
entityManager.add(aiCastle)
Let’s review this section by section:
- Creates an instance of the
EntityManagerhelper class you created in the previous section. - Creates an instance of the
Castleentity you created earlier to represent the human player. After creating the castle it retrieves the sprite component and positions it on the left hand side of the screen. Finally, it adds it to the entity manager. - Similar code to set up the AI player’s castle.
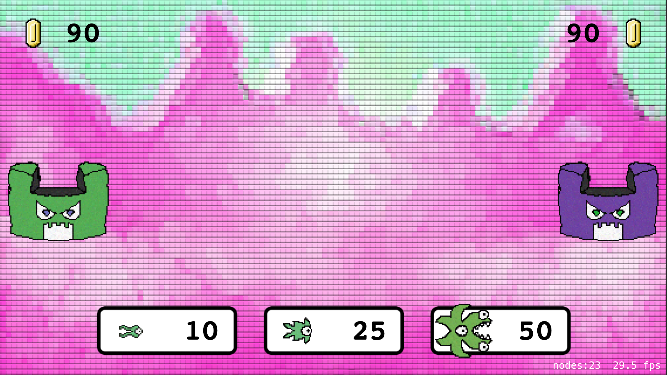
That’s it! Build and run and you’ll see your castles in the game:

Your Second Component
When you develop games with an entity-component system, all the data you need for your game objects must be stored in some kind of component.
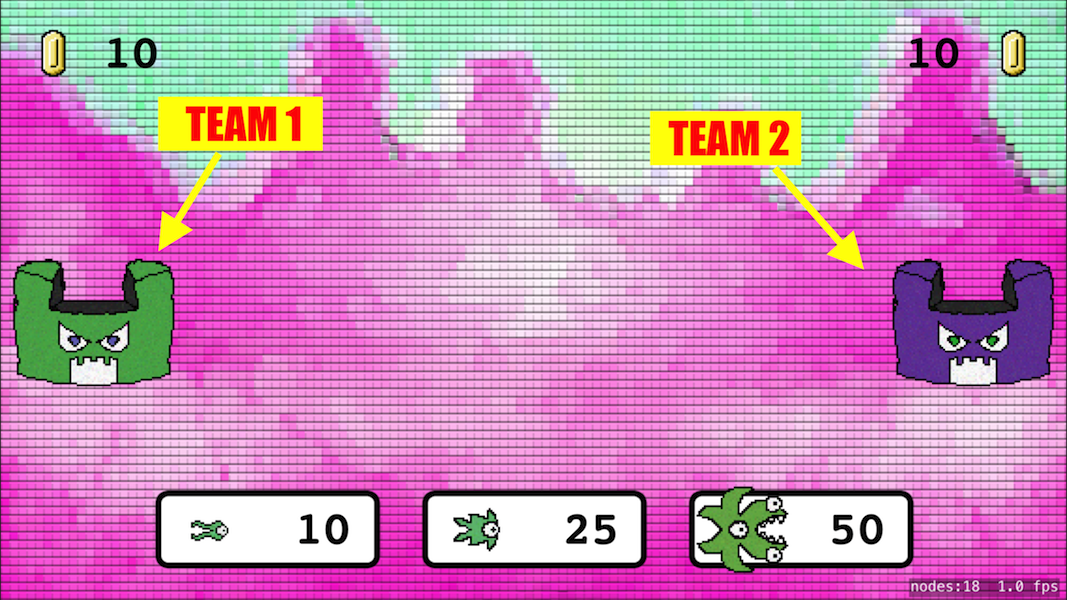
One data point you’ll need to keep track of for this game is which team an object belongs to – team 1 or team 2. Since that information doesn’t belong on your sprite component, you might want to have an entity that doesn’t belong to either team. Let’s create a new component for that.
Right-click your Components group, select New File.., select the iOS/Source/Swift File template, and click Next. Name the new file TeamComponent and click Create.
Open TeamComponent.swift and replace the contents with the following:
import SpriteKit
import GameplayKit

// 1
enum Team: Int {
  case team1 = 1
  case team2 = 2

  static let allValues = [team1, team2]

  func oppositeTeam() -> Team {
    switch self {
    case .team1:
      return .team2
    case .team2:
      return .team1
    }
  }
}

// 2
class TeamComponent: GKComponent {
  let team: Team

  init(team: Team) {
    self.team = team
    super.init()
  }

  required init?(coder aDecoder: NSCoder) {
    fatalError("init(coder:) has not been implemented")
  }
}
This is a fairly simple file, so I’ll just point out two things:
- This is an enumeration to keep track of the two teams in this game – team 1 and team 2. It also has a helper method to return the opposite team, which will come in handy later.
- This is a very simple component that simply keeps track of the team for this entity.
Now that you have this new component, let’s update your castle entity to use it. Open Castle.swift and modify the initializer to take the team as a parameter:
init(imageName: String, team: Team) {
Then add this line to the bottom of init(imageName:team:):
addComponent(TeamComponent(team: team))
This adds your new component to the castle entity. Finally, open GameScene.swift and replace the line that initializes humanCastle with the following:
let humanCastle = Castle(imageName: "castle1_atk", team: .team1)
Similarly, replace the line that initializes aiCastle with the following:
let aiCastle = Castle(imageName: "castle2_atk", team: .team2)
Build and run the game. You shouldn’t notice any changes, but you have now successfully associated a new set of data to your entity which will come in handy later.
Teaming up is essential in a war
Your Third Component
Another piece of data you need to keep track of is each player’s current coins. In this game, since there’s a single castle on each side, you’ll think of the castle as the “commander” for each player. so the castle will be a good place to store this information.
Right-click your Components group, select New File.., select the iOS/Source/Swift File template, and click Next. Name the new file CastleComponent and click Create.
Open CastleComponent.swift and replace the contents with the following:
import SpriteKit
import GameplayKit

class CastleComponent: GKComponent {

  // 1
  var coins = 0
  var lastCoinDrop = TimeInterval(0)

  override init() {
    super.init()
  }

  required init?(coder aDecoder: NSCoder) {
    fatalError("init(coder:) has not been implemented")
  }

  // 2
  override func update(deltaTime seconds: TimeInterval) {
    super.update(deltaTime: seconds)

  // 3
    let coinDropInterval = TimeInterval(0.5)
    let coinsPerInterval = 10
    if (CACurrentMediaTime() - lastCoinDrop > coinDropInterval) {
      lastCoinDrop = CACurrentMediaTime()
      coins += coinsPerInterval
    }
  }
}
This component is a little different than the others, so let’s review this in more detail.
- These 2 properties store the number of coins in the castle and the last time coins were earned.
- SpriteKit calls
update(deltaTime:)on each frame of the game. Note that SpriteKit does not call this method automatically; there’s a little bit of setup to get this to happen, which you’ll do shortly. - This code spawns coins periodically.
Switch to Castle.swift and add this to the bottom of init(imageName:team:):
addComponent(CastleComponent())
Next, you need to add the code I mentioned earlier to get your updateWithDeltaTime(_:) method to be called. To do this, switch to EntityManager.swift and add this new property to the top of the class:
lazy var componentSystems: [GKComponentSystem] = {
  let castleSystem = GKComponentSystem(componentClass: CastleComponent.self)
  return [castleSystem]
}()
Think of GKComponentSystem as a class that stores a collection of components. Here, you create a GKComponentSystem to keep track of all of the CastleComponent instances in your game.
You then put the GKComponentSystem that stores components into an array. Right now it’s the only object in the array, but you’ll be adding more to this later.
Add this to the end of add(_:):
for componentSystem in componentSystems {
  componentSystem.addComponent(foundIn: entity)
}
Here whenever you add a new entity, you add it to each of the component systems in your array (right now, it only contains the castle component system). Don’t worry – if your entity does not contain a castle component, nothing will happen.
Add this line to the property declarations:
var toRemove = Set<GKEntity>()
Then add this to the end of remove(_:):
toRemove.insert(entity)
Note that instead of removing the entity directly from the component system, you add it to a toRemove set, so you can remove it later. This is going to make it easier in the next step to remove an entity while you are enumerating the objects in a component system, since Swift does not let you modify a collection while you are iterating through it.
Add this new method to the bottom of the class:
func update(_ deltaTime: CFTimeInterval) {
  // 1
  for componentSystem in componentSystems {
    componentSystem.update(deltaTime: deltaTime)
  }

  // 2
  for currentRemove in toRemove {
    for componentSystem in componentSystems {
      componentSystem.removeComponent(foundIn: currentRemove)
    }
  }
  toRemove.removeAll()
}
Let’s review this section by section:
Here you loop through all the component systems in the array and call update(deltaTime:) on each one. This causes each component system to call update(deltaTime:) on each component in their system in turn.
This actually demonstrates the whole purpose and benefit of using GKComponentSystem. The way this is set up, components are updated one system at a time. In games, it’s often convenient to have precise control over the ordering of the processing of each system (physics, rendering, etc).
- Here’s where you loop through anything in the
toRemovearray and remove those entities from the component systems.
There’s one last helper method to add to this file. Add this method to the bottom of the class:
func castle(for team: Team) -> GKEntity? {
  for entity in entities {
    if let teamComponent = entity.component(ofType: TeamComponent.self),
      let _ = entity.component(ofType: CastleComponent.self) {
      if teamComponent.team == team {
        return entity
      }
    }
  }
  return nil
}
Basically, this is a handy method to get the castle for a particular team. In here you loop through all of the entities in the game and check to see any entities that have both a TeamComponent and a CastleComponent – which should be the two castles in the game. You then check to see if the team matches the passed in parameter and return that.
Let’s hook this up to the game scene now. Open GameScene.swift, scroll down to the bottom of the file and add this code to the bottom of the update(_:) method:
let deltaTime = currentTime - lastUpdateTimeInterval
lastUpdateTimeInterval = currentTime

entityManager.update(deltaTime)

if let human = entityManager.castle(for: .team1),
  let humanCastle = human.component(ofType: CastleComponent.self) {
  coin1Label.text = "\(humanCastle.coins)"
}
if let ai = entityManager.castle(for: .team2),
  let aiCastle = ai.component(ofType: CastleComponent.self) {
  coin2Label.text = "\(aiCastle.coins)"
}
Here you call the update(_:) method on the entity manager. Then you find the castle (and castle component) for each team, and update the labels with the current coin values for each castle.
Build and run, and see the money begin to roll in!