File Handling Tutorial for Server-Side Swift Part 1
In this two-part file handling tutorial, we’ll take a close look at Server-side Swift file handling and distribution by building a MadLibs clone. By Brian Schick.
Putting It All Together
Now, add the routes for these handlers by appending the following to boot(router:):
sessions.get("add-template", use: addTemplateGetHandler)
sessions.post(UploadFormData.self, at: "add-template", use: addTemplatePostHandler)
The last thing you need is to add a button to direct users to the custom template entry page. Open Resources/Views/templates.leaf, and add the following to its content declaration, immediately after the closing curly brace of its else clause:
<h2 class="or"> Or... Make Your Own!</h2>
<form method="get" action="/templates/add-template">
  <button type="submit"> Let Me Make My Own Retro-Awesome Template! </button>
</form>
OK! Build and run and, once again, open your browser to localhost:8080.

Click the new button at the bottom of this page to navigate to the custom template entry form. Feel free to enter your own template using the syntax described above, or use the following values:
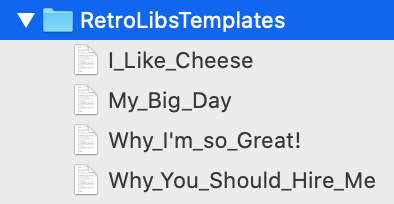
Title: My Big Day
Template Contents: I woke up and made myself a {container} of {breakfast food}. It tasted {adjective}.
Click the submit button, and you'll see a just-slightly over-the-top confirmation that your new creation was saved to disk.

Take a quick peek in Xcode, and you'll see your template has also been added to the RetroLibsTemplates directory.
To complete the loop, return to the landing page, select your new template, fill in your custom words and enjoy your very own timeless masterpiece. Ah... the wonders of technology!

Adding Concurrency
RetroLibs is now functionally complete. But it's hiding a lurking problem: Its core read and write methods are currently both synchronous — they block the main thread. This isn't a big deal in a trial app running locally for one user. At scale, however, it could bring a web app to its knees.
The backstory here is that FileManager was written long before modern Server-Side Swift was a glimmer in Apple's eye, with Apple-native-app needs in mind. It's generally entirely reasonable for reads and writes to be synchronous within the context of a mobile or desktop app, since apps have a single user.
But in a server-side context, web apps can scale to large numbers of concurrent users. And although threads often save the day in native app contexts, there are only a finite number of threads available — often, one per CPU core.
For this reason, threads aren't the primary answer to performance at scale in a scalable web app. What you need is a library written from the ground up to support the unique needs of the server.

Fortunately, Apple offers precisely this feature with SwiftNIO.
Using SwiftNIO
If you've worked with Swift on the server, you know that SwiftNIO provides the high-performance engine that underlies both Kitura and Vapor. So it'll come as no surprise to use it to address your thread-blocking issues.
Return to FileController.swift, and take a look at the signature of readFileSync(_:). Notice that it directly returns an optional Data type. It's of course expected – and very convenient – for a blocking, synchronous method to return a result directly.
But with SwiftNIO, processes like these are asynchronous. They return EventLoopFuture-wrapped results that aren't guaranteed to be ready when downstream methods receive them.
This means that your asynchronous file writing method needs to return Future<Data>, and you need to adjust your receiving functions to accommodate Future-wrapped results.

This approach lets frameworks handle the heavy lifting of working with SwiftNIO so developers can focus on simpler, more immediately-useful APIs. You'll take that approach here.
Enough talk. Make it so!
Reading a File Asynchronously
Locate FileController's readFileAsync(_:on:). Replace its contents with:
try req.fileio().read(file: workingDir + filename)
If you think that after all this buildup, the solution was almost trivial, you're right! This deceptively simple line of code does a lot of heavy lifting on your behalf. It's one of a great many things that are easy to overlook when considering the value of frameworks like Kitura and Vapor.

This code asynchronously reads the contents of a file in a manner guaranteed not to block your web app. It throws an error if it encounters any problems, and returns the file contents within a Future.
Notice that its signature differs from its synchronous counterpart in that it takes a Request object: You need this to attach EventLoopFutures to the request's thread, as well as to return a Future-wrapped result.
Getting a List of Templates Asynchronously
Open TemplateCollection.swift. See how its init() needs to read the content of each template in real time? That's natural for synchronous methods, but it doesn't square with your new asynchronous read method.
Quite simply, if you call the read method within the context of the initializer, you don't have a way to "reach inside" the Future-wrapped Data. You'll need to add a layer of indirection to solve this.
First, add this new initializer below the current one:
init(withTemplates templates: [Template]) {
  self.templates = templates
}
Here, you quite simply pass the buck back to the calling context, in effect saying "You take care of handing me a set of unwrapped templates, buddy." Here's how you'll make this happen.
Immediately below the new initializer, add this static method:
static func makeFutureSelf(on req: Request) throws -> Future<TemplateCollection> {
  // 1
  guard let templateNames = FileController.getTemplateNames() else {
      throw Abort(.preconditionFailed)
  }
  // 2
  var futureFileData: [Future<Data>] = []
  for name in templateNames {
    try? futureFileData.append(FileController.readFileAsync(name, on: req))
  }
  // 3
  return futureFileData.flatten(on: req).map(to: TemplateCollection.self) {
    dataArray in
    var templates = [Template]()
    for (index, data) in dataArray.enumerated() {
      guard let content = String(data: data, encoding: .utf8)
        else { continue }
      let (templateParts, tags) = content.toRetroLibsClips()
      let template = Template(name: templateNames[index],
        templateParts: templateParts, tags: tags)
      templates.append( template )
    }
    guard templates.count > 0 else { throw Abort(.preconditionFailed) }
    return TemplateCollection(withTemplates: templates)
  }
}
Here's what you're doing in this method:
- Get an array of template names from
FileController. - Loop through the template names, and call
readFileAsync(_:on:)to create an array ofFuture. - Flatten the array of
Futureto a singleFuturecontaining aTemplateCollection. Within themapclosure, you do have direct access to the unwrapped templates SwiftNIO has read from disk. This gives you the platform you need to call your new initializer with an already-assembled set of templates. W00t!
Now, you just need to wire this new functionality to your routes. Open WebController.swift, and replace the contents of templatesHandler(_:) with:
try TemplateCollection.makeFutureSelf(on: req)
  .flatMap(to: View.self) { templateCollection in
  let context = templateCollection
  try req.session()["templates"] = context.toJSONString()
  return try req.view().render("templates", context)
}
Here, you rely on flatMap(to:) to "step inside" the Future (a heady concept!), and work directly with the Future-nested Data. You do your work within this closure, and Vapor and SwiftNIO take care of resolving the chain of Futures before presenting the results in your view.

Build and run your app, then open your browser to localhost:8080 again. You'll notice that... well, everything works exactly the same as before. Exciting, right?
Actually, of course, if you're building web apps, it really is exciting to know your app stands ready to scale as needed! :]