State Management With Provider
See how to architect your Flutter app using Provider, letting you readily handle app state to update your UI when the app state changes. By Jonathan Sande.
Models
Now, take a look at the models folder:
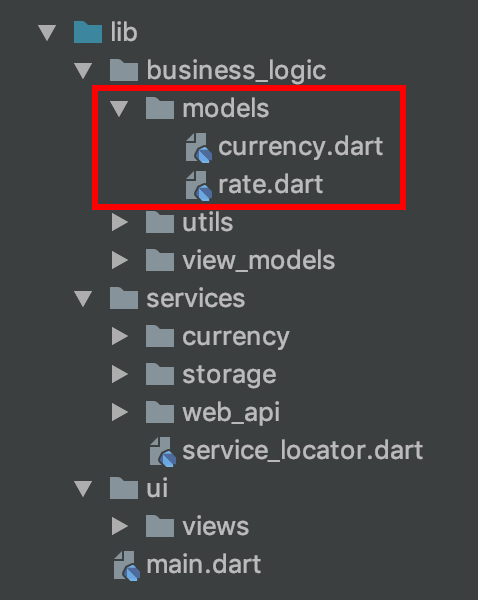
These are the data structures that the business logic uses, which you can also call entities. This tutorial uses them to pass data from the services, too, though some people recommend using separate models for that.
The Class Responsibility Collaboration (CRC) card model is a good way to decide which data models your app needs. Here are the cards for this app (click the image for a larger view):

In the end, the app only uses the Currency and Rate data structures. These represent the cash and the exchange rate that you’d need even if you didn’t have a computer.
View Models
The job of a view model is to take the data and put it in a presentable form that the UI can use.
Expand view_models. You’ll see that there are two view models, one for the screen that calculates the actual currency exchange and another for choosing which currencies you want to convert.

Since the process for making any view model is basically the same, you’ll only make the view model for choosing your favorite currencies. The starter project already includes the other one.
Open choose_favorites_viewmodel.dart. Ignore the gray squiggle lines beneath some of the import code at the top of the file. These squiggles mean the libraries are not currently in use, but you’ll use them soon.
Beneath the top-most import statements, you’ll see the following code.
// 1
import 'package:flutter/foundation.dart';

// 2
class ChooseFavoritesViewModel extends ChangeNotifier {
  // 3
  final CurrencyService _currencyService = serviceLocator<CurrencyService>();

  List<FavoritePresentation> _choices = [];
  List<Currency> _favorites = [];

  // 4
  List<FavoritePresentation> get choices => _choices;

  void loadData() async {
    // ...
    // 5
    notifyListeners();
  }

  void toggleFavoriteStatus(int choiceIndex) {
    // ...
    // 5
    notifyListeners();
  }
}
Note the following things in the code above:
- To let the UI listen for changes in the view model, you use
ChangeNotifier. This class is part of the Flutterfoundationpackage. - You’re extending the view model class with
ChangeNotifier. Another option would be to use a mixin.ChangeNotifierprovidesnotifyListeners(), which you’ll use below. - A service handles the work of getting and saving the currencies and exchange rates. Here, you get an implementation of the abstract
CurrencyService. The actual implementation is hidden from the view model. You can swap it out with different implementations, or even fake data, and the view model will be none the wiser. - Anyone who has a reference to this view model can access a list of currencies choices that the user can favorite. The UI will use that list to create a clickable
ListView. - After loading the list of currencies or changing the favorite status of a currency, you can notify the listeners. The UI will listen so it can reflect the change visually.
Still in choose_favorites_viewmodel.dart, look below ChooseFavoritesViewModel. There’s a second class called FavoritePresentation:
class FavoritePresentation {
  final String flag;
  final String alphabeticCode;
  final String longName;
  bool isFavorite;

  FavoritePresentation(
      {this.flag, this.alphabeticCode, this.longName, this.isFavorite,});
}
To keep the data in a simple format, the member variables of this model class are all strings. Remember to keep as much logic out of the UI as possible.
In ChooseFavoritesViewModel, replace the loadData() method with the following (including adding two private helper methods):
  void loadData() async {
    final rates = await _currencyService.getAllExchangeRates();
    _favorites = await _currencyService.getFavoriteCurrencies();
    _prepareChoicePresentation(rates);
    notifyListeners();
  }

  void _prepareChoicePresentation(List<Rate> rates) {
    List<FavoritePresentation> list = [];
    for (Rate rate in rates) {
      String code = rate.quoteCurrency;
      bool isFavorite = _getFavoriteStatus(code);
      list.add(FavoritePresentation(
        flag: IsoData.flagOf(code),
        alphabeticCode: code,
        longName: IsoData.longNameOf(code),
        isFavorite: isFavorite,
      ));
    }
    _choices = list;
  }

  bool _getFavoriteStatus(String code) {
    for (Currency currency in _favorites) {
      if (code == currency.isoCode)
        return true;
    }
    return false;
  }
Here, loadData() asks the currency service for a list of all the available exchange rates and also the ones that the user has favorited. Next, _prepareChoicePresentation() converts the list to a form that the UI can easily present. The helper _getFavoriteStatus() just determines whether a currency is favorited.
To finish up the view model logic, replace the toggleFavoriteStatus() method with the following (again, adding two helper methods that in this case add and remove currency choices from favorites):
  void toggleFavoriteStatus(int choiceIndex) {
    final isFavorite = !_choices[choiceIndex].isFavorite;
    final code = _choices[choiceIndex].alphabeticCode;
    _choices[choiceIndex].isFavorite = isFavorite;
    if (isFavorite) {
      _addToFavorites(code);
    } else {
      _removeFromFavorites(code);
    }
    notifyListeners();
  }

  void _addToFavorites(String alphabeticCode) {
    _favorites.add(Currency(alphabeticCode));
    _currencyService.saveFavoriteCurrencies(_favorites);
  }

  void _removeFromFavorites(String alphabeticCode) {
    for (final currency in _favorites) {
      if (currency.isoCode == alphabeticCode) {
        _favorites.remove(currency);
        break;
      }
    }
    _currencyService.saveFavoriteCurrencies(_favorites);
  }
As soon as toggleFavoriteStatus() is called, the view model asks the currency service to save the new favorite status. Since it also calls notifyListeners(), the UI immediately shows the change in state as well.
Congratulations, you’ve now finished the view model.
In summary, all your view model needs to do is to extend ChangeNotifier and call notifyListeners() whenever it needs to update the UI with the new state. You can follow this pattern even with futures and streams.
Services
A service is a class that does some work for you. You have three services in your app: Currency Exchange, Storage, and Web API. Look at the app architectural diagram and you’ll see the three services on the right in red.

The process for making a service in Dart is pretty easy.
- First you make an abstract class containing the methods you’ll need.
- Then you write a concrete implementation of the abstract class.
Since the process of making a service is the same every time, you’ll only make the Web API Service. The starter project already contains the Currency Exchange Service and Storage Service.
Creating an Abstract Service Class
To start making the Web API Service, open web_api.dart.

You’ll see the following code:
import 'package:moolax/business_logic/models/rate.dart';

abstract class WebApi {
  Future<List<Rate>> fetchExchangeRates();
}
The class is abstract, so it doesn’t actually do anything. However, it does tell you what your app expects it to do: It should get a list of exchange rates from the web. How you actually do that is up to you.
Having the freedom to easily change implementations means that, during development, you can use fake data. Just hard-code it so the app thinks it’s from the web. Then come back later and write the code to access the web.