How To Make an App Like Runkeeper: Part 2
This is the second and final part of a tutorial that teaches you how to create an app like Runkeeper, complete with color-coded maps and badges! By Richard Critz.
What Does a Runner Have to Do to Get a Gold Medal Around Here?
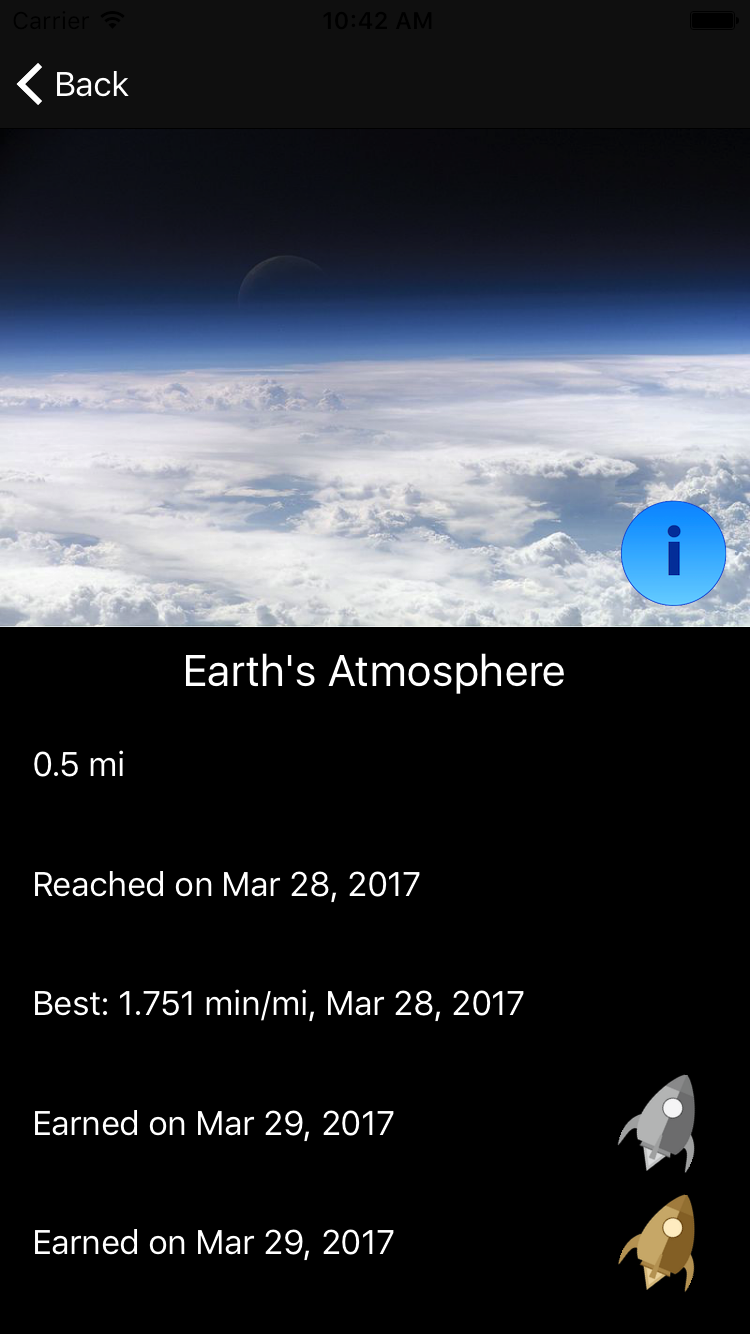
The last view controller for MoonRunner is the one that shows the details of a badge. Add a new Swift file to your project and name it BadgeDetailsViewController.swift. Replace the contents of the file with the following:
import UIKit

class BadgeDetailsViewController: UIViewController {

  @IBOutlet weak var badgeImageView: UIImageView!
  @IBOutlet weak var nameLabel: UILabel!
  @IBOutlet weak var distanceLabel: UILabel!
  @IBOutlet weak var earnedLabel: UILabel!
  @IBOutlet weak var bestLabel: UILabel!
  @IBOutlet weak var silverLabel: UILabel!
  @IBOutlet weak var goldLabel: UILabel!
  @IBOutlet weak var silverImageView: UIImageView!
  @IBOutlet weak var goldImageView: UIImageView!

  var status: BadgeStatus!
}
This declares all of the outlets you will need to control the UI and the BadgeStatus that is the model for this view.
Next, add your viewDidLoad():
override func viewDidLoad() {
  super.viewDidLoad()
  let badgeRotation = CGAffineTransform(rotationAngle: .pi / 8)

  badgeImageView.image = UIImage(named: status.badge.imageName)
  nameLabel.text = status.badge.name
  distanceLabel.text = FormatDisplay.distance(status.badge.distance)
  let earnedDate = FormatDisplay.date(status.earned?.timestamp)
  earnedLabel.text = "Reached on \(earnedDate)"

  let bestDistance = Measurement(value: status.best!.distance, unit: UnitLength.meters)
  let bestPace = FormatDisplay.pace(distance: bestDistance,
                                    seconds: Int(status.best!.duration),
                                    outputUnit: UnitSpeed.minutesPerMile)
  let bestDate = FormatDisplay.date(status.earned?.timestamp)
  bestLabel.text = "Best: \(bestPace), \(bestDate)"

  let earnedDistance = Measurement(value: status.earned!.distance, unit: UnitLength.meters)
  let earnedDuration = Int(status.earned!.duration)
}
This sets up the labels in the detail view from the BadgeStatus information. Now, you need to set up the gold and silver badges.
Add the following code to the end of viewDidLoad():
if let silver = status.silver {
  silverImageView.transform = badgeRotation
  silverImageView.alpha = 1
  let silverDate = FormatDisplay.date(silver.timestamp)
  silverLabel.text = "Earned on \(silverDate)"
} else {
  silverImageView.alpha = 0
  let silverDistance = earnedDistance * BadgeStatus.silverMultiplier
  let pace = FormatDisplay.pace(distance: silverDistance,
                                seconds: earnedDuration,
                                outputUnit: UnitSpeed.minutesPerMile)
  silverLabel.text = "Pace < \(pace) for silver!"
}

if let gold = status.gold {
  goldImageView.transform = badgeRotation
  goldImageView.alpha = 1
  let goldDate = FormatDisplay.date(gold.timestamp)
  goldLabel.text = "Earned on \(goldDate)"
} else {
  goldImageView.alpha = 0
  let goldDistance = earnedDistance * BadgeStatus.goldMultiplier
  let pace = FormatDisplay.pace(distance: goldDistance,
                                seconds: earnedDuration,
                                outputUnit: UnitSpeed.minutesPerMile)
  goldLabel.text = "Pace < \(pace) for gold!"
}
The gold and silver image views are hidden when necessary by setting their alphas to 0. This works around an interaction between nested UIStackViews and Auto Layout.
Finally, add the following method:
@IBAction func infoButtonTapped() {
  let alert = UIAlertController(title: status.badge.name,
                                message: status.badge.information,
                                preferredStyle: .alert)
  alert.addAction(UIAlertAction(title: "OK", style: .cancel))
  present(alert, animated: true)
}
This will be invoked when the info button is pressed and will show a pop-up with the badge's information.
Open Main.storyboard. Connect the outlets of BadgeDetailsViewController:
- badgeImageView
- nameLabel
- distanceLabel
- earnedLabel
- bestLabel
- silverLabel
- goldLabel
- silverImageLabel
- goldImageLabel
Connect the action infoButtonTapped() to the info button. Finally, Select the Table View in the Badges Table View Controller Scene.

Check the User Interaction Enabled checkbox in the Attributes Inspector:

Open BadgesTableViewController.swift and add the following extension:
extension BadgesTableViewController: SegueHandlerType {
  enum SegueIdentifier: String {
    case details = "BadgeDetailsViewController"
  }

  override func prepare(for segue: UIStoryboardSegue, sender: Any?) {
    switch segueIdentifier(for: segue) {
    case .details:
      let destination = segue.destination as! BadgeDetailsViewController
      let indexPath = tableView.indexPathForSelectedRow!
      destination.status = statusList[indexPath.row]
    }
  }

  override func shouldPerformSegue(withIdentifier identifier: String, sender: Any?) -> Bool {
    guard let segue = SegueIdentifier(rawValue: identifier) else { return false }
    switch segue {
    case .details:
      guard let cell = sender as? UITableViewCell else { return false }
      return cell.accessoryType == .disclosureIndicator
    }
  }
}
This takes care of passing a BadgeStatus to BadgeDetailsViewController when the user taps a badge in the table.
isUserInteractionEnabled to true after the cell is configured and before it is displayed. As a result, you must implement shouldPerformSegue(withIdentifier:sender:) to prevent accessing badge details for unearned badges. If later versions of iOS 11 correct this error, this method can be dropped.Build and run. Check out your new badges' details!
Carrot Motivation
Now that you have a cool new badge system, you need to update the UI of the existing app to incorporate it. Before you can do that, you need a couple of utility methods to determine the most recently earned badge and the next badge to earn for a given distance.
Open Badge.swift and add these methods:
static func best(for distance: Double) -> Badge {
  return allBadges.filter { $0.distance < distance }.last ?? allBadges.first!
}

static func next(for distance: Double) -> Badge {
  return allBadges.filter { distance < $0.distance }.first ?? allBadges.last!
}
Each of these methods filters the list of badges depending on whether they have been earned or are, as yet, unearned.
Now, open Main.storyboard. Find the Button Stack View in the New Run View Controller Scene. Drag a UIImageView and a UILabel into the Document Outline. Make sure they are at the top of Button Stack View:

Select both of these new views and select Editor\Embed In\Stack View. Change the resulting Stack View's properties as follows:
- Axis: Horizontal
- Distribution: Fill Equally
- Spacing: 10
- Hidden: checked

Set the Image View's Content Mode to Aspect Fit.
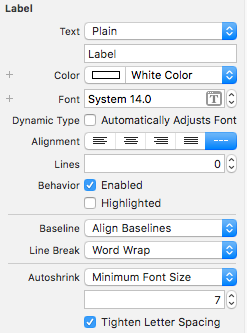
Change the Label's properties as follows:
- Color: White Color
- Font: System 14.0
- Lines: 0
- Line Break: Word Wrap
- Autoshrink: Minimum Font Size
- Tighten Letter Spacing: checked
Use your favorite Assistant Editor technique to connect outlets from the new Stack View, Image View and Label, named as follows:
@IBOutlet weak var badgeStackView: UIStackView!
@IBOutlet weak var badgeImageView: UIImageView!
@IBOutlet weak var badgeInfoLabel: UILabel!
With luck, this problem will be resolved in a future release of Xcode 9.
Badge Stack View in Main.storyboard. Then add the following line to viewDidLoad() in NewRunViewController.swift:
badgeStackView.isHidden = true // required to work around behavior change in Xcode 9 beta 1
badgeStackView.isHidden = true // required to work around behavior change in Xcode 9 beta 1
Open NewRunViewController.swift and import AVFoundation:
import AVFoundation
Now, add the following properties:
private var upcomingBadge: Badge!
private let successSound: AVAudioPlayer = {
  guard let successSound = NSDataAsset(name: "success") else {
    return AVAudioPlayer()
  }
  return try! AVAudioPlayer(data: successSound.data)
}()
successSound is created as an audio player for the "success sound" that will be played each time a new badge is earned.
Next, find updateDisplay() and add:
let distanceRemaining = upcomingBadge.distance - distance.value
let formattedDistanceRemaining = FormatDisplay.distance(distanceRemaining)
badgeInfoLabel.text = "\(formattedDistanceRemaining) until \(upcomingBadge.name)"
This will keep the user up-to-date about the next badge to be earned.
In startRun(), before the call to updateDisplay(), add:
badgeStackView.isHidden = false
upcomingBadge = Badge.next(for: 0)
badgeImageView.image = UIImage(named: upcomingBadge.imageName)
This shows the initial badge to earn.
In stopRun() add:
badgeStackView.isHidden = true
Just like the other views, all of the badge info needs to be hidden between runs.
Add the following new method:
private func checkNextBadge() {
  let nextBadge = Badge.next(for: distance.value)
  if upcomingBadge != nextBadge {
    badgeImageView.image = UIImage(named: nextBadge.imageName)
    upcomingBadge = nextBadge
    successSound.play()
    AudioServicesPlaySystemSound(kSystemSoundID_Vibrate)
  }
}
This detects when a badge has been achieved, updates the UI to show the next badge, and plays a success sound to celebrate completing a badge.
In eachSecond() add a call to checkNextBadge() before the call to updateDisplay():
checkNextBadge()
Build and run to watch the label update as the simulator goes for a run. Listen for the sound when it passes a new badge!

On the simulator, this is normal. The messages come from AVFoundation and do not indicate an error on your part.
Also, if you don't want to wait around to test out the badges, you can always switch to a different location mode in the Simulator's Debug\Location menu. Don't worry, we won't tell anyone. :]
[aqme] 254: AQDefaultDevice (188): skipping input stream 0 0 0x0
[aqme] 254: AQDefaultDevice (188): skipping input stream 0 0 0x0