Couchbase Tutorial for iOS: Getting Started
In this Couchbase tutorial for iOS, you’ll learn how to use Couchbase and Sync Gateway to persist data across apps while making Ray’s Pizzeria App. By .
Saving Orders
Open DataManager.swift and add the following to the Order data extension:
func add(order: Order) {
  // 1
  let mutableDoc = MutableDocument()
    .setString(order.pizzaId, forKey: OrderKeys.pizzaId.rawValue)
    .setString(order.customerId, forKey: OrderKeys.customerId.rawValue)
    .setInt(order.state.rawValue, forKey: OrderKeys.state.rawValue)
    .setString(DocTypes.order.rawValue, forKey: "type")

  do {
    // 2
    try database.saveDocument(mutableDoc)
  } catch {
    fatalError("Error saving document")
  }
}
Just like above, you:
- Create a
MutableDocumentand store theOrderproperties in it. - Save the document to the database.
Back in CustomerViewController.swift, in showReviewOrderAlert(for:with:at:), replace:
let placeOrder = UIAlertAction(title: "Place Order", style: .default) { (action) in
  let _ = Order(id: "", pizzaId: pizza.id, customerId: customer.id, state: .notStarted)
}
With:
let placeOrder = UIAlertAction(title: "Place Order",
                               style: .default) { [tableView] (action) in
  let order = Order(
    id: "",
    pizzaId: pizza.id,
    customerId: customer.id,
    state: .notStarted)
  DataManager.shared.add(order: order)
  tableView?.reloadData()
}
This adds the new order to the database and reloads the table view with the new order data.
Now, in DataManager.swift, add the following in the Order extension:
func getOrderCount(for customer: Customer) -> Int {
  let query = QueryBuilder
    // 1
    .select(SelectResult.expression(Function.count(Expression.all())))
    .from(DataSource.database(database))
    .where(Expression.property("type")
      .equalTo(Expression.string(DocTypes.order.rawValue))
      // 2
      .and(Expression.property(OrderKeys.customerId.rawValue)
        .equalTo(Expression.string(customer.id))))

  do {
    // 3
    let results = try query.execute()
    return results.allResults().map { $0.int(forKey: "$1") }.reduce(0) { $0 +  $1 }
  } catch {
    fatalError("Error running the query")
  }
}
That’s correct… another query function, but this one returns only the number of orders for a specific customer. Here’s how it works:
-
SelectResult.expression(Function.count(Expression.all()))requests the count of all items instead of returning the items themselves. -
.and(Expression.property(OrderKeys.customerId.rawValue).equalTo(Expression.string(customer.id))))is part of thewhereclause, and indicates to only return documents where thecustomerIdproperty is equal tocustomer.id. -
resultsis of typeResultSet, which you can iterate over to compute the counts. Butresults.allResults()returns[Result]and you can use that for map-reduce to compute the count. Technically, there should only be oneResultin theallResults()array, but using map-reduce works whether you have 0, 1 or more than 1 results. Note: Sincecount()is an aggregate function and not a property, it does not have a key, but you use the provision key “$1”
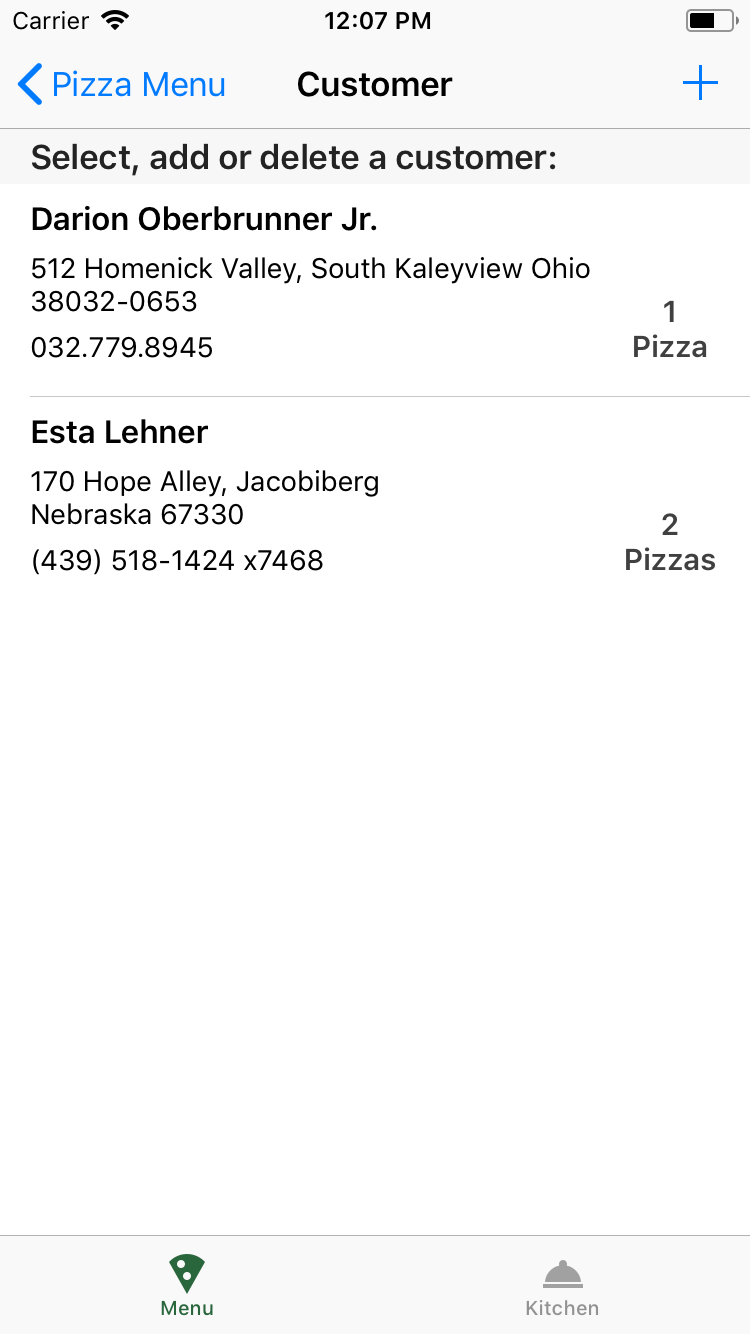
Open CustomerCell.swift and add the following to bind(with:):
let orderCount = DataManager.shared.getOrderCount(for: customer)
orderCountLabel.text = "\(orderCount)\n\(orderCount == 1 ? "Pizza" : "Pizzas")"
Build and run.
The Menu tab is fully functional now — a customer can place a pizza order. However, the kitchen staff still doesn’t know about the orders.
Displaying Orders in Kitchen
In DataManager.swift, add the following in the Order extension:
func getOrders() -> [Order] {
  var orders: [Order] = []

  // 1
  let query = QueryBuilder
    .select(SelectResult.all(),
            SelectResult.expression(Meta.id))
    .from(DataSource.database(database))
    .where(Expression.property("type")
      .equalTo(Expression.string(DocTypes.order.rawValue)))

  // 2
  do {
    for result in try query.execute() {
      guard let dict = result.dictionary(forKey: databaseName),
        let pizzaId = dict.string(forKey: OrderKeys.pizzaId.rawValue),
        let customerId = dict.string(forKey: OrderKeys.customerId.rawValue),
        let id = result.string(forKey: OrderKeys.id.rawValue) else {
          continue
      }

      let state = dict.int(forKey: OrderKeys.state.rawValue)
      let orderState = Order.OrderState(rawValue: state) ?? .notStarted

      let order = Order(
        id: id,
        pizzaId: pizzaId,
        customerId: customerId,
        state: orderState)
      orders.append(order)
    }
  } catch {
    fatalError("Error running the query")
  }

  return orders
}
Just like in getMenu() and getCustomers(), this:
- Creates a query for all orders.
- Loops thru each document and gets all of the property values and id.
- Creates an
Orderobject and adds it to theordersarray.
Open KitchenViewController.swift, and in loadData(_:), add:
orders = DataManager.shared.getOrders()
This loads all of the orders. If you look at Order.swift, you’ll see the properties: id, pizzaId, customerId and state. To display order information, you need to retrieve the pizza and customer data using their respective id’s.
Open DataManager.swift and add the following to the Pizza data extension:
func getPizza(id: String) -> Pizza? {
  guard let doc = database.document(withID: id),
    let name = doc.string(forKey: PizzaKeys.name.rawValue) else {
      return nil
  }

  return Pizza(id: id, name: name, price: doc.double(forKey: PizzaKeys.price.rawValue))
}
This queries the database for the document with the specified id and returns a Pizza object.
Add the following to the Customer data extension:
func getCustomer(id: String) -> Customer? {
  guard let doc = database.document(withID: id),
    let name = doc.string(forKey: CustomerKeys.name.rawValue),
    let street = doc.string(forKey: CustomerKeys.street.rawValue),
    let city = doc.string(forKey: CustomerKeys.city.rawValue),
    let state = doc.string(forKey: CustomerKeys.state.rawValue),
    let postalCode = doc.string(forKey: CustomerKeys.postalCode.rawValue),
    let phoneNumber = doc.string(forKey: CustomerKeys.phoneNumber.rawValue) else {
      return nil
  }

  return Customer(
    id: id,
    name: name,
    street: street,
    city: city,
    state: state,
    postalCode: postalCode,
    phoneNumber: phoneNumber)
}
This returns the Customer object for the specified id.
It’s time to use these two new functions. Open Order.swift and replace:
var pizza: Pizza? {
  return nil
}
var customer: Customer? {
  return nil
}
With:
var pizza: Pizza? {
  return DataManager.shared.getPizza(id: pizzaId)
}
var customer: Customer? {
  return DataManager.shared.getCustomer(id: customerId)
}
Build and run.

Selecting an order in the Kitchen tab displays a UIAlertController, however, nothing happens when you tap Yes because you haven’t implemented a way to update the order’s state in the database.
Open DataManager.swift and add the following to the Order data extension:
func update(order: Order) {
  // 1
  guard let mutableDoc = database.document(withID: order.id)?.toMutable() else {
    return
  }

  mutableDoc.setInt(order.state.rawValue, forKey: OrderKeys.state.rawValue)
  mutableDoc.setString(order.pizzaId, forKey: OrderKeys.pizzaId.rawValue)
  mutableDoc.setString(order.customerId, forKey: OrderKeys.customerId.rawValue)

  do {
    // 2
    try database.saveDocument(mutableDoc)
  } catch {
    fatalError("Error updating document")
  }
}
A closer look shows some similarities to the previous get and add functions:
- Calling
database.document(withID:)returns an immutable document, but a call totoMutable()returns a mutable copy so you can update it with the new order values. - Calling
database.saveDocument()saves the updated order.
In KitchenViewController.swift, find tableView(_:didSelectRowAt:), and replace:
let moveOrder = UIAlertAction(title: "Yes", style: .default) { (action) in
  let _ = Order(id: order.id,
                pizzaId: order.pizzaId,
                customerId: order.customerId,
                state: nextState)
}
With:
let moveOrder = UIAlertAction(title: "Yes", style: .default) { [weak self] (action) in
  let orderUpdate = Order(
    id: order.id,
    pizzaId: order.pizzaId,
    customerId: order.customerId,
    state: nextState)
  DataManager.shared.update(order: orderUpdate)
  self?.orders = DataManager.shared.getOrders()
}
Build and run.
Now you can tap an Order cell and move it to the next kitchen state.

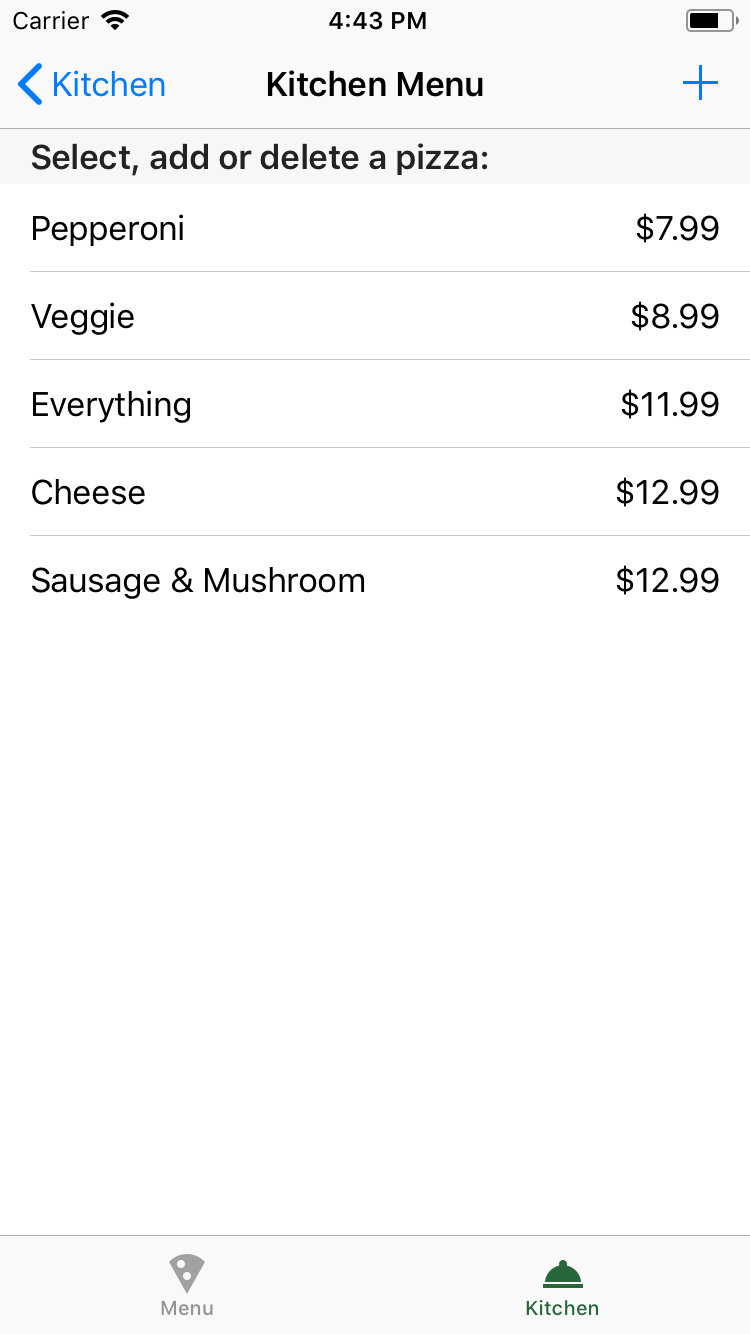
Updating the Menu
Open KitchenMenuViewController.swift and in loadData(_:), add:
menu = DataManager.shared.getMenu()
This loads the menu from the database.
Selecting a cell or tapping the + presents the PizzaViewController. If selecting a cell, it loads the selected pizza properties into the appropriate text fields and allows you to update the values. Tapping + loads them with defaults of “Cheese” and “$5.99”. Tap Save to update pizza or add a new pizza to the menu.
However, you need to add some code to save it to the database with the updated or new pizza menu items.
Open DataManager.swift and add the following to the Pizza data extension:
func add(pizza: Pizza) {
  let mutableDoc = MutableDocument()
    .setDouble(pizza.price, forKey: PizzaKeys.price.rawValue)
    .setString(pizza.name, forKey: PizzaKeys.name.rawValue)
    .setString(DocTypes.pizza.rawValue, forKey: "type")

  do {
    try database.saveDocument(mutableDoc)
  } catch {
    fatalError("Error saving document")
  }
}

func update(pizza: Pizza) {
  guard let mutableDoc = database.document(withID: pizza.id)?.toMutable() else { return }

  mutableDoc.setDouble(pizza.price, forKey: PizzaKeys.price.rawValue)
  mutableDoc.setString(pizza.name, forKey: PizzaKeys.name.rawValue)

  do {
    try database.saveDocument(mutableDoc)
  } catch {
    fatalError("Error updating document")
  }
}

func delete(pizza: Pizza) {
  guard let doc = database.document(withID: pizza.id) else { return }

  do {
    try database.deleteDocument(doc)
  } catch {
    fatalError("Error deleting document")
  }
}
The add() and update() functions are similar to those previously added, and there’s nothing unusual in delete(), just get the document and call database.deleteDocument() to delete it.
Open PizzaViewController.swift and replace the following in saveTapped():
if let editPizza = editPizza {
  if editPizza.name != pizzaName || editPizza.price != pizzaPrice {
    let _ = Pizza(id: editPizza.id, name: pizzaName, price: pizzaPrice)
  }
} else {
  let _ = Pizza(id: "", name: pizzaName, price: pizzaPrice)
}
With:
if let editPizza = editPizza {
  if editPizza.name != pizzaName || editPizza.price != pizzaPrice {
    let pizza = Pizza(id: editPizza.id, name: pizzaName, price: pizzaPrice)
    DataManager.shared.update(pizza: pizza)
  }
} else {
  let pizza = Pizza(id: "", name: pizzaName, price: pizzaPrice)
  DataManager.shared.add(pizza: pizza)
}
Open KitchenMenuViewController.swift and in tableView(_:commit:forRowAt:) replace:
if editingStyle == .delete {
  menu?.remove(at: indexPath.row)
}
With:
if editingStyle == .delete,
  let pizza = menu?[indexPath.row] {
  DataManager.shared.delete(pizza: pizza)
  menu = DataManager.shared.getMenu()
}
Build and run.
In Kitchen Menu, tap the Cheese cell, change the price to $12.99 and tap Save.
Excellent! Ray now has full control over his menu; he can add, update and delete items on the menu right from within the app.