CloudKit Tutorial: Getting Started
In this CloudKit tutorial, you’ll learn how to add and query data in iCloud from your app, as well as how to manage that data using the CloudKit dashboard. By Andy Pereira.
Introducing the CloudKit Dashboard
Your next step is to create some record types that define the data that your app will use. You can do this using the CloudKit dashboard. Click CloudKit Dashboard, which you can find in the target’s Signing & Capabilities pane, under iCloud or by opening https://icloud.developer.apple.com/dashboard/ in your browser.

Here’s what the dashboard looks like:

The CloudKit dashboard consists of six sections:
- Data
- Schema
- Telemetry
- Usage
- Logs
- API Access
The Schema section represents the high-level objects of a CloudKit container: Record Types, Indexes, Security Roles and Subscription Types. You’ll only deal with Record Types in this tutorial.
A Record Type is a set of fields that defines individual records. In terms of object-oriented programming, a Record Type is like a class. You can think of a record as an instance of a particular Record Type. It represents structured data in the container, much like a typical row in a database, and encapsulates a series of key/value pairs.
Under Data, the Private Database and Public Database sections let you add data to, or search for, data in the databases you have access to. Remember, as a developer you can access all public data, but only your own private data.
The User Records store data, such as name and email, about the current iCloud user.
You use a Record Zone, noted here as the Default Zone, to provide a logical organization to a private database by grouping records together.
Custom zones support atomic transactions by allowing you to save multiple records at the same time before processing other operations. Custom zones are outside the scope of this tutorial.
The API Access section provides the ability to configure the dashboard permissions for your team members. If you have multiple development team members, you can restrict their ability to edit data here. This, too, is out of scope for this tutorial.
Adding the Establishment Record Type
Think about the design of your app for a moment. The establishments you track each have lots of data: Name, location and availability of child-friendly options. Record types use fields to define the various pieces of data each record contains.
Under Schema, select Record Types and then New Type to add a new record type.
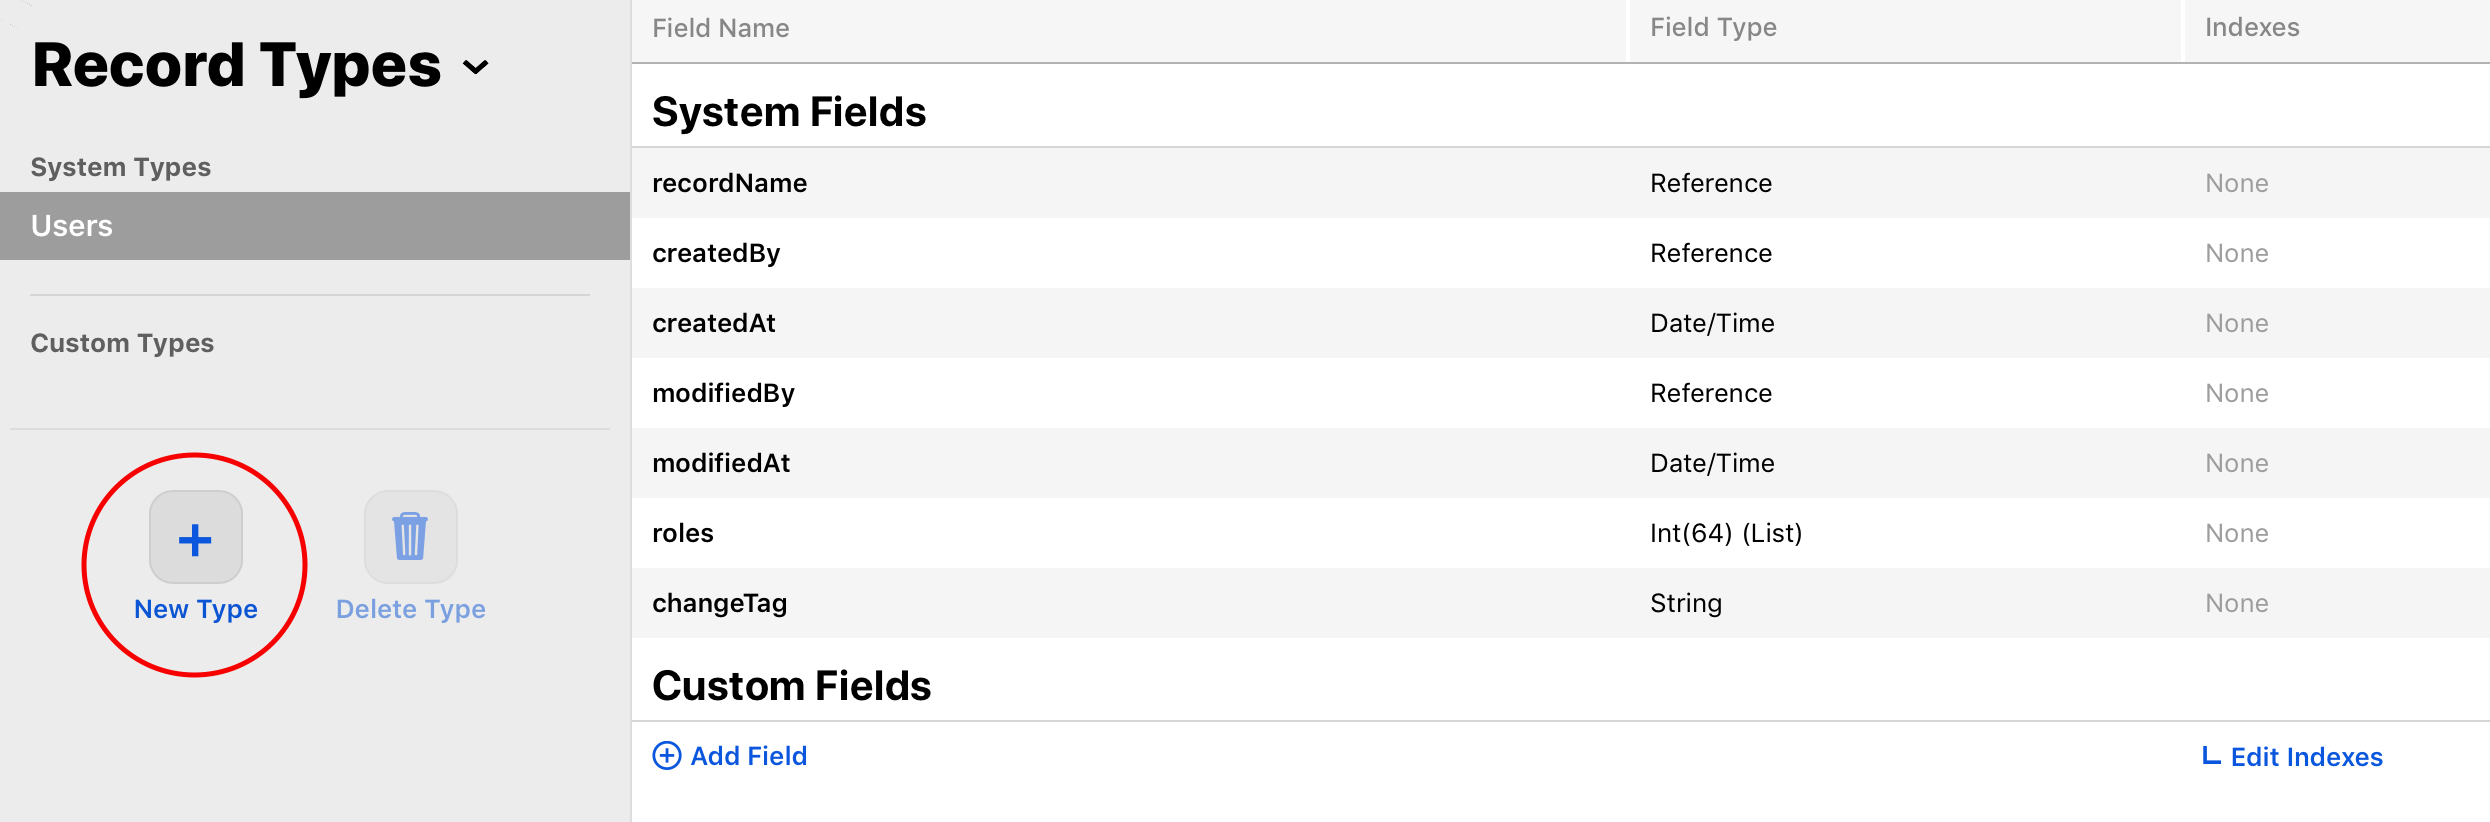
Name your new record type Establishment, then press Enter.
You’ll see a row of system fields, automatically created for every record type. Each one has a Field Name, a Field Type and an Index.
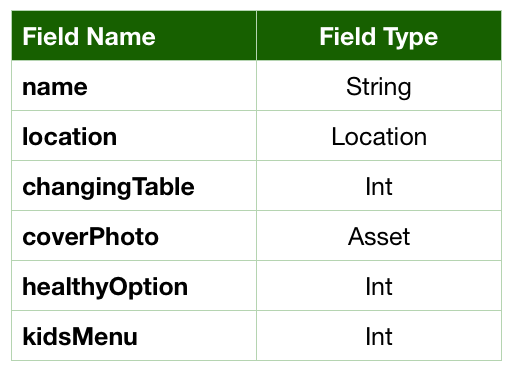
Of course, you can add your own fields. Start by selecting Add Field, call it name, and set the Field Type to String. Repeat until you have added all these fields:
Click Save at the bottom of the page to save your new record type.
Next, click Edit Indexes. You’re going to add two indexes so that you can query your records:
1. recordName with the index type of QUERYABLE.
2. name with the index type of QUERYABLE.
You need to make recordName queryable by default. You set name to queryable so you can query records based on a specific name.
Click Save Changes at the bottom of the page to save your indexes.
When you’re done, your list of fields should look like this:

You’re now ready to add some sample establishment records to your database. To do this, switch to Data in the drop-down at the top of the dashboard:

Select _defaultZone under the Public Database section in the navigation pane on the left. This zone will contain the public records for your app.
Select the Establishment record type from the drop-down list in the center pane, if it’s not already selected. Then click the New Record button in the bottom detail pane, as shown in the screenshot below:

This will create a new, empty Establishment record.

At this point, you’re ready to enter some test data for your app.
The following sample establishment data is fictional. The establishments are located near Apple’s headquarters, so they’re easy to find in the simulator.
Enter each record as described below:

You’ll find the images in the materials file containing the starter project, which you downloaded earlier. Look for the Images folder.
Once you’ve saved all the records, the dashboard should look like this. You might need to click the Query Records button to make the records appear:

For each record, the entered values are the database representation of the data.
On the app side, the data types are different. For example, ChangingTable is an enum. So the specified Int value for changingTable might correspond to a changing table being available in the men’s or women’s room.
For healthyOption and kidsMenu, the Int values represent Boolean types: A 0 means that establishment doesn’t have that option and a 1 means that it does.
To run the app, you need to have an iCloud account that you can use for development. You’ll find instructions here: Creating an iCloud Account for Development.
You’ll also need to enter the iCloud credentials associated with this account into the iOS Simulator: Enter iCloud Credentials Before Running Your App
Return to Xcode. It’s time to start integrating this data into your app!
Querying Establishment Records
To select records from a database, you’ll use CKQuery. A CKQuery describes how to find all records of a specific type that match certain criteria. These criteria can be something like “all records with a Name field that starts with ‘M’”, “all records that have booster seats” or “all records within 3 km”.
iOS uses NSPredicate to handle these kinds of expressions. NSPredicate evaluates objects to see if they match the criteria. Predicates are also used in Core Data; they’re a natural fit for CloudKit because the definition of a predicate is simply a comparison on a field.
CloudKit supports only a subset of available NSPredicate functions. These include mathematical comparisons, some string and set operations such as “field matches one of the items in a list”, and a special distance function. The CKQuery Class Reference contains a detailed list of the functions that CloudKit supports as well as descriptions of how to use them.
In Xcode, open Model.swift. Replace refresh(_:) with the following implementation:
@objc func refresh(_ completion: @escaping (Error?) -> Void) {
  // 1.
  let predicate = NSPredicate(value: true)
  // 2.
  let query = CKQuery(recordType: "Establishment", predicate: predicate)
  establishments(forQuery: query, completion)
}
Here’s what you’ve added:
- You create a predicate with the value
true.NSPredicatedetermines how you fetch or filter data; in this case, you’re specifying that a value should just exist. - You add a query to specify which type of record you want and a predicate.
Next, replace establishments(forQuery:_:) with the following:
private func establishments(forQuery query: CKQuery,
    _ completion: @escaping (Error?) -> Void) {
  publicDB.perform(query,
      inZoneWith: CKRecordZone.default().zoneID) { [weak self] results, error in
    guard let self = self else { return }
    if let error = error {
      DispatchQueue.main.async {
        completion(error)
      }
      return
    }
    guard let results = results else { return }
    self.establishments = results.compactMap {
      Establishment(record: $0, database: self.publicDB)
    }
    DispatchQueue.main.async {
      completion(nil)
    }
  }
}
Since you’re passing the CKQuery object here, your public database, publicDB, can perform the query. If you think back to when you created the two Establishment objects in the CloudKit dashboard, you put them in the public database, in the default container. That’s exactly what inZoneWith’s parameter is specifying here. Now, the database will query any Establishment records that exist in the public database.
Build and run. You should see a list of nearby establishments.

Things don’t look quite right. You have two items in the table, and if you select one, most of the details are properly loaded.

However, the details screen is missing an image. That’s because the images you uploaded are CKAssets. These require a bit of special handling.