Building an Action for Google Assistant: Getting Started
In this tutorial, you’ll learn how to create a conversational experience with Google Assistant. By Jenn Bailey.
Running your Action
Run the action in the Simulator by clicking Integrations ▸ Integration Settings:

Select the Auto-Preview Changes option and click Test:

Another tab will open. When Dialogflow finishes Updating the Action in the Actions on Google Console, you’ll see the action loaded in the Actions Simulator.
The default welcome and fallback intents are operational. To see what I mean, have a conversation with your action!
Select the Talk to my Test App Suggestion Chip to begin. You’ll see a friendly greeting randomly selected from the list of responses each time the action runs.

Modifying the Welcome Intent
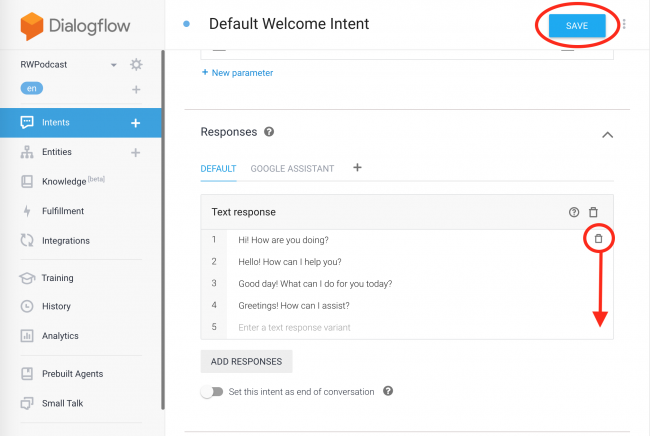
Time to try adding your first custom response! Return to the Dialogflow web browser tab. Select Intents ▸ Default Welcome Intent and scroll to the Responses section.
First, delete all the default welcome intent’s responses by selecting the trashcan:
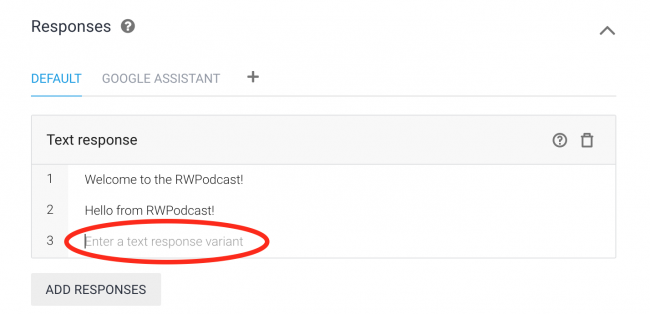
Now, add your own responses. Make sure you click Save when you’re done!
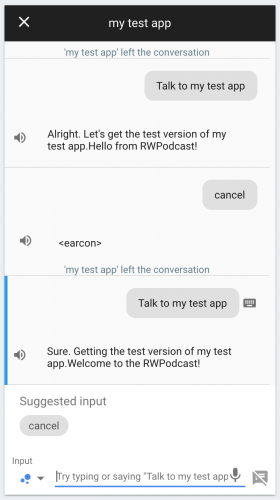
Finally, click Integrations ▸ Integration Settings ▸ Test to run the action. Click the Suggestion Chip to Talk to my test app and Cancel a few times to see how the action randomly chooses between the custom welcome intent responses.
Testing Actions on a Device
In addition to the Simulator, Google Assistant allows you to run your action on a device. Open Google Assistant on most Android devices by long pressing home. Swipe up on the Assistant to open it.
Note: This guide explains how to use Google Assistant on different platforms including iOS.
Make sure the Assistant is logged in with the account you’re using for development. To change accounts, click your account avatar in the top right corner. Then, click Account and select the appropriate account. If the development account isn’t on your device, add it through the device settings and try again.

Note: Make sure your phone location is set to English (US) to find your app.
By typing or speaking, tell Google Assistant to Talk to my test app.
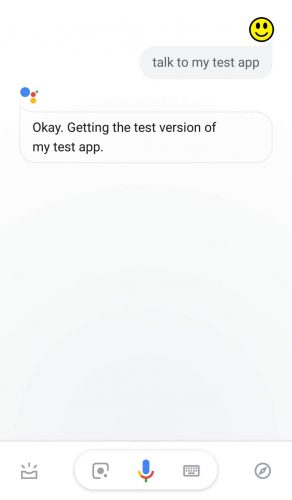
Google Assistant will run your test action.

Now that you’ve modified your welcome intent and tested your action, you need to upload the Dialogflow project from the starter project to start developing your own intents. Keep reading to learn how!
Uploading the Dialogflow Agent
To upload the preconfigured agent in the sample project, select Gear Icon ▸ Export and Import ▸ Restore From Zip.

Drag and drop to attach or browse to the file RWPodcast.zip from the starter materials for this tutorial. If you haven’t downloaded them yet, you can download them using the Download Materials button at the top or bottom of this tutorial. Then, type RESTORE in the appropriate text box and click Restore. After it uploads, click Done.

Now that you know how to get started building a Dialogflow agent, it’s time to learn how to fulfill more complicated user natural language requests by developing Fulfillment.
Fulfillment
Fulfillment for Google Assistant is code deployed as a webhook. Each intent in the agent has corresponding business logic in the webhook. Information extracted by the agent can generate dynamic responses or trigger actions on the back end.
Most actions require fulfillment to extend an agent’s capabilities and perform tasks such as returning information from a database, implementing game logic or placing orders for the customer.
You can implement a simple webhook inside Dialogflow by utilizing the Inline Editor. More complicated actions benefit from a different approach.
Setting up the Local Development Environment
Installing and Configuring Google Cloud SDK
Due to limitations of the Inline Editor, it’s best to do development for the webhooks locally. First, download and install the Google Cloud SDK. Configure the Gradle with App Engine Plugin by running the following commands at the command line:
- Run
gcloud auth application-default loginand login with your Gooogle account. - Install and update the App Engine component by running
gcloud components install app-engine-java - Update other components with
gcloud components update
Configuring the Project
Still at the command line, run the command gcloud init. If you’ve run this command before you can select [1] Re-initialize this configuration [default] with new settings. Select your google account. Pick a cloud project to use by selecting the Actions Console project you created in the previous steps.
Opening the Project and Deploying to the App Engine
Open Android Studio, select Open an Existing Android Studio Project, locate and select the Starter folder for this tutorial. Once the project loads in Android studio, open the Gradle tab on the right near the top and click Execute Gradle Task.

Now run the command appengineDeploy to deploy the App Action to the App Engine.

Now you’re ready for the next steps!
Implementing the Webhook
In Dialogflow, find your project’s ID by selecting gear icon ▸ General ▸ Google Project Section ▸ Project ID. Retain this project ID for the next step. In Dialogflow under the Fulfillment tab, enable the Webhook and enter https://your_project_id.appspot.com. Finally, click Save.
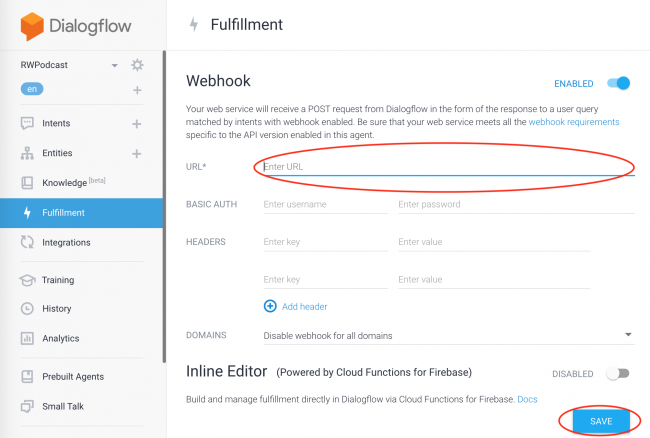
Open the Welcome Intent again under Intents, scroll down and make sure that under the Fulfillment section the Webhook is enabled.

This informs the Dialogflow agent to run the code found in the Welcome Intent function in RWPodcastApp.kt instead of utilizing the default text responses defined in Dialogflow. Open open Starter ▸ src ▸ main ▸ java ▸ com.raywenderlich ▸ RWPodcastApp.kt in Android Studio.and find this code:
@ForIntent("Welcome Intent")
fun welcome(request: ActionRequest): ActionResponse {
  xml = URL(rssUrl).readText()
  jsonRSS = XML.toJSONObject(xml)
  val responseBuilder = getResponseBuilder(request)
  println("Hello! Welcome to the Action!")
  responseBuilder.add("Hello World!")
  return responseBuilder.build()
}
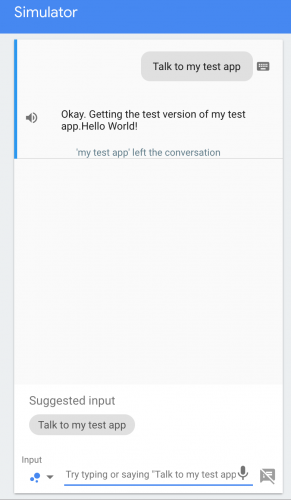
The above code retrieves and stores the rss feed in a jsonObject for later use. It then uses the responseBuilder object and adds the words Hello World! and returns the response. Test the action in the Simulator or on your device. This time it replies “Hello World!”.
Now you’ve set up your local development environment. Each time you make changes in the RWPodcastApp.kt file, deploy the app to the App Engine utilizing the Execute Gradle Task button on the Gradle tab in Android Studio. You may also hit the run button in Android Studio after the first time you deploy the app to the app engine. Then relaunch the simulator. On a device, the most current version of the action deploys automatically.