WWDC 2019 Top 10 Videos
Wondering which of the over 100 WWDC 2019 videos you must see? Check out our recommendations! By Richard Critz.
8) Adopting Swift Packages in Xcode – Session 408

As mentioned above, Xcode 11 now supports using Swift Package Manager (SPM) to manage dependencies on external, open-source packages. This session begins with another demonstration of how easy it is to add a dependency to an Xcode project.
Similar to other dependency managers, SPM uses a form of manifest to define a package. For SPM, that manifest is a file called Package.swift. In addition to this file, a package contains a Sources directory and a Tests directory, each containing additional directories for each target the package defines. Sources can be written in any mix of Swift, C, C++ and Objective-C. By default, packages build as static libraries and link directly into the resulting app executable.
Swift Package Manager uses semantic versioning to implement revision control for packages. This provides for logical, intelligent version selection during package resolution. SPM uses the modifiers .upToNextMajor(from:) and .upToNextMinor(from:) to control version selection. Xcode exposes this same ability in its dialogs.
Updating to the latest qualifying package versions couldn’t be more simple: a single menu command. If you’re familiar with using SPM from the command prompt, it’s the same as performing swift package update. The magic in versioning is a file called Package.resolved where SPM records the exact version of each package it resolves. You should be sure and check this file into your source control system to ensure each member of your team is using the same version you are.
If you want to create your own packages, check out session 410, Creating Swift Packages.
9) Introducing Sign In with Apple – Session 706

Sign In with Apple is a new service which enables your app to provide streamlined account set up for your users. It allows your user to tap a single button, quickly approve the information you requested, and authenticate with Apple. You get great privacy, great security — the login is guaranteed to be secured with two-factor authentication — and a verified email address, all with essentially no work on your part.
Integrating Sign In with Apple into your app consists of four steps:
- Configure and show the button. There are several styles and appearances to choose from.
- When your user taps the button, create and send an authorization request. This is where you specify the additional information, such as full name or email, that you require.
- Respond to the verification callbacks. You receive a number of different data items, including a unique, stable user ID and a “real user indicator” that gives you a high confidence indication that this user is an actual person and not a bot. Use this information to configure the account in your app.
- Respond to changes in authorization status.
The session also shows you how best to sign users in, using not only the new button but existing iCloud keychain passwords, if they exist. If your app requires users to register for an account, it’s worth taking the time to watch this session and study the slides to implement the lowest friction, friendliest user experience.
It’s also worth noting that Sign In with Apple is available as a JavaScript library so you can integrate it into any non-Apple platforms you may support.
10) LLDB: Beyond “po” – Session 429
The session explains the three different LLDB commands for displaying values when debugging a program. po is the first command we all learn when trying to debug programs in Xcode. It prints the object description of the specified variable. The system run-time provides a default object description, but you can customize it by making your type conform to CustomDebugStringConvertible.
The argument to po can be anything that’s compilable. The command actually generates code snippets which are compiled with the embedded compiler and executed in the context of your program. It wraps the result in another function to get the description. That description is what it displays.
Next, comes p. Think of it as “print without the object description”. It does the same thing as po up through the first result. After doing some type resolution, it passes the result to the appropriate formatter. LLDB provides formatters for many common data types, so their representations match what we expect in the console.
The third way to examine values in LLDB is the v command. This is an alias for the frame variable command, and it doesn’t compile and execute code. This makes it fast but means that it doesn’t use syntax that matches the source language of the debugged program.
The session wraps up by demonstrating ways to customize or supplement the built-in data formatters. And, it provides a reminder that the version of LLDB in Xcode 11 now uses Python 3, and not Python 2, as its scripting engine.
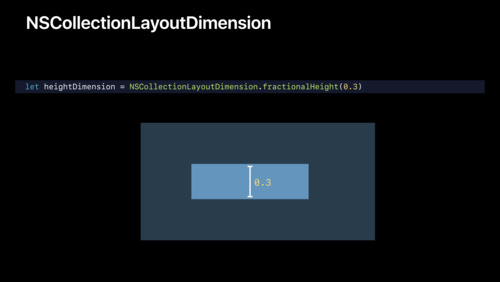
10+) Advances in Collection View Layout – Session 215
Here’s a bonus video; it’s too important to leave off of the list!
When collection views were introduced in iOS 6, they opened the door to more complex UI designs. The secret to their power is the collection view layout, which separates rendering and handling user interactions from the actual placement of items. While Apple has provided a single, line-based layout engine — UICollectionViewFlowLayout — building anything more complex has required writing a custom layout class.
But, custom layout can be hard to get right. It involves lots of boilerplate code; it can be difficult to ensure fast performance. Laying out supplementary and decoration views correctly can seem like black magic. And, nesting collection views in order to create the scrolling behavior your designer desires can involve many a late night working out the proper coordination.
Compositional Layout to the Rescue!
New this year are UICollectionViewCompositionalLayout and NSCollectionViewCompositionalLayout, providing a whole new way to create your layouts on all of Apple’s platforms. When you adopt compositional layout, you compose your layout from smaller units, building into ever larger components until you have your complete layout.
Conceptually, there are four levels of building blocks: items are collected into groups, which are collected into sections, which are collected into the final layout. Groups are, themselves, items, allowing you to nest them. A layout can be defined with a closure which vends sections on demand, allowing you to mix completely different layout strategies inside your single collection view.
There is so much more to this new layout engine. The session provides a downloadable demo app that illustrates how easy it is to build many complex layouts. After you watch the session, be sure to grab it and play with it!