Make a 2D Grappling Hook Game in Unity – Part 1
Learn how to implement your own 2D grappling hook system in this Unity tutorial. By Sean Duffy.
Adding the Swing Ability
That slug is still pretty static on the rope. To fix it, you can add the ability to swing when on the rope.
To do this, you'll want to work out a position perpendicular to the slug's forward (side) swinging position, no matter what angle he is facing.
Open PlayerMovement.cs and add the following two public variables to the top of the script:
public Vector2 ropeHook;
public float swingForce = 4f;
The ropeHook variable will be set to whichever position the rope grappling anchor is currently at, and swingForce is a value to be used to add to the swing motion.
Replace the FixedUpdate() method with this new one:
void FixedUpdate()
{
    if (horizontalInput < 0f || horizontalInput > 0f)
    {
        animator.SetFloat("Speed", Mathf.Abs(horizontalInput));
        playerSprite.flipX = horizontalInput < 0f;
        if (isSwinging)
        {
            animator.SetBool("IsSwinging", true);

            // 1 - Get a normalized direction vector from the player to the hook point
            var playerToHookDirection = (ropeHook - (Vector2)transform.position).normalized;

            // 2 - Inverse the direction to get a perpendicular direction
            Vector2 perpendicularDirection;
            if (horizontalInput < 0)
            {
                perpendicularDirection = new Vector2(-playerToHookDirection.y, playerToHookDirection.x);
                var leftPerpPos = (Vector2)transform.position - perpendicularDirection * -2f;
                Debug.DrawLine(transform.position, leftPerpPos, Color.green, 0f);
            }
            else
            {
                perpendicularDirection = new Vector2(playerToHookDirection.y, -playerToHookDirection.x);
                var rightPerpPos = (Vector2)transform.position + perpendicularDirection * 2f;
                Debug.DrawLine(transform.position, rightPerpPos, Color.green, 0f);
            }

            var force = perpendicularDirection * swingForce;
            rBody.AddForce(force, ForceMode2D.Force);
        }
        else
        {
            animator.SetBool("IsSwinging", false);
            if (groundCheck)
            {
                var groundForce = speed * 2f;
                rBody.AddForce(new Vector2((horizontalInput * groundForce - rBody.velocity.x) * groundForce, 0));
                rBody.velocity = new Vector2(rBody.velocity.x, rBody.velocity.y);
            }
        }
    }
    else
    {
        animator.SetBool("IsSwinging", false);
        animator.SetFloat("Speed", 0f);
    }

    if (!isSwinging)
    {
        if (!groundCheck) return;

        isJumping = jumpInput > 0f;
        if (isJumping)
        {
            rBody.velocity = new Vector2(rBody.velocity.x, jumpSpeed);
        }
    }
}
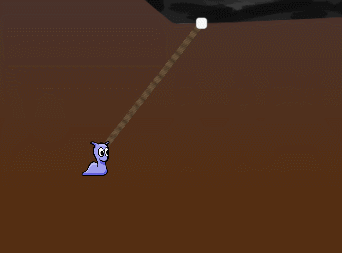
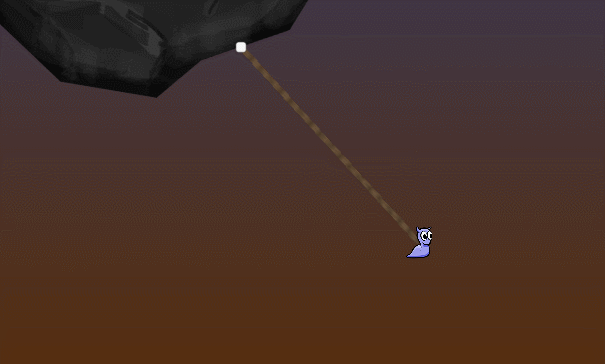
The main changes here are that an isSwinging flag is checked first for actions that should only happen while on the rope, and that you are now adding for perpendicular to the slug's angle pointing up to his current pivot/anchor point at the top of the rope, but perpendicular in the direction he is swinging.
- Get a normalized direction vector from the player to the grappling anchor point.
- Depending on whether the slug is swinging left or right, a perpendicular direction is calculated using the
playerToHookDirection. A debug draw call is also added so you can see this in the editor if you like.
Open RopeSystem.cs and in Update(), at the top of the else block for the if(!ropeAttached) statement, add:
playerMovement.isSwinging = true;
playerMovement.ropeHook = ropePositions.Last();
For the if block of the same if(!ropeAttached) statement above, add:
playerMovement.isSwinging = false;
This just tells the PlayerMovement script when the player is swinging, and what the last (excluding the player position) rope position is — in other words, the anchor rope position. This is required for the perpendicular angle calculation you just added to the PlayerMovement script.
Here's how this looks if you enable gizmos with the game running and press A or D to swing left or right while hooked:

Adding Rappeling
Right now there is no way to move up and down the rope. While it's true that a slug would never be able to pull himself up or down a rope this easily, this is a game, and that means anything can happen right?
In the RopeSystem script, add two new field variables to the top of the script:
public float climbSpeed = 3f;
private bool isColliding;
The climbSpeed will set the speed at which the slug can go up and down the rope and isColliding will be used as a flag to determine whether or not the rope's distance joint distance property can be increased or decreased.
Add this new method:
private void HandleRopeLength()
{
	// 1
    if (Input.GetAxis("Vertical") >= 1f && ropeAttached && !isColliding)
    {
        ropeJoint.distance -= Time.deltaTime * climbSpeed;
    }
    else if (Input.GetAxis("Vertical") < 0f && ropeAttached)
    {
        ropeJoint.distance += Time.deltaTime * climbSpeed;
    }
}
This if..elseif block looks for vertical axis input (up/down or W/S on the keyboard), and depending on the ropeAttached iscColliding flags will either increase or decrease the ropeJoint distance, having the effect of lengthening or shortening the rope.
Hook this method up by adding a call to it at the bottom of Update():
HandleRopeLength();
You'll also need a way of setting the isColliding flag.
Add these two methods to the bottom of the script:
void OnTriggerStay2D(Collider2D colliderStay)
{
    isColliding = true;
}

private void OnTriggerExit2D(Collider2D colliderOnExit)
{
    isColliding = false;
}
These two methods are native to the MonoBehaviour base script class.
If a Collider is currently touching another physics object in the game, the OnTriggerStay2D method will continuously fire, setting the isColliding flag to true. This means whenever the slug is touching a rock, the isColliding flag is being set to true.
The OnTriggerExit2D method will fire when one collider leaves another's collider area, setting the flag to false.
Just be warned: the OnTriggerStay2D method can be very performance-intensive, so be careful with its use.
Where to Go From Here?
Run the game again, and this time use your arrow or W/S keys to move up or down on the rope.
Here's a link to the completed project for this tutorial.
You've come a long way from having a sluggish slug with no swing, to an acrobatic shell-less gastropod mollusk!
You've learned how to create an aiming system that can fire a grappling hook at any object covered by a collider, attach to it, and swing about on it, wrapping a dynamic rope around the edges at the same time! Great job.
There is a missing piece though, the rope does not 'unwind' or 'unwrap' when it should.
Stay tuned for part two of this tutorial series, where you'll tackle that next.
If you're feeling adventurous, why not give it a go yourself? You can use the Dictionary wrapPointsLookup to help you along.
The Unity team has created a book, Unity Games By Tutorials. Have you checked it out yet? The book will teach you to create four complete games from scratch:
- A twin-stick shooter
- A first-person shooter
- A tower defense game (with VR support!)
- A 2D platformer
By the end of this book, you’ll be ready to make your own games for Windows, macOS, iOS, and more!
This book is for complete beginners to Unity, as well as for those who’d like to bring their Unity skills to a professional level. The book assumes you have some prior programming experience (in a language of your choice).
If you have any questions or comments on this tutorial, please join the discussion below!