Social Network Integration on Android
Learn how to let your users authenticate into your app using Facebook and Twitter, and see how to make posts to both social networks. By Aaqib Hussain.
Connecting With Twitter
Like Facebook, you need a working Twitter account in order to integrate Twitter into your app, Twitter provides a Consumer Key and Consumer Secret for communication.
Creating a Twitter App on Developer Portal
Login to Twitter in a browser and head to Twitter’s Application Management Portal and click on Create New App.

Complete the necessary fields with the appropriate information (you’ll need to use a unique name like Sharetastic + your initials, and you also must provide a Privacy Policy URL and Terms of Service URL in order to follow along, but these can be placeholders like example.com) then click Create your Twitter application.
You’ll be taken to the following page:
I had to name the app Share-tastic because Sharetastic wasn’t available. :]
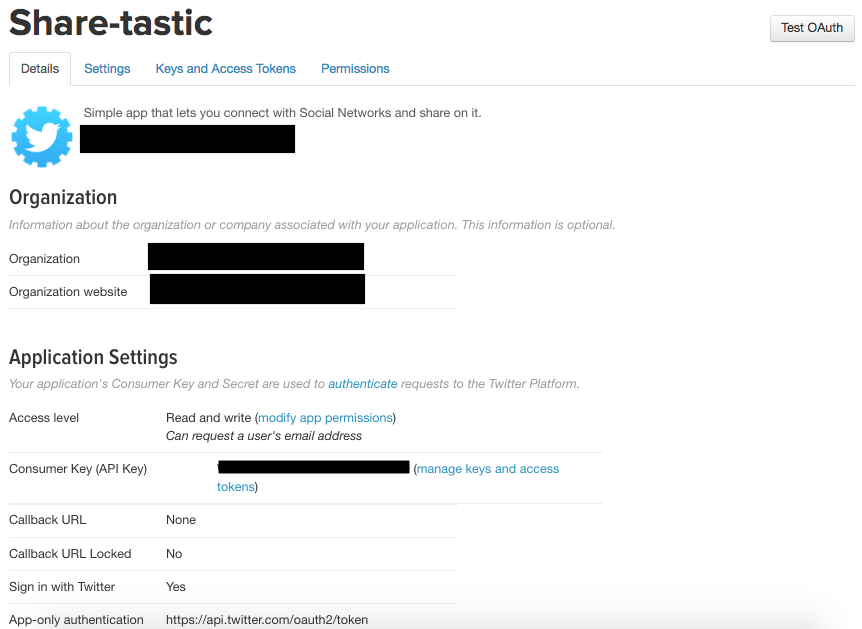
Copy the Consumer Key and Consumer Secret from the Keys and Access Tokens tab and paste them into the strings.xml with the names Twitter_CONSUMER_KEY and Twitter_CONSUMER_SECRET, respectively.
Then click on the Permissions tab.

If you want to get user’s email at the time of login, you have to check the option that says Request email addresses from users then click on Update Settings.
Setting Up
After finishing the creation of the app on the Twitter developer portal, you’ll now move on and add the Twitter Kit dependency.
Adding Twitter Kit Dependency
Note: This step can be skipped because it’s already done in the Starter Project
There are many dependencies provided by Twitter like Twitter Core, Tweet UI, Tweet Composer, and Twitter Mopub. For now, stick with Twitter Core because that’s the only dependency you need for this tutorial.
implementation 'com.twitter.sdk.android:twitter-core:3.1.1'
Paste the above dependency in the app build.gradle file and let the project sync.
Initializing Twitter Kit
Create a CustomApplication class extending from Application under a new package root. Override the onCreate() of the Application class as follows:
class CustomApplication : Application() {
  override fun onCreate() {
    super.onCreate()

    val config = TwitterConfig.Builder(this)
        .logger(DefaultLogger(Log.DEBUG))
        .twitterAuthConfig(TwitterAuthConfig(
            resources.getString(R.string.Twitter_CONSUMER_KEY),
            resources.getString(R.string.Twitter_CONSUMER_SECRET)))
        .debug(true)
        .build()
    Twitter.initialize(config)
  }
}
Then open AndroidManifest.xml and inside the tag application, paste the following snippet.
Log in With Twitter
A Tweet for the Tweeps
Logging Out of Twitter
Where to Go From Here?
You are done setting up now and are ready to dive into writing some Twitter code!
Add a Twitter login button to activity_main.xml:
Open MainActivity and inside the twitterSetup() method, add the following:
And in the onActivityResult() method, add the following line:
Like the method you wrote that fetches the user info after Facebook’s login is complete, you need to write a similar method for Twitter that gets the user’s info at login.
Open the Helper file and write the following method:
You’re using TwitterCore to authenticate the user and then going to the share screen on a successful authentication.
Next, open MainActivity and in the success part of the twitterLoginButton callback, add:
Now, build and run your project and tap on Log in with Twitter. You’ll need to be running Sharetastic on a device or emulator that has the Twitter app installed and in which you are logged in.
You’ll be shown a screen to accept connecting your Twitter account to Sharetastic, and after you allow it, you’ll successfully log in and be taken to the Share screen.

Before posting a tweet, make the app a little more interactive by placing the Twitter’s character limit — i.e., 240 — and change the TextView count placed on the top right with respect to the number of characters written in the posting TextView.
Write a method onTextChangeListener inside ShareActivity:
This code is handling the character count change logic at runtime.
Furthermore, change the setData() method of ShareActivity by replacing the line that sets the postEditText to be GONE with the following code:
Here, a character limit is applied on the TextView to stop a user from writing more than 240 characters.
Now, move on to posting a tweet. For that, you’ll write another method:
Finally, you need to tweak the postButtonAction() method a little bit:
Now the time has come in which you post your first tweet!
Build and run the app again. Like before, since you’re not saving the authenticated state of the user, you’ll need to login to Twitter again.
After logging in write, say, Hello Twitter from Sharetastic!

Then tap on POST and open the Twitter app.
 You can finally see your tweet.
Feels good, doesn’t it?
Like Facebook, logging out is pretty simple. All you have to do is change the method sendToMainActivity() in ShareActivity to the following:
The only change here is that the Twitter session is being cleared.
Once you run the app again, you’ll be able to log out from Twitter as well. :]
The Final Project for this tutorial can be found in the Download Materials link at the top or bottom of this tutorial. If you try to build the final project, please be sure to add in your own Facebook and Twitter app ID’s and keys.
You now know how to authenticate a user into Facebook and Twitter, post content to each, and log a user out of each.
As was mentioned in the tutorial, in your app you’re going to want to persist the state of the logged in user, so that the user does not have to log in to Facebook or Twitter every time the app runs. Try saving the user state as a challenge, once you’ve worked your way through the tutorial. If the user is logged in, take them right to the share screen.
If you want to explore more about the Facebook SDK and TwitterKit, visit the resources below:
If you have any questions or comments, please let us know in the discussion below!

<com.twitter.sdk.android.core.identity.TwitterLoginButton
  android:id="@+id/twitterLoginButton"
  android:layout_width="wrap_content"
  android:layout_height="wrap_content"
  app:layout_constraintBottom_toBottomOf="parent"
  app:layout_constraintLeft_toLeftOf="parent"
  app:layout_constraintRight_toRightOf="parent"
  app:layout_constraintTop_toBottomOf="@+id/facebookLoginButton"
  app:layout_constraintVertical_bias="0.1" />
twitterLoginButton.callback = object : Callback<TwitterSession>() {
  override fun success(result: Result<TwitterSession>) {

  }

  override fun failure(exception: TwitterException) {
    Toast.makeText(context,exception.localizedMessage, Toast.LENGTH_SHORT).show()
  }
}
twitterLoginButton.onActivityResult(requestCode, resultCode, data)
fun getTwitterUserProfileWthTwitterCoreApi(
    context: Context, session: TwitterSession) {

  TwitterCore.getInstance().getApiClient(session).accountService
      .verifyCredentials(true, true, false)
      .enqueue(object : Callback<User>() {
        override fun success(result: Result<User>) {
          val name = result.data.name
          val userName = result.data.screenName
          val profileImageUrl = result.data.profileImageUrl.replace("_normal", "")
          val user = UserModel(name, userName, profileImageUrl, SocialNetwork.Twitter)
          startShareActivity(context, user)
        }

        override fun failure(exception: TwitterException) {
          Toast.makeText(context, exception.localizedMessage, Toast.LENGTH_SHORT).show()
        }
      })
}
Helper.getTwitterUserProfileWthTwitterCoreApi(context, result.data)
fun onTextChangeListener() {
  postEditText.addTextChangedListener(object : TextWatcher {
    override fun afterTextChanged(s: Editable) {
      characterLimitTextView.text = "${s.length}/240"
    }

    override fun beforeTextChanged(s: CharSequence, start: Int,
                                   count: Int, after: Int) {
    }

    override fun onTextChanged(s: CharSequence, start: Int,
                               before: Int, count: Int) {
    }
  })
}
if (user.socialNetwork == SocialNetwork.Twitter) {
  postEditText.filters = arrayOf<InputFilter>(InputFilter.LengthFilter(240))
  onTextChangeListener()
} else {
  postEditText.visibility = View.GONE
}
fun postATweet(message: String) {
  val statusesService = TwitterCore.getInstance().apiClient.statusesService
  val context = this
  statusesService.update(message, null, null, null, null, null, null, null, null)
      .enqueue(object : Callback<Tweet>() {
        override fun success(result: Result<Tweet>) {
          Toast.makeText(context,R.string.tweet_posted,Toast.LENGTH_SHORT).show()
        }

        override  fun failure(exception: TwitterException) {
          Toast.makeText(context,exception.localizedMessage,Toast.LENGTH_SHORT).show()
        }
      })
  postEditText.setText("")
}
fun postButtonAction() {
  postButton.setOnClickListener { view ->
    if (postEditText.text.toString().isBlank() && user.socialNetwork == SocialNetwork.Twitter) {
      Toast.makeText(this, R.string.cannot_be_empty, Toast.LENGTH_SHORT).show()
    } else if (user.socialNetwork == SocialNetwork.Facebook) {
      postStatusToFacebook()
    } else {
      postATweet(postEditText.text.toString())
    }
  }
}
if (user.socialNetwork == SocialNetwork.Facebook) {
  LoginManager.getInstance().logOut()
} else {
  TwitterCore.getInstance().sessionManager.clearActiveSession()
}
finish()
val intent = Intent(this, MainActivity::class.java)
startActivity(intent)