Runtime Mesh Manipulation With Unity
One of the benefits of using Unity as your game development platform is its powerful 3D engine. In this tutorial, you’ll get an introduction to the world of 3D objects and mesh manipulation. By Sean Duffy.
Making the Vertices Move Smoothly
In DisplaceVertices, add the following:
Vector3 currentVertexPos = Vector3.zero;
float sqrRadius = radius * radius; //1

for (int i = 0; i < modifiedVertices.Length; i++) //2
{
    currentVertexPos = modifiedVertices[i];
    float sqrMagnitude = (currentVertexPos - targetVertexPos).sqrMagnitude; //3
    if (sqrMagnitude > sqrRadius)
    {
        continue; //4
    }
    float distance = Mathf.Sqrt(sqrMagnitude); //5
    float falloff = GaussFalloff(distance, radius);
    Vector3 translate = (currentVertexPos * force) * falloff; //6
    translate.z = 0f;
    Quaternion rotation = Quaternion.Euler(translate);
    Matrix4x4 m = Matrix4x4.TRS(translate, rotation, Vector3.one);
    modifiedVertices[i] = m.MultiplyPoint3x4(currentVertexPos);
}
originalMesh.vertices = modifiedVertices; //7
originalMesh.RecalculateNormals();
This code loops over every vertex in the mesh and displaces those that are close to the ones you selected in the editor. It does some math tricks to create a smooth, organic effect, like pushing your thumb into clay. You'll learn more about this later on.
Here's a closer look at what this code does:
- Gets the square of the radius.
- Loops through every vertex in the mesh.
- Finds the distance between the current vertex and the target vertex and squares it.
- If this vertex is outside the area of effect, exits the loop early and continues to the next vertex.
- Otherwise, calculates the
falloffvalue based on the distance. Gaussian functions create a smooth bell curve. - Calculates how far to move based on distance, then sets the rotation (direction of displacement) based on the result. This makes the vertex move "outward", that is, directly away from the targetVertex, making it seem to puff out from the center.
- On exiting the loop, stores the updated
modifiedVerticesin the original mesh and has Unity recalculate the normals.
Save your file and return to Unity. Select the Sphere, go to the HeartMesh component, and try adding some vertices into your Selected Indices property. Turn off Is Edit mode and press Play to preview your work.

Play around with the Radius Of Effect, Pull Value and Duration settings to see different results. When you are ready, update the settings per the screenshot below.

Press Play. Did your sphere balloon into a heart shape?

Congratulations! In the next section, you will learn how to save the mesh for further use.

Saving Your Mesh in Real Time
Right now, your heart comes and goes whenever you push the Play button. If you want a love that lasts, you need a way to write the mesh to a file.
A simple way is to set up a placeholder prefab that has a 3D object as its child, then replace its mesh asset with your heart (...er, your Heart mesh) via a script.
In the Project view, find Prefabs/CustomHeart. Double-click the prefab to open it in Prefab Editing mode.
Click on the Arrow icon to expand its contents in the Hierarchy and select Child. This is where you'll store your generated mesh.

Exit prefab editing mode and open HeartMeshInspector.cs. At the end of OnInspectorGUI, before the closing braces, add the following:
if (!mesh.isEditMode && mesh.isMeshReady)
{
    string path = "Assets/RW/Prefabs/CustomHeart.prefab"; //1

    if (GUILayout.Button("Save Mesh"))
    {
        mesh.isMeshReady = false;
        Object prefabToInstantiate =
            AssetDatabase.LoadAssetAtPath(path, typeof(GameObject)); //2
        Object referencePrefab =
            AssetDatabase.LoadAssetAtPath (path, typeof(GameObject));
        GameObject gameObj =
            (GameObject)PrefabUtility.InstantiatePrefab(prefabToInstantiate);
        Mesh prefabMesh = (Mesh)AssetDatabase.LoadAssetAtPath(path,
            typeof(Mesh)); //3
        if (!prefabMesh)
        {
            prefabMesh = new Mesh();
            AssetDatabase.AddObjectToAsset(prefabMesh, path);
        }
        else
        {
            prefabMesh.Clear();
        }
        prefabMesh = mesh.SaveMesh(prefabMesh); //4
        AssetDatabase.AddObjectToAsset(prefabMesh, path);
        gameObj.GetComponentInChildren<MeshFilter>().mesh = prefabMesh; //5
        PrefabUtility.SaveAsPrefabAsset(gameObj, path); //6
        Object.DestroyImmediate(gameObj); //7
    }
}
Here's what the code does:
- Stores the CustomHeart prefab object asset path, which you need to be able to write to the file.
- Creates two objects from the CustomHeart prefab, one as a GameObject and the other as a reference.
- Creates an instance of the mesh asset
prefabMeshfrom CustomHeart. If it finds the asset, it clears its data; otherwise, it creates a new empty mesh. - Updates
prefabMeshwith new mesh data and associates it with the CustomHeart asset. - Updates the GameObject's mesh asset with
prefabMesh. - Creates a Prefab Asset at the given path from the given
gameObj, including any children in the scene. This replaces whatever was in the CustomHeart prefab. - Destroys
gameObjimmediately.
Save your file and go to HeartMesh.cs. Replace the body of SaveMeshwith the following:
Mesh nMesh = new Mesh();
nMesh.name = "HeartMesh";
nMesh.vertices = originalMesh.vertices;
nMesh.triangles = originalMesh.triangles;
nMesh.normals = originalMesh.normals;
return nMesh;
This will return a mesh asset based on the heart-shaped mesh.
Save the file and return to Unity. Press Play. When the animation ends, a Save Mesh button will appear in the Inspector. Click on the button to save your new mesh, then stop the player.
Find Prefabs/CustomHeart again in the Project view and open it in Prefab Editing mode. You will see a brand spanking new heart-shaped mesh has been saved in your prefab!

Good Job!

Putting It All Together
In the previous section, you learned how to modify a mesh by selecting individual vertices. While this is cool, you can do more interesting things if you know how to select vertices procedurally.
In the previous scene, DisplaceVertices uses a Gaussian falloff formula to determine how much to "pull" each vertex within the radius of the effect. But there are other mathematical functions you can use to calculate the 'fall off' point; that is, where the pull strength starts decaying. Each function produces a different shape:

Like cupcake toppings...

In this section, you will learn how to manipulate vertices using a calculated curve.
Based on the principle that velocity equals distance divided by time (v=(d/t)), you can determine the vector's position by referencing its distance divided by its time factor.
Using the Curve Method
Save your current scene, then open 03 Customize Heart Mesh from the Scenes folder.
Find the instance of your CustomHeart prefab in the hierarchy and click on the arrow icon next to it to expand its content. Select the Child object.
View its properties in the Inspector. You'll see Mesh Filter with the Heart Mesh asset. Attach Custom Heart to Child. The asset should now change from HeartMesh to clone.

Open CustomHeart.cs and add the following right above Start:
public enum CurveType
{
    Curve1, Curve2
}

public CurveType curveType;
Curve curve;
This creates a public enum named CurveType and makes it available in the Inspector.
Go to CurveType1 and add the following:
Vector3[] curvepoints = new Vector3[3]; //1
curvepoints[0] = new Vector3(0, 1, 0);
curvepoints[1] = new Vector3(0.5f, 0.5f, 0);
curvepoints[2] = new Vector3(1, 0, 0);
curve = new Curve(curvepoints[0], curvepoints[1], curvepoints[2], false); //2
What's going on?
- The basic curve consists of three points. This code sets and plots the points for the first curve.
- Generates the first curve with
Curveand assigns its values tocurve. You can set the last parameter totrueto draw the curve as a preview.
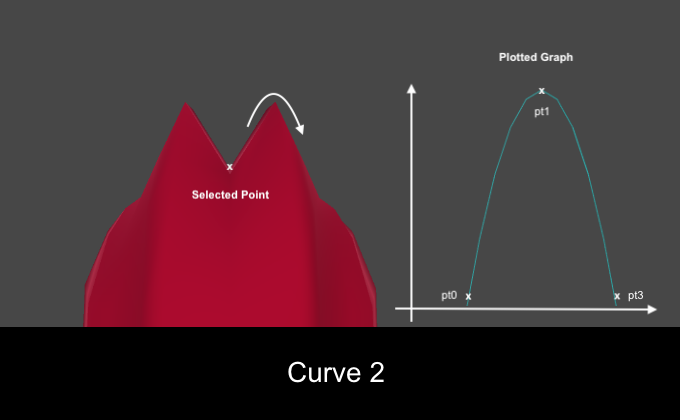
Now go to CurveType2 and add the following:
Vector3[] curvepoints = new Vector3[3]; //1
curvepoints[0] = new Vector3(0, 0, 0);
curvepoints[1] = new Vector3(0.5f, 1, 0);
curvepoints[2] = new Vector3(1, 0, 0);
curve = new Curve(curvepoints[0], curvepoints[1], curvepoints[2], false); //2
This works much like CurveType1.
- Sets and plots the points for the second curve.
- Generates the second curve with the
Curvemethod and assigns its values tocurve.
In StartDisplacement, before the closing braces, add the following:
if (curveType == CurveType.Curve1)
{
    CurveType1();
}
else if (curveType == CurveType.Curve2)
{
    CurveType2();
}
This will generate different curves depending on what you select as the Curve Type in the Custom Heart component.
In DisplaceVertices, inside the for loop, before the closing braces, add the following:
float increment = curve.GetPoint(distance).y * force; //1
Vector3 translate = (vert * increment) * Time.deltaTime; //2
Quaternion rotation = Quaternion.Euler(translate);
Matrix4x4 m = Matrix4x4.TRS(translate, rotation, Vector3.one);
modifiedVertices[i] = m.MultiplyPoint3x4(modifiedVertices[i]);
This might look familiar — it's much like the code you added to HeartMesh.
- Gets the curve's position at the given
distanceand multiplies itsyvalue byforceto getincrement. - Creates a new
Vector3calledtranslateto store the new position for the current vertex and applies its Transform accordingly.
Save the file and return to Unity. Check out the properties in Custom Heart on the Child GameObject.
In the Edit Type drop-down menu, you can now select Add Indices or Remove Indices to update your list of vertices. Select None to exit Edit mode, then click Play see the results. Experiment with different settings and vertex selections.
To see an example of the different curve types, enter these values:

Set Curve Type to Curve1, check that Edit Type is set to None and press Play.

You should see how the mesh fans out into a pattern. Move the model around to its side-view so you can see the shape this curve produces. Exit Play and try it again with Curve 2 to compare the results of both curve types:

That's it! You can click Clear Selected Vertices to reset the Selected Indices and experiment with your own patterns. Don't forget that there are several factors that will affect the final shape of the mesh:
- The size of the radius.
- The spread of vertices within the area.
- The pattern position of the selected vertices.
- The method that you choose for displacement.