watchOS 4 Tutorial Part 1: Getting Started
In this watchOS 4 tutorial for complete beginners, you’ll learn how to create the user interface for a fictional airline called Air Aber. By Audrey Tam.
Creating the Controller
Right-click on the Watch Extension group in the Project navigator, and choose New File…. In the dialog that appears, select watchOS\Source\WatchKit Class, and click Next. Name the new class FlightInterfaceController, making sure it’s subclassing WKInterfaceController, and Language is set to Swift:

Click Next, and then Create.
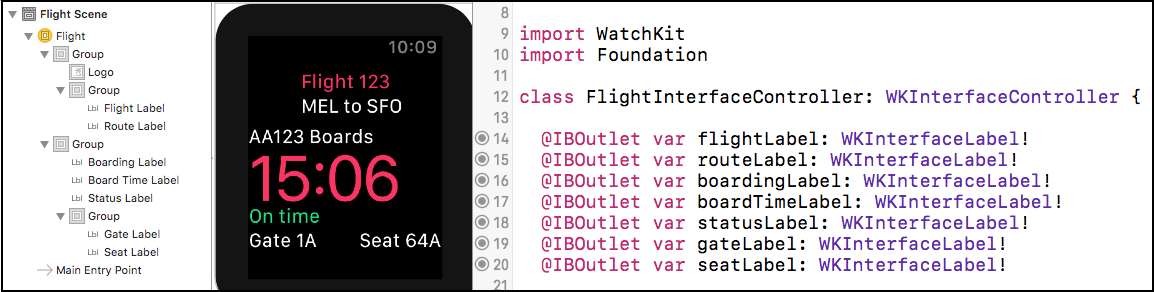
When the new file opens in the code editor, delete the three empty method stubs, so you’re left with only the import statements and the class definition.
Add the following outlets to the top of FlightInterfaceController:
@IBOutlet var flightLabel: WKInterfaceLabel!
@IBOutlet var routeLabel: WKInterfaceLabel!
@IBOutlet var boardingLabel: WKInterfaceLabel!
@IBOutlet var boardTimeLabel: WKInterfaceLabel!
@IBOutlet var statusLabel: WKInterfaceLabel!
@IBOutlet var gateLabel: WKInterfaceLabel!
@IBOutlet var seatLabel: WKInterfaceLabel!
Here, you’re simply adding an outlet for each of the labels you added to the interface earlier. You’ll hook them up in just a moment.
Next, add the following property and property observer below the outlets:
// 1
var flight: Flight? {
  // 2
  didSet {
    // 3
    guard let flight = flight else { return }
    // 4
    flightLabel.setText("Flight \(flight.shortNumber)")
    routeLabel.setText(flight.route)
    boardingLabel.setText("\(flight.number) Boards")
    boardTimeLabel.setText(flight.boardsAt)
    // 5
    if flight.onSchedule {
      statusLabel.setText("On Time")
    } else {
      statusLabel.setText("Delayed")
      statusLabel.setTextColor(.red)
    }
    gateLabel.setText("Gate \(flight.gate)")
    seatLabel.setText("Seat \(flight.seat)")
  }
}
Here’s the play-by-play of what’s happening:
- You declare an optional property of type
Flight. This class is declared in Flight.swift, which is part of the shared code you added to the Watch Extension target earlier. - You add a property observer that is triggered whenever the property is set.
- You make sure there’s an actual flight rather than
nilin the optional property. You only want to proceed with configuring the labels when you know you have a valid instance ofFlight. - You configure the labels using the relevant properties of
flight. - If the flight is delayed, you change the text color of the label to red.
Now you need to set flight when the controller is first shown. Add the following below the declaration of flight:
override func awake(withContext context: Any?) {
  super.awake(withContext: context)

  flight = Flight.allFlights().first
}
In the next part of this series, you’ll change this implementation to use the context that’s passed to it, but for now, you simply load all the flights from the shared JSON file, then take the first one from the array.
awake(withContext:) is called after the controller is loaded from the storyboard, and all its outlets are set up, so it’s a great place to set flight.Now, there’s one final step before you can build and run, and that’s to connect the outlets.
Connecting the Outlets
Open Watch\Interface.storyboard, and select the interface controller. Using the Identity inspector, set Custom Class\Class to FlightInterfaceController.
Next, use your favorite method to connect the outlets according to the list below:
-
flightLabel: Flight 123 -
routeLabel: MEL to SFO -
boardingLabel: AA123 Boards -
boardTimeLabel: 15:06 -
statusLabel: On time -
gateLabel: Gate 1A -
seatLabel: Seat 64A
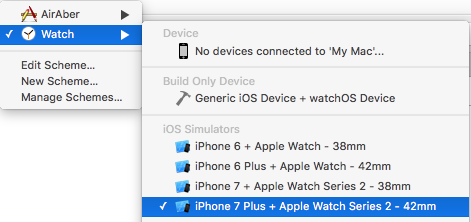
Before you hit run, there’s just one more thing to do. The sample app you’re building throughout this tutorial has been designed for the 42mm Apple Watch, so you need to make sure you have the correct watch simulator set up, otherwise some things may look a little off. For a real world app, you’d want to make sure your interfaces work equally well across both sizes of watch, but that’s outside the scope of this tutorial.
Open the Watch scheme menu, and select one of the 42mm simulators:
Build and run. Once the simulator has finished loading, you should see your elaborate layout, with the logo tinted Air Aber pink. The Flight object generates random values for boarding time and seat number, so you’ll see different values there:

Congratulations! You’ve now finished implementing your very first WatchKit interface, and got it up and running in the watch simulator using real data — nice work. :]
Where To Go From Here?
Here is the finished example from this tutorial series so far.
In this exercise, you’ve learned how to add a Watch app to an existing iOS app, how to create an interface controller, and lay out a pretty complex interface using nested groups, and how to tie the whole thing together using a WKInterfaceController subclass. So, where to next?
Part 2 of this tutorial series, of course! In Part 2, you’ll learn all about tables and navigation in WatchKit.
If you have any questions or comments on this tutorial, please join the forum discussion below! :]
 If you enjoyed this tutorial series, you’d definitely enjoy our book watchOS by Tutorials.
The book goes into further detail on making watchOS apps and is written for intermediate iOS developers who already know the basics of iOS and Swift development but want to learn how to make Apple Watch apps for watchOS 4.
It’s been fully updated for Swift 4, watchOS 4 and Xcode 9 — get it on the raywenderlich.com store today!