Objectively Speaking 2: A Crash Course in Objective-C for iOS 6
This is the 2nd post by iOS Tutorial Team Member Linda Burke, an indie iOS developer and the founder of canApps. If you are a software developer skilled in another platform, but want to start learning iPhone development (and hence Objective-C) – this is the tutorial series for you! This tutorial picks up where the […] By .
Adding a Segue Between Views
To hookup the two view controllers by a segue, select the Tip button, then right click on the button and drag over to QuizTipViewController, like so:

From the menu selection, select modal.
You will notice a line with a slight curve is now connecting the two views. This is the segue.
Select the circle in between the view controllers, then select the Attributes Inspector. In the Identifier field, enter TipModal, like so:

Build and run your app, and click on the Tip button, and you'll see the following:

As you can see, the view controller shows only the empty text — and when you click the Done button, nothing happens!
You'll need to initialize the view controller during the segue, and set the tip text accordingly.
You can manipulate a view controller or run other additional code before the view controller is presented on the screen. Your segue must have a unique name, so that you can trigger different actions based on which segue is being triggered — in this case, it's TipModal.
To do so, add the following code to QuoteQuizViewController.m, just before the final @end:
- (void)prepareForSegue:(UIStoryboardSegue *)segue sender:(id)sender
{
    if ([segue.identifier isEqualToString:@"TipModal"]) {
        QuizTipViewController * detailViewController = (QuizTipViewController *) segue.destinationViewController;
        detailViewController.delegate = self;
        detailViewController.tipText = self.quiz.tip;
    }
}
This is the actual segue code. First, you obtain the next view controller and since it is returned as a type id, you must cast it to your destination view controller. Then you can manipulate this view controller like it were any other object, and set the various properties as required.
Build and run your app, and when the first clue presents itself, tap the Tip button. You should see the following:
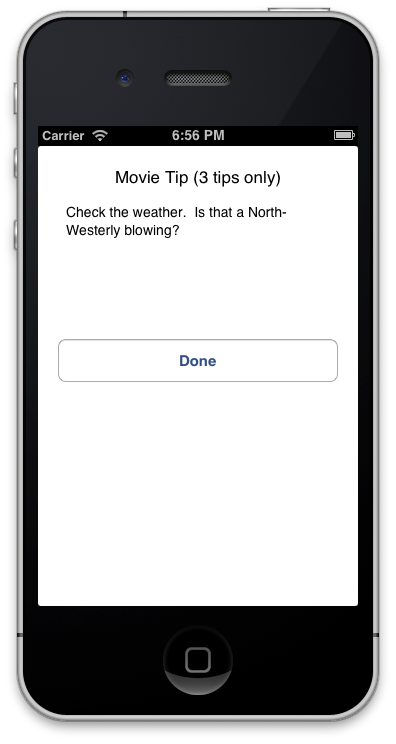
Click the Done button to dismiss the view controller. It all works!
Congratulations, you have made a complete quiz app - and learned a ton about Objective-C and iOS development in general in the process!
Where to Go From Here?

Here is a sample project with all of the code from the above tutorial.
Well, you've come to the end of your road - and hopefully you've learned a lot of cool new things! Take a break and when you are feeling rested, gas up the car then put the pedal to the metal. There's a whole wide world of app development just waiting for you out there! :]
The next best place to start is to check out our huge list of free tutorials, or check out some of our books and starter kits.
Also, feel free to stop by the forums if you have any questions about what you've done. Also, if you liked this tutorial and would like to see more in the series, please let me know!
In the meantime, good luck and I'll see you on the road! :]