Fat Fractal Tutorial for iOS: Getting Started
Learn how to make an iOS app with a back end like Twitter in this beginner Fat Fractal tutorial! By .
Building The Authentication System Part II
Let’s complete the rest of the authentication system while you are at it.
Open AppDelegate.m, and let’s make the application automatically log in the user if there are user credentials in the keychain.
Inside application:didFinishLaunchingWithOptions:, add the following code after the “Login with FatFractal by initiating connection with the server” comment:
// Step 1
[_ff loginWithUserName:username andPassword:password onComplete:^(NSError *theErr, id theObj, NSHTTPURLResponse *theResponse) {

    // Step 2
    if (theErr) {
        NSLog(@"Error trying to log in from AppDelegate: %@", [theErr localizedDescription]);
        // Probably keychain item is corrupted, reset the keychain and force user to sign up/ login again.
        // Better error handling can be done in a production application.
        [_keychainItem resetKeychainItem];
        return ;
    }

    // Step 3
    if (theObj) {
        NSLog(@"Login from AppDelegate using keychain successful!");
        [self userSuccessfullyAuthenticated];
    }
}];
In the code above, you login an existing user in the keychain by:
- Calling the
loginWithUserName:AndPassword:onCompletemethod on your FatFractal instance, which will return with a response from the server. - If there is an error, your keychain item is probably corrupted. Thus, you will clear it, and force the user to sign up and log in again when he next launches the application. In a production application, more robust error handling can be done.
- If there is no error, and the server returns you an
FFUserobject, you will send a message to theMainFeedViewControllerto inform it that user is successfully authenticated. This is so that you can know when to download the tweets and user information, as well as refresh the table view in theMainFeedViewController.
Build and run your application. If all goes well, in the log you should see the FFUser object being returned by the server and your log message that login from the app delegate using keychain was successful:

The Login View Controller
Registration works great, but the Login View Controller still doesn’t work, so let’s add the code for that next.
Open LoginViewController.m and add the following code to loginUserWithUsername:andPassword: after the “TODO” comment:
#pragma mark - Helper Methods
// Login with FatFractal, save to keychain and handleSuccessfulLogin if successful
// Step 1
[[FatFractal main] loginWithUserName:usernameText andPassword:passwordText onComplete:^(NSError *theErr, id theObj, NSHTTPURLResponse *theResponse) {

    // Step 2
    if (theErr) {
        NSLog(@"Error logging in from LoginViewController: %@", [theErr localizedDescription]);
        [MBProgressHUD hideHUDForView:self.view animated:YES];
        UIAlertView *alert = [[UIAlertView alloc] initWithTitle:@"Error" message:@"Your username and password could not be authenticated. Double check that you entered them correctly and try again." delegate:self cancelButtonTitle:@"OK" otherButtonTitles: nil];
        [alert show];
    } else {

        // Step 3
        if (theObj) {
            // App is now in signed in state.
            [self saveUserCredentialsInKeychain];

            [MBProgressHUD hideHUDForView:self.view animated:YES];

            [self dismissViewControllerAnimated:YES completion:^{
                // Upon successful dismiss, handle login.
                [self handleSuccessfulLogin];
            }];

        }
    }
}];
In the code above, you login an user to your Fat Fractal backend by:
- Calling the
loginWithUserName:AndPassword:onCompletemethod on your FatFractal instance, which will return with a response from the server. - Handle the error, if any. Notice that you do not display the localized error, you will explain why in a short while.
- Check that the server actually returned you the
FFUserobject, save your credentials in the keychain and dismiss the modal view.
Now, why don’t you show the localized error message?
The reason is that the error message will reveal that the user is either using an incorrect password or user name that does not exist. This is bad in terms of security as you don’t want to make it easy for people to guess user names or passwords. Thus, you give a generic message that makes it hard to guess if the user name exists or the password is wrong. You can see it in the logs below:


For now, you will not be using the Login View Controller, as you are automatically logged in when you sign up, and there is no log out function as of yet.
You will come to that in a while.
Adding Your First Tweet
What Twitter clone would you have if the user can’t even post his or her tweet?
Let’s create the Micropost object that will hold your tweets.
Choose File > New > New File or ⌘N to bring up the Template Chooser for the new class file. You will use the standard Objective-C class template. Click Next.
Enter the name of the Objective-C class as Micropost, a subclass of NSObject.
Modify Micropost.h as follows:
#import <Foundation/Foundation.h>

@interface Micropost : NSObject

@property (strong, nonatomic) NSString *content;
@property (strong, nonatomic) FFUser *user;

@end
Next, let’s create your AddTweetViewController.
Choose File > New > New File or ⌘N to bring up the Template Chooser for the new class file. We will use the standard Objective-C class template. Click Next.
Enter the name of the Objective-C class as AddTweetViewController, a subclass of UIViewController.

Next, let’s create the user interface for your AddTweetViewController in your storyboard. Drag a new View Controller object into your storyboard, select it, and change it’s class to AddTweetViewController under it’s Identity Inspector.

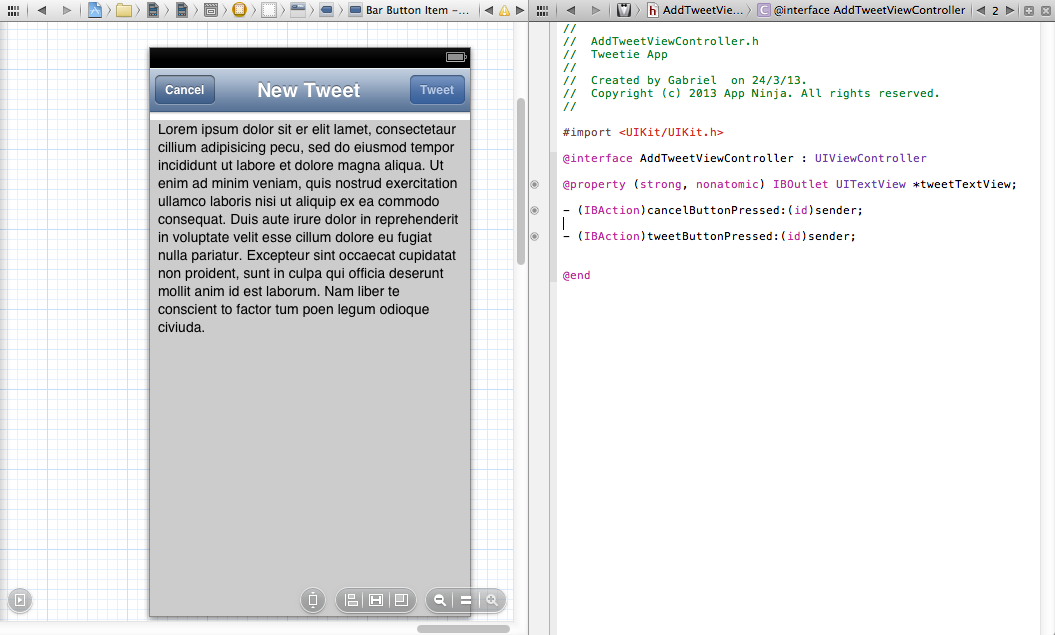
Next, drag a UITextView, UINavigationBar and two UIBarButtonItems and set up your user interface as such:

Connect your text view to an outlet called tweetTextView, the cancel button to an action called cancelButtonPressed:, and the tweet button to an action called tweetButtonPressed::
Next open AddTweetViewController.m and import the Micropost header at the top of the file:
#import "Micropost.h"
Make the text field the first responder when the view loads and clear the text by adding this to the viewDidLoad method:
- (void)viewDidLoad
{
    [super viewDidLoad];
    [_tweetTextView becomeFirstResponder];
    [_tweetTextView setText:@""];
}
Then in edit the cancelButtonPressed: method to simply dismiss the view controller:
- (IBAction)cancelButtonPressed:(id)sender {
    [self dismissViewControllerAnimated:YES completion:nil];
}
And replace tweetButtonPressed: with the following:
- (IBAction)tweetButtonPressed:(id)sender {

    // Check if logged in user exists (logged in)
    if ([[FatFractal main] loggedInUser]) {
        Micropost *myPost = [[Micropost alloc] init];
        myPost.content = _tweetTextView.text;
        myPost.user = [[FatFractal main] loggedInUser];
        [[FatFractal main] createObj:myPost atUri:@"/Micropost" onComplete:^(NSError *theErr, id theObj, NSHTTPURLResponse *theResponse) {
            if (theErr) {
                NSLog(@"Error, can't post at this time.");
            }

            if (theObj) {
                NSLog(@"Success! Micropost created: %@", theObj);
                [self dismissViewControllerAnimated:YES completion:nil];
            }
        } onOffline:^(NSError *theErr, id theObj, NSHTTPURLResponse *theResponse) {
            FFQueuedOperation *operation = (FFQueuedOperation *)theObj;
        }];
    }
}
You first check if the user is logged in, and create a new Micropost object with the text and currently logged in users as the properties.
You then call the createObj: method on your FatFractal singleton to create and post the object to your web service. This should be familiar to you by now.
The interesting thing here is the onOffline: block.
Fat Fractal supports offline queuing for most operations, in case the client is offline. The Fat Fractal SDK will try to complete any queued operations every 1 second while the client is online, and every 10 seconds while your client is offline.
The queued operations are saved to the iOS device local storage, so they survive app restarts, termination etc. This is very useful when designing an app like Twitter, which if your user tweets a post while in an area without network connectivity, the app will ‘hold’ or queue the post for you, and post it to the server when the user has connectivity again.
Allright! The last step is to display the new Add Tweet View Controller modally from the Main Feed View Controller.
Open MainFeedViewController.m and import the file:
#import "AddTweetViewController.h"
Then open MainStoryboard.storyboard and drag a UIBarButtonItem from your Object library to the navigation bar of your Main Feed View Controller like this:

Change the Identifier of the UIBarButtonItem under the Attributes Inspector to Add.

Next, connect the UIBarButtonItem you added to the AddTweetViewController through a modal segue by Ctrl-Dragging from the button to the AddTweetViewController:
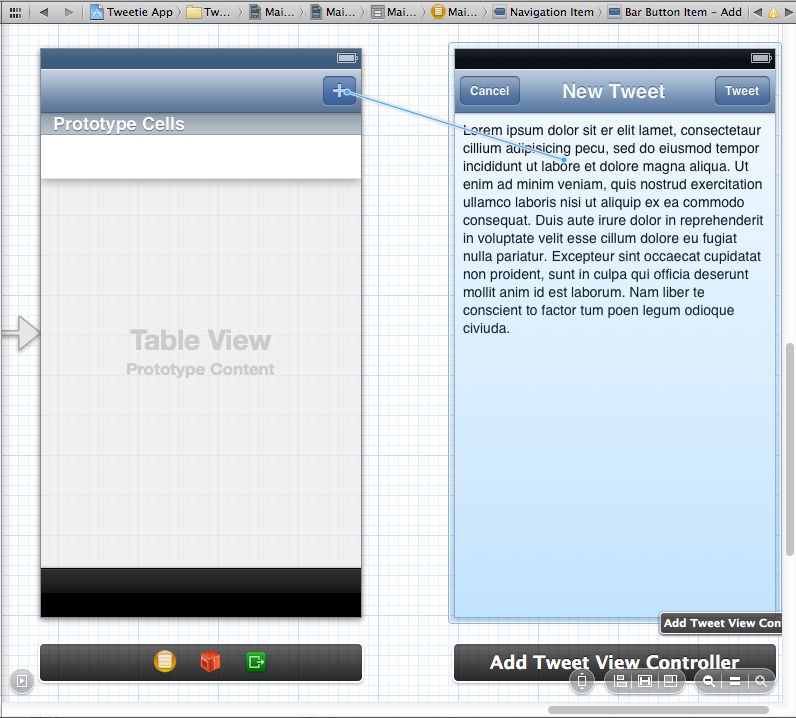
And select Modal Segue when the pop up appears:

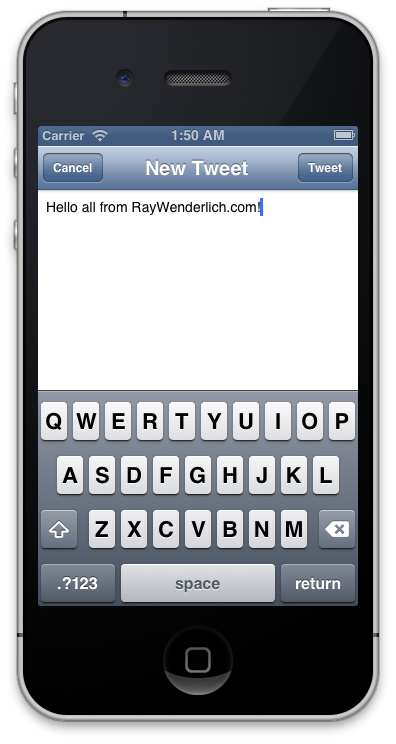
Allright! Run the app now try adding a tweet.
To do this, click on the + Bar Button, and you should see the AddTweetViewController’s modal view appear. Type in what ever you like, and hit the Tweet button:
You should see something like the following in your logs, signifying that your post was successful!

![]()
If you go to your Fat Fractal domain, using your web browser, at https://[YOUR DOMAIN].fatfractal.com/[YOUR APP NAME]/ff/resources/Micropost, you will see that your object has been created in your backend, along with other JSON data:

Our table view is still empty though.. So let’s retrieve this data and format it to your table view.