Fat Fractal Tutorial for iOS: Getting Started
Learn how to make an iOS app with a back end like Twitter in this beginner Fat Fractal tutorial! By .
Installing FatFractal Locally
Next, you will install FatFractal locally on your computer. For those of you who have experience with web development, you are probably familiar with developing and testing your web applications locally before deploying them to the cloud. Sadly, most BaaS do not support this feature, which means that you are always developing in production – which is dangerous.
Luckily, FatFractal supports local development, which you can then push to the cloud and ‘live’ your code when you are satisfied. This is one of the key strengths of FatFractal – the ability to build your backend locally, which is much faster, efficient and safer than compiling, deploying and tweaking over the internet. As their webpage states – “You are installing a fully featured FatFractal Engine on your desktop. This is not a crippleware version, not a simulation.” Check this link out for more information.
Head over to http://fatfractal.com/docs/getting-started/ and download the FatFractal Engine and Command-Line Tools (scroll down to the “Get down to business” section to find the links):

Once the download is complete, unzip the file to a location of your choice, preferably your Home directory. You are now going to add the FatFractal_Runtime/bin directory to your path. This allows you to run command line instructions without referencing the full path. Open up Terminal, and type in nano ~/.bash_profile as such:
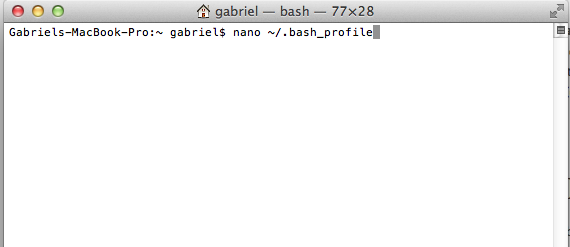
Press Enter, and you should see your bash_profile, which may have other lines of code in it. Add the following to the bottom of your file (do not touch any of the other lines!): export PATH=/(your FatFractal installation directory)/FatFractal_Runtime/bin:$PATH

Save and exit by pressing Control-X and pressing Y and Enter when prompted if you want to save your changes.
Restart Terminal at this point so it picks up your new path changes.
Next, you are going to scaffold your application backend. Scaffolding an app creates a directory structure with essential files needed by the backend so that the application can be deployed to the engine. Create a new directory for your application and change to it inside Terminal:
> mkdir rwtweet
> cd rwtweet
Scaffold your application using the ffef command – but replace the bracketed entries with what you entered for your domain name and app name in FatFractal. For example, I used rwtweet for both.
> ffef newapp [YOUR DOMAIN NAME] [YOUR APP NAME]
Note: FatFractal requires Java JRE1.6 to run. If you don’t have it installed already, it will be installed automatically after you issue this command.
Fat Fractal will then generate a scaffolded application for you:

At this point, your application backend is ready to be deployed. Deployment delivers your scaffolded backend to a FatFractal Engine for execution in the cloud.
So let’s deploy your backend application to the cloud right now! Deploy your application with the ffef command:
> ffef deployFFFabric
You should be prompted for your email and password, you will have to answer Yes to the question “Would you like to validate your domain[rwtweet] and context[rwtweet] before deploying to the FatFractal Cloud?” and will see something like the following in your Terminal:

After your Terminal reads Done, head over to

Congratulations – you have successfully deployed your backend to the cloud!
Now it’s time to set up your iOS client and write some Objective-C code.
Downloading the SDK and Starter Project
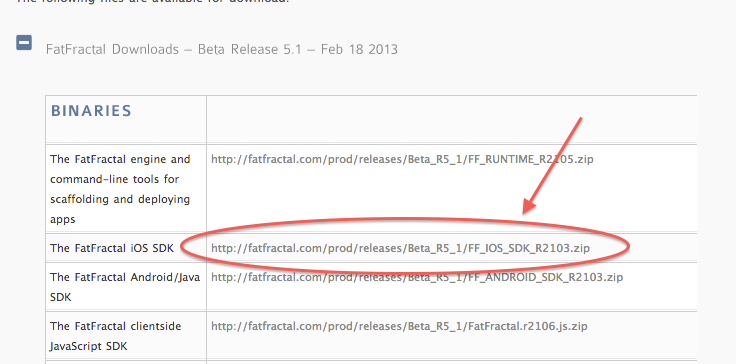
Before you can set up the iOS Client, you need to download the FatFractal iOS SDK. This will allow your application to easily interface with the FatFractal backend. Head over to http://fatfractal.com/prod/docs/getting-started/ and download the FatFractal iOS SDK.
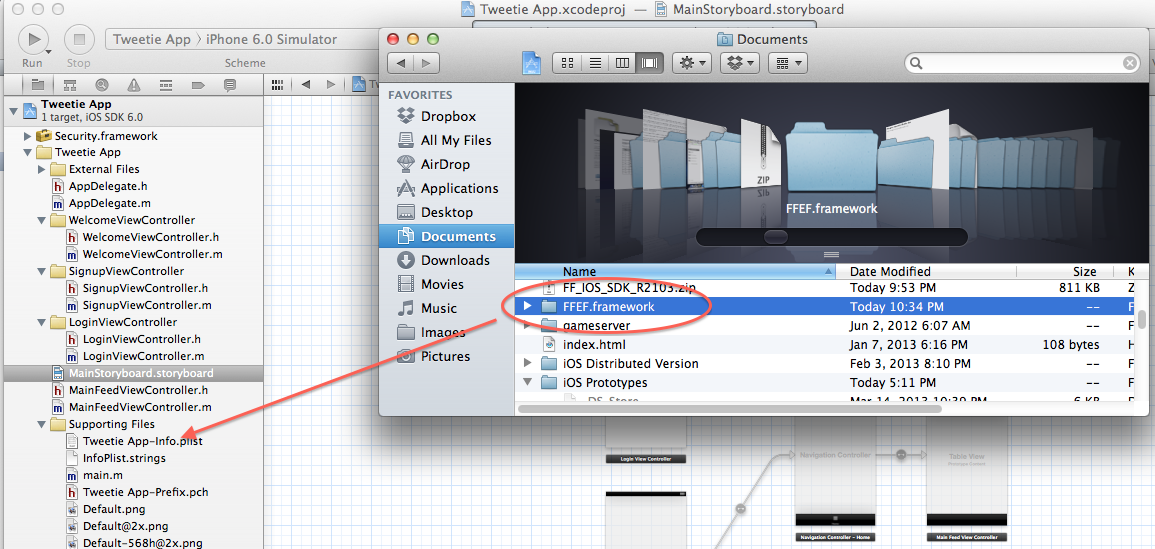
If you unzip the file you downloaded, you should get a folder named FFEF.framework. Remember where you unzipped this file – you will need it soon.
Next, download the starter project I prepared for you. This starter project has the user interface pre-created so you can focus on the Fat Fractal-related code in this tutorial.
Open the project in Xcode and build and run. The first thing you will see is a login screen, as well as two buttons that lead to a Sign up and Log in page:

However, there is no backend or logic to handle this yet, you’ll create these functions shortly.
Before you proceed any further, have a look at the structure and flow of the app by opening MainStoryboard.storyboard.

The project starts from a root view controller called Tab Bar Controller. It has only one tab for now, the UINavigationController which houses the MainFeedViewController – a table view controller.
This MainFeedViewController will be responsible for showing all the tweets from your users. It will look something like the real Twitter iOS application – but not quite as colorful.

The WelcomeViewController is the landing page for users who have not logged in or signed up yet. It is a modal view controller that is presented by the MainFeedViewController, hence it is not directly linked to any controllers in the storyboard. It is supposed to be similar to the Twitter landing view when you first download the app and launch it.

The color here could also use a little work. :] But anyways, this WelcomeViewController will link to the SignupViewController and LoginViewController respectively for the user to authenticate themselves with the backend web service.
Ok, so now that you are oriented around the application, you can begin configuring your project to work with FatFractal!
Setting Up The iOS Client
Drag your entire FFEF.framework folder into your Framework folder in the project navigator menu of your Xcode project. When prompted, check Copy Items.. and Create Groups..:
When done, test that your Xcode project is able to build with the FFEF.framework linked in by building the project (Build or ⌘B). Everything should run without error. If so, this means that your app is integrated with the FatFractal SDK. You are now ready to work with the service!
The next logical step is to create some sample objects as a sanity check, and to finally see your backend in action!
Creating Sample Objects
The cool thing about FatFractal is that it uses native Objective-C classes for its backend data modeling. This is your object definition. The FatFractal platform does not create dependencies in your code by requiring you to use their own proprietary object classes like most other BaaS. (PFObject anyone?)
This prevents vendor lock-in, which means that you do not have to rewrite your entire application – models, controllers and all if you ever decide to migrate backend service providers. Pretty thoughtful of the folks at FatFractal!
Lets create your first test object – a TestZombie class that you will solely use for testing purposes.
Choose File > New > New File or ⌘N to bring up the Template Chooser for the new class file. You will use the standard Objective-C class template. Click Next.

Enter the name of the Objective-C class, TestZombie, as a subclass of plain old NSObject. Then click Next and then

Modify TestZombie.h to include the properties for the class as such:
#import <Foundation/Foundation.h>

@interface TestZombie : NSObject

@property (strong, nonatomic) NSString *name;
@property (strong, nonatomic) NSString *gender;
@property (strong, nonatomic) NSString *mortalEnemy;

@end
Here you create three properties – one for the zombie’s name, one for its gender, and one for its mortal enemy – like shotguns!
Because in Xcode 4.5, properties are automatically synthesized for you, you can leave the TestZombie.m file alone.
That’s it for the test object model – let’s create an instance of the main class you will use to work with FatFractal.