Creating a Static Library in iOS Tutorial
Learn how to create a static library in iOS in this tutorial, and how to use it from within different projects and architectures. By Ernesto García.
Method 1: Header and Library Binary Files
For this part of the tutorial, you’ll need to download the starter project for this section . Copy the zipped file to any folder on your hard drive, and unzip it. You’ll see the following folder structure:

For your convenience, copies of the universal library .a file and header files are included, but the project isn’t configured to use them. That’s where you come in.
Note: The typical Unix convention for includes is an include folder for the header files, and a lib folder for the library files (.a). This folder structure is only a convention; it’s not mandatory in any way. You don’t need to follow this structure or copy the files inside your project’s folder. In your own apps, you can have the header and library files in any location of your choice, as long as you set the proper directories when you configure the Xcode project later on.
Open the project, and build and run your app. You’ll see the following build error:

As expected, the app has no idea where to find the header file. In order to solve this, you need to add a new Header Search Path to the project that points to the folder where the header is located. Configuring the Header Search Path is always the first step when using code from a static library.
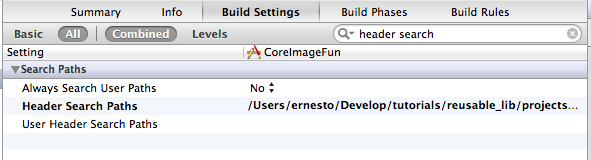
As demonstrated in the image below, click on the project root node in the project navigator (1), and select the CoreImageFun target (2). Select Build Settings (3), and locate the Header Search Paths setting in the list. You can type “header search” in the search box to filter the big list of settings if necessary (4).

Double click on the Header Search Paths item, and a popover will appear. Click the + button, and enter the following:
$SOURCE_ROOT/include
The popover should look like the following image:

$SOURCE_ROOT is an Xcode environment variable, which points to the project’s root folder. Xcode will replace this variable with the actual folder which contains your project, which means stays up to date when you move the project to another folder or drive.
Click outside the popover to dismiss, and you’ll see that Xcode has automatically translated it to the actual location of the project, as shown below:
Build and run your app, and see what kind of result you get. Hmm — some linker errors appear:

That doesn’t look great, but it gives you one more piece of information that you need. If you look closely, you’ll see that all the compile error is gone, and has been replaced with the linker errors. This means that Xcode found the header file and used it to compile the app, but in the linking phase, it couldn’t find the object code for the ImageFilter class. Why?
That’s simple — you haven’t yet told Xcode where to find the library file which contains the class implementation. (See, it wasn’t anything too serious.)
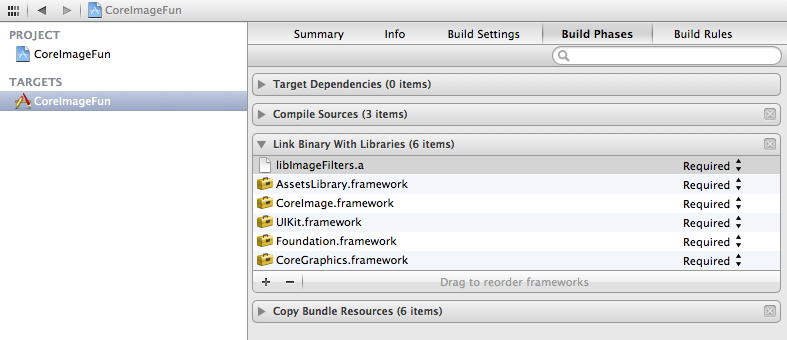
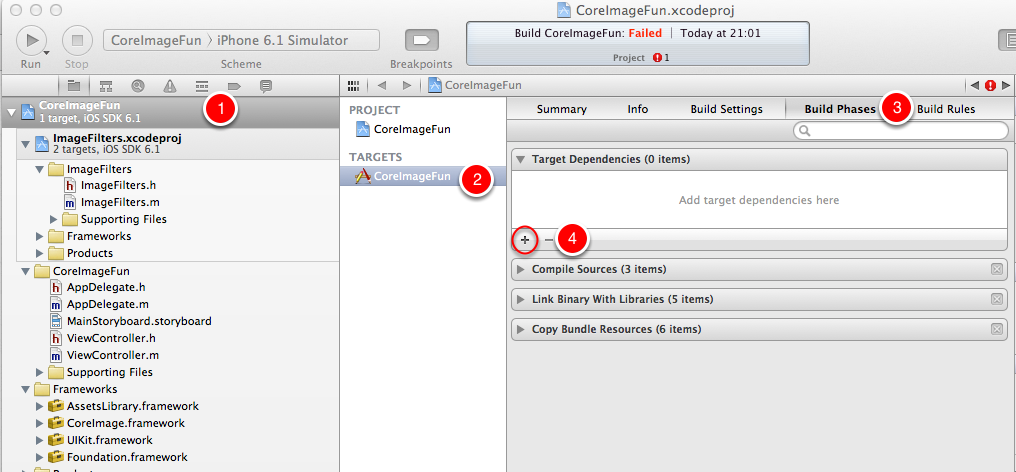
As shown in the screenshot below, return to the build settings (1) for the CoreImageFun target (2). Select the Build Phases tab (3), and expand the Link Binary With Libraries section (4). Finally, click the + button in that section (5).

In the window that appears, click on the Add Other… button and locate the libImageFilters.a library file in the lib subdirectory inside the project’s root folder, as so:

This is how the Build Phase of your project should look when you’re all done:
The final step is to add the -ObjC linker flag. The linker tries to be efficient about only including needed code, which can sometimes exclude static library code. With this flag, all the Objective-C classes and categories in the library are loaded properly. You can learn more about this in Apple’s Technical Q&A QA1490
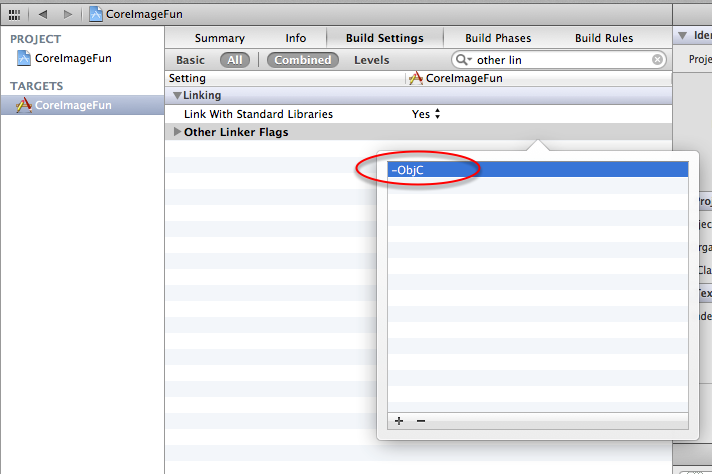
Click on the Build Settings tab, and locate the Other linker Flags setting, as shown below:

In the popover, click on the + button and type -ObjC, as such:
Finally, build and run your app; you should not receive any build errors, and the app will open in all it’s glory, like so:
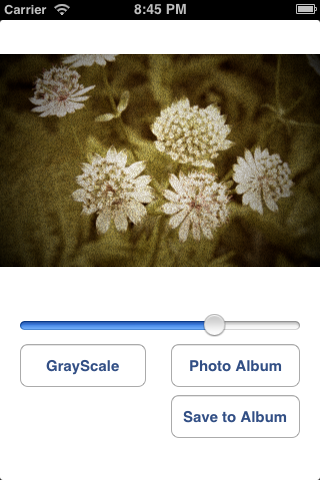
Drag the slider to change the filter level, or tap on the GrayScale button. The code used to perform those image filters is coming not from the app, but from the static library.
Congratulations — you just built and used your first static library in a real application! You’ll see this method of including the header and library used in many third-party libraries such as AdMob, TestFlight or any other commercial libraries that don’t provide the source code.
Method 2: Subprojects
For this part of the tutorial, you’ll need to download the starter project for this section here
Copy it to any folder in your hard drive, and unzip it. You’ll see the following folder structure:

If you followed the first method of this tutorial, you will notice a difference in the base project. This project does not have any header or static library files — that’s because they aren’t needed. Instead, you’ll take the ImageFilters library project you created at the beginning of the tutorial and add it to this project as a dependency.
Before doing anything else, build and run your application. You should be greeted with the following error:
If you followed along with the first method, then you might already know how to fix this issue. In the sample project, you’re using the ImageFilters class in the ViewController class, but you still haven’t told Xcode where the header files are located. Xcode is trying to find the ImageFilters.h file, but it fails.
To include the ImageFilters library project as a subproject, all you need to do is drag the library project file to the Project File Tree. Xcode will not add a subproject properly if it’s already open in another Xcode window. So, before going on with the tutorial, make sure the ImageFilters library project is closed.
In the Finder, find the project file of the library project; it’s named ImageFilters.xcodeproj. Drag that file into the Project Explorer of the CoreImageFun project, located on the left side of the window, as so:

After dragging and dropping the file, your Project Explorer view should look like the following:

Now that Xcode knows about the library subproject, you can add the library to the project Dependencies. This means Xcode will make sure that the Library is up to date before building the main app.
Click on the project root (1), and select the CoreImageFun target (2). Click on the Build Phases tab (3), and expand the Target Dependencies (4), like so:
Click on the + button to add a new dependency. As shown below, make sure you choose the ImageFilters target (not universalLib) from the popup:

After adding it, this is how the dependency section should look:

The last step is configuring the project to link the app with the static library. Expand the Link Binary with libraries section, and click the + button, as shown below:

Choose the libImageFilters.a item and click Add:

This is how the Link Binary with Libraries section should look after adding the library:

As with the first method, the final step is to add the -ObjC linker flag. Click on the Build Settings tab, and locate the Other linker Flags setting, as shown below:
In the popover, click on the + button and type -ObjC, as so:
Build and run your app; you shouldn’t get any errors, and the app will open once again:
Drag the slider or tap on the GrayScale button to see the results of the image filters. Once again, the filter logic is totally contained within your library.
If you followed the first method to add the library to your app (using the header and library files), you’ll have noticed some differences in the approach for the second method. In the second method, you haven’t added any header search paths to the project configuration. Another difference is that you’re not using the Universal library.
Why the difference? When adding the library as a subproject, Xcode takes care of almost everything for you. After adding the subproject and the dependency, Xcode knows where to search for the header and binary files, and which architecture of the library needs to be built for your app based on the selected configuration. That’s pretty handy.
If you’re using your own library, or if you have access to the source and project files, adding the library as a subproject provides a convenient way to import a static library in your app. You get closer build integration as a project dependency, with fewer things to worry about doing yourself. Win-win!