Creating a Static Library in iOS Tutorial
Learn how to create a static library in iOS in this tutorial, and how to use it from within different projects and architectures. By Ernesto García.
Universal Binaries
A universal binary is a special kind of binary file that contains object code for multiple architectures. You might be familiar with universal binaries from the transition from PowerPC (PPC) to Intel (i386) in the Mac computers line. During that transition, Mac apps usually shipped with universal binaries containing both executables in a single binary file so that the application could work with both Intel and PowerPC Macs.
The concept for supporting ARM and i386 isn’t that much different. In this case, the static library file will include the object code for your iOS device’s (ARM) and your simulator’s (i386) architectures. Xcode will recognize the library as universal, and every time you build the app it will choose the appropriate architecture based on the target.
In order to create a universal binary library, you need to use a system tool called lipo.

Don’t worry kitten, it’s not that kind of lipo! :]
lipo is a command line tool that allows you to perform operations on universal files (operations like creating universal binaries, listing universal file contents and more). What you are going to use lipo for in this tutorial is combine different architecture binary files into a single output binary for multiple architectures. You could use lipo directly from the command line, but in this tutorial you will make Xcode do the work for you by running a command line script that creates a universal library.
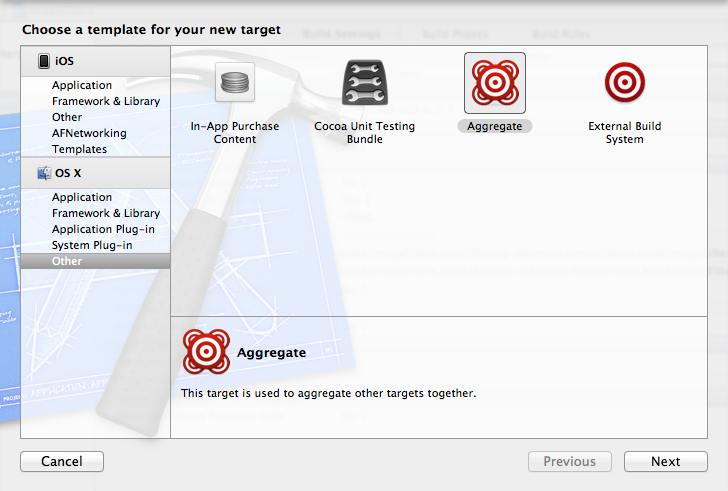
An Aggregate Target in Xcode will build multiple targets at once, including command-line scripts. Navigate to File/New/Target in the Xcode menu. Choose iOS/Other and click on Aggregate, like so:
Call the target UniversalLib, and make sure ImageFilters is the selected project, as shown below:

Click on the ImageFilters project in the project navigator, then select the UniversalLib target. Switch to the Build Phases tab; this is where you will set up the actions that will run when the target is built.
Click on the Add Build Phase button, and select Add Run Script in the menu that pops up, as shown below:

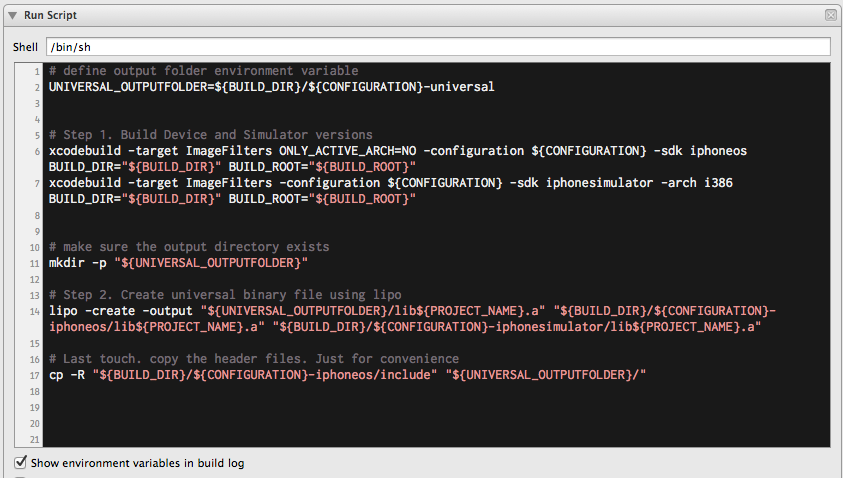
Now you have a script item to set up. Expand the Run Script module, and paste in the following text under the Shell line:
# define output folder environment variable
UNIVERSAL_OUTPUTFOLDER=${BUILD_DIR}/${CONFIGURATION}-universal

# Step 1. Build Device and Simulator versions
xcodebuild -target ImageFilters ONLY_ACTIVE_ARCH=NO -configuration ${CONFIGURATION} -sdk iphoneos  BUILD_DIR="${BUILD_DIR}" BUILD_ROOT="${BUILD_ROOT}"
xcodebuild -target ImageFilters -configuration ${CONFIGURATION} -sdk iphonesimulator -arch i386 BUILD_DIR="${BUILD_DIR}" BUILD_ROOT="${BUILD_ROOT}"

# make sure the output directory exists
mkdir -p "${UNIVERSAL_OUTPUTFOLDER}"

# Step 2. Create universal binary file using lipo
lipo -create -output "${UNIVERSAL_OUTPUTFOLDER}/lib${PROJECT_NAME}.a" "${BUILD_DIR}/${CONFIGURATION}-iphoneos/lib${PROJECT_NAME}.a" "${BUILD_DIR}/${CONFIGURATION}-iphonesimulator/lib${PROJECT_NAME}.a"

# Last touch. copy the header files. Just for convenience
cp -R "${BUILD_DIR}/${CONFIGURATION}-iphoneos/include" "${UNIVERSAL_OUTPUTFOLDER}/"
The code is not so complicated, this is how it goes line-by-line:
- UNIVERSAL_OUTPUTFOLDER contains the name of the folder where the universal binary will be copied: “Debug-universal”
- Step 1. On the second line you call xcodebuild and instruct it to build the ARM architecture binary (you will see on this line the parameter -sdk iphoneos)
- Next line calls xcodebuild again and builds in a separate folder the iPhone Simulator binary for an Intel architecure, the key params here are: -sdk iphonesimulator -arch i386. (If you’re interested, you can learn more about xcodebuild on its man page)
- Step 2. Now that you already have the two .a files for the two architectures you just invoke lipo -create and set it to create a universal binary out of them
- In the last line you copy the header files over to the universal build folder (using the cp shell command)
Your Run Script window should look like the following:
Now you’re ready to build the universal version of the static library. Select the aggregate target UniversalLib in the Scheme Selection drop down, as so (unlike on the screenshot below instead of “iOS Device” you might see your device’s name):

Press the Play button to build the target for the aggregate scheme.
To see the result, use the Show in Finder option on the libImageFilters.a product again. Switch to Finder’s column view to see the folders in the hierarchy and you’ll see a new folder called Debug-Universal (or Release-Universal if you built the Release version), which contains the Universal version of the library, as shown below:

You’ll find the usual headers and static library files are present, except this one links with both the simulator and the device.
And that is all you needed to learn in order to create your very own universal static library!
To recap, a static library project is very similar to an app. You can have one or many classes, and the final build products are the header files and a .a file with the code. This .a file is the static library which can be linked into several applications.
Using a Static Library in Your App
Using the ImageFilters class in your own app is not very different from using it directly from source: you import the header file and start using the class! The problem is that Xcode doesn’t know the location of the header or the library file.
There are two methods to include your static library in your project:
- Method 1: Reference the headers and the library binary file (.a) directly.
- Method 2: Include the library project as a Subproject.
Choosing one or the other method really depends on your own preferences and whether you have the source code and the project file of the static library at your disposal.
Both methods are described independently in this tutorial. You can try either the first or second method, although it’s best to try both in the order described. At the beginning of both method Sections, you will be asked to download a zip file with a modified version of the application created in the Core Image Tutorial, which uses the new ImageFilters class from the library.
Since the main goal of this tutorial is to teach you how to use the static library, the modified version includes all the source code required for the app. That way you can focus on the project configuration needed to use the library.