Cocos2D-X Tutorial: Making a Universal App: Part 1
Learn how to make a universal app that works on the iPhone, iPad, and Android in this Cocos2D-X tutorial. By .
Planning the Art: Conclusion
OK, so based on the above discussion, here is the plan for this Cocos2D-X tutorial.
- The art has been designed to be within a 960×640 playable area, used full-screen on retina-display iPhones, and centered in the iPad screen.
- The art will then be scaled by TexturePacker to be 1/2 the size for normal iPhones.
- The full sized-art will be added in a folder with name hd, and the half size in the sd.
- Backgrounds are a special case because they need to be fullscreen always. The backgrounds will be made to the 1024×768 size (iPad size) so the entire screen is filled. The same images will actually be used on the iPhone too since it’s close enough. Some of the background will be offscreen, but that doesn’t matter for this particular background.
- The iPad version will contain code to use the hd images, convert coordinates to inside the playable area, use the appropriate radio, etc.
Go ahead and download the art for this Cocos2D-X tutorial, made by this lovely lady. Unzip the file and take a look at how things are set up:
- In the foreground folder, the foreground is 1024×768 (the size of the iPad), but it is actually split into two parts: the lower part, and the upper part. It’s split into two parts so you can place the mole in-between the lower and upper parts, to make him look like he’s going underground.
- In the background folder, the background has the 1.33 aspect ratio of the iPad, but is actually half sized (512×384). This is becase the background barely shows (just through the three mole holes), so it’s not worth the cost of a large 1024×1024 texture load. Instead a small texture is loaded and scaled up.
- In the sprites folder, all sprites were sized to fit nicely within the 960×640 playable area. Note there’s a mole, and two animations for him (the mole laughing, and the mole being hit).
Ok – enough background info – it’s time to get started!
Let’s get started
Launch Xcode, select File\New\Project… and create a new project with the iOS\cocos2d-x\cocos2dx template, then click Next. Name the project WhackAMole, set the Device family as Universal, and then save the project.

Next, take the file that you just downloaded and unzip it into your WhackAMole project directory with Finder. It should be a sibling of the Classes folder.

Next, make sure you have TexturePacker installed and ready to go on your machine. If you don’t have it already or know how to use it, check out this tutorial for more information.
You will now set up TexturePacker to create the sprite sheets you’ll need for this project. You’ll be doing everything by TexturePacker‘s command line tools and Xcode integration, so no need to use the TexturePacker GUI at all!
Now choose the Resources folder, press Command+N, choose OS X\Other\Shell Script, and click Next. Name the file PackTexures.sh, and click Create.
Then replace the contents of PackTextures.sh with the following:
#!/bin/sh
TP="/usr/local/bin/TexturePacker"
if [ "${ACTION}" = "clean" ]
then
echo "cleaning..."
rm Resources/hd/background*
rm Resources/hd/foreground*
rm Resources/hd/sprites*
rm Resources/sd/background*
rm Resources/sd/foreground*
rm Resources/sd/sprites*
else
echo "building..."

${TP} --smart-update \
--format cocos2d \
--data Resources/hd/background.plist \
--sheet Resources/hd/background.pvr.ccz \
--dither-fs \
--opt RGB565 \
Art/background/*.png
${TP} --smart-update \
--format cocos2d \
--data Resources/sd/background.plist \
--sheet Resources/sd/background.pvr.ccz \
--dither-fs \
--scale 0.5 \
--opt RGB565 \
Art/background/*.png
${TP} --smart-update \
--format cocos2d \
--data Resources/hd/foreground.plist \
--sheet Resources/hd/foreground.pvr.ccz \
--dither-fs-alpha \
--opt RGBA4444 \
Art/foreground/*.png
${TP} --smart-update \
--format cocos2d \
--data Resources/sd/foreground.plist \
--sheet Resources/sd/foreground.pvr.ccz \
--dither-fs-alpha \
--scale 0.5 \
--opt RGBA4444 \
Art/foreground/*.png
${TP} --smart-update \
--format cocos2d \
--data Resources/hd/sprites.plist \
--sheet Resources/hd/sprites.pvr.ccz \
--dither-fs-alpha \
--opt RGBA4444 \
Art/sprites/*.png
${TP} --smart-update \
--format cocos2d \
--data Resources/sd/sprites.plist \
--sheet Resources/sd/sprites.pvr.ccz \
--dither-fs-alpha \
--scale 0.5 \
--opt RGBA4444 \
Art/sprites/*.png
fi
exit 0
Then move PackTextures.sh to the file path.

And don’t forget to move the PackTextures.sh reference of the file in the project.

This script runs TexturePacker to create a sprite sheets for the background image, the foreground images, and the sprite images – an HD and regular-quality image for each.
Note that each image is saved in the pvr.ccz format since it is the most efficient in terms of memory and disk space usage. Also the pixel format and dithering options were chosen to get a good tradeoff of quality and memory usage for each set of images.
If you’re unsure what the TexturePacker options do, load up Terminal and run TexturePacker –help to get a full description of each option.
Next, you need to set up your project to run this shell script when you compile. Now choose File\New\Target…, and choose OS X\Other\External Build System, and click Next. Name the Target TexturePacker, and click Finish.
Then select TexturePacker target and set up the settings as follows:

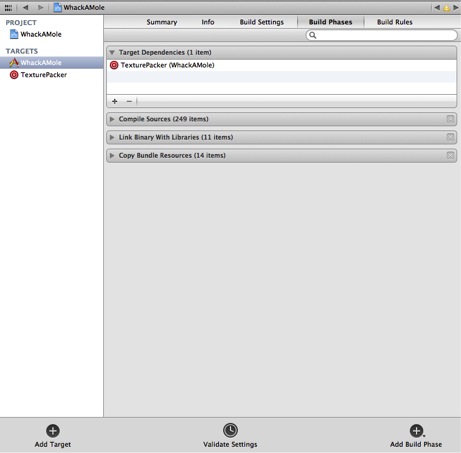
The final step is to set this target as a dependency of your app. Click on WhackAMole target right above the TexturePacker target, go to the Build Phases, click the + button in Target Dependencies, choose TexturePacker from the list, and click Add.
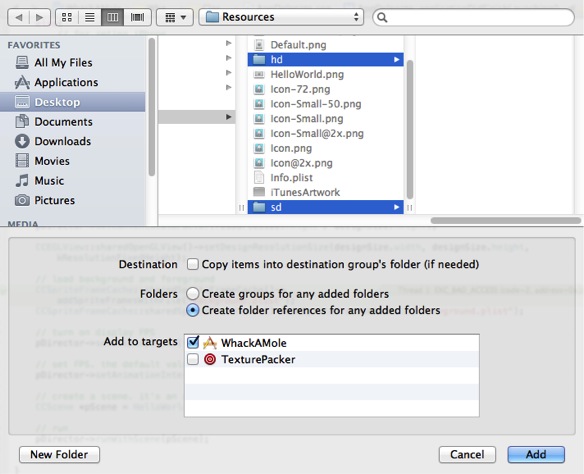
Compile your app, and you should see the output from TexturePacker from your build results if everything is working OK and then go to the Finder you’ll find two new folders hd and sd added to your Resources folder.
Add them to your project as below (make sure Create folder references for any added folders is checked).
Add the Art folder to the project.

One more thing before writing some code, copy Default-568h@2x.png into your Resources folder and add it to your project as below, otherwise your project can not support iPhone5!!

Setting the Background
Next, open up HelloWorldScene.cpp and find the init function. Remove the line codes between “return false” and “return true”. Then go to the AppDelegate.cpp and find the applicationDidFinishLaunching function. Add the following code lines below the
pDirector->setOpenGLView(CCEGLView::sharedOpenGLView());
as follow:
CCSize screenSize = CCEGLView::sharedOpenGLView()->getFrameSize();
CCFileUtils *pFileUtils = CCFileUtils::sharedFileUtils();
std::vector<std::string> searchPaths;

CCSize designSize = CCSizeMake(480, 320);
CCSize resourceSize;

// if the device is iPad
if (screenSize.height >= 768) {
    searchPaths.push_back("hd");
    searchPaths.push_back("sd");

    resourceSize = CCSizeMake(1024, 768);
    designSize = CCSizeMake(1024, 768);
}
// if the device is iPhone
else{
    // for retina iPhone
    if (screenSize.height > 320) {
        searchPaths.push_back("hd");
        searchPaths.push_back("sd");
        resourceSize = CCSizeMake(960, 640);
    }
    else{
        searchPaths.push_back("sd");
        resourceSize = CCSizeMake(480, 320);
    }
}
searchPaths.push_back("WhackAMoleSounds");
pFileUtils->setSearchPaths(searchPaths);
pDirector->setContentScaleFactor(resourceSize.width / designSize.width);

CCEGLView::sharedOpenGLView()->setDesignResolutionSize(designSize.width, designSize.height, kResolutionFixedWidth);
This block is how you deal with the multi-resolution. You always use three sizes in Cocos2D-X to solve this kind of problem: resourceSize is the art size, designSize is what you use to adapt different screen and finally the screenSize is the size you can see in the screen. With the help of the setContentScaleFactor and setDesignResolution functions you can deal with all kind of screens.
Then go to the HelloWorldScene.h add
USING_NS_CC;
under the #include section and add
CCSize _winSize;
as a private variable of HelloWorldScene.
Now back to HelloWorldScene.cpp, find the method init and add the code block between “return false” and “return true” as follow:
_winSize = CCDirector::sharedDirector()->getWinSize();

    // Load background
    CCSpriteFrameCache::sharedSpriteFrameCache()->addSpriteFramesWithFile("background.plist");

    // Load foreround
    CCSpriteFrameCache::sharedSpriteFrameCache()->addSpriteFramesWithFile("foreground.plist");

    // Add background
    CCSprite *dirt = CCSprite::createWithSpriteFrameName("bg_dirt.png");
    dirt->setScale(2.0);
    dirt->setPosition(ccp(_winSize.width * 0.5, _winSize.height * 0.5));
    this->addChild(dirt, -2);

    // Add foreground
    CCSprite *lower = CCSprite::createWithSpriteFrameName("grass_lower.png");
    lower->setAnchorPoint(ccp(0.5, 1));
    lower->setPosition(ccp(_winSize.width * 0.5, _winSize.height * 0.5));
    lower->getTexture()->setAliasTexParameters();
    this->addChild(lower, 1);

    CCSprite *upper = CCSprite::createWithSpriteFrameName("grass_upper.png");
    upper->setAnchorPoint(ccp(0.5, 0));
    upper->setPosition(ccp(_winSize.width * 0.5, _winSize.height * 0.5));
    upper->getTexture()->setAliasTexParameters();
    this->addChild(upper, -1);

    // Add more here later...
OK let’s go over this section by section, since there is a good amount of new material here.
- Determine names of sprite sheets and plists to load. This section lists the names of the sprite sheets and plists generated by TexturePacker to be loaded. Note that Cocos2D-X will not automatically choose between the “hd” versions and the normal versions. You need to choose which version to be loaded by yourself according the screen pixel of the devices.
- Load background and foreground. The next step is to load the information about each sprite for the background and foreground into the CCSpriteFrameCache so that they can be used later. Note that these sprites won’t actually be added to a CCSpriteBatchNode anywhere – since these images are just used once each it would be kind of pointless.
-
Add background. The background image is added as a child of the layer (with a zOrder of -2 so it appears beneath everything else) next. It scales the image by 2 because you made it smaller on purpose to conserve space, and centers the image. You may find that there is a black line on the middle of the screen if your code run on iPhone5 without this code line:
setAliasTexParameters();
- Add foreground. The foreground is added in two parts. As an easy way to place the image, it sets the anchor point to the middle/bottom for the top image, and the middle/top for the bottom image, and matches that anchor point up to the center of the screen. That way you don’t have to do any complicated math, and it shows up in the right place on all devices. Note that part of the background will be off-screen for iPhones, but that is OK for this background and barely even noticeable. Also note that the images are added with different zOrder values, so the lower image appears on top.
setAliasTexParameters();
Compile and Run the code, and you should now see the background and foreground on the screen! Give it a try on both the iPhone and iPad simulators to make sure that it appears OK on both devices.
