How To Make A UIViewController Transition Animation Like in the Ping App
iOS supports custom transitions between view controllers. In this tutorial you’ll implement a UIViewController transition animation like the Ping app. By Luke Parham.
CAShapeLayer
CAShapeLayers are a special class of CALayer that, instead of always rendering as a square, can have their shape defined by first defining a bezier path and then assigning that path to the layer’s path property.
In this case, you’ll define two bezier paths and animate between them.
Add the following logic to the method you added earlier, animate(toView:triggerButton:):
// 1
let rect = CGRect(x: triggerButton.frame.origin.x,
                  y: triggerButton.frame.origin.y,
                  width: triggerButton.frame.width,
                  height: triggerButton.frame.width)
// 2
let circleMaskPathInitial = UIBezierPath(ovalIn: rect)
This creates a bezier path that defines a small circular window into the content, starting at the location of the triggerButton.
You created a:
-
rectsimilar to the button’s frame, but with an equal width and height. - bezier path oval from the
rectwhich results in a circle.
Next, create a circle representing the ending state of the animation. Since you’ll only be able to see content inside of the circle, you don’t want any edge of the circle to still be visible by the end of the animation. Add the following below the code you just added:
// 1
let fullHeight = toView.bounds.height
let extremePoint = CGPoint(x: triggerButton.center.x,
                           y: triggerButton.center.y - fullHeight)
// 2
let radius = sqrt((extremePoint.x*extremePoint.x) +
                  (extremePoint.y*extremePoint.y))
// 3
let circleMaskPathFinal = UIBezierPath(ovalIn: triggerButton.frame.insetBy(dx: -radius,
                                                                           dy: -radius))
Here’s what this does:
- Defines a point that’s the full screen’s height above the top of the screen.
- Calculates the radius of your new circle by using the Pythagorean Theorem: a² + b² = c².
- Creates your new bezier path by taking the current frame of the circle and “insetting” it by a negative amount in both directions, thus pushing it out to go fully beyond the bounds of the screen in both directions.
Now that you’ve got your bezier paths set up, it’s time to actually put them to work. Still in animate(toView:triggerButton:), add:
let maskLayer = CAShapeLayer()
maskLayer.path = circleMaskPathFinal.cgPath
toView.layer.mask = maskLayer
This creates a CAShapeLayer layer and sets its path to the circular bezier path. maskLayer is then used as a mask for the destination view.
But wait a second, how exactly do masks work?
CALayer Masking
In general, a mask with an alpha value of 1 shows the layer content underneath, while an alpha value of 0 hides content beneath. Anything in-between partially reveals the layer’s content. Here’s a diagram to explain this:
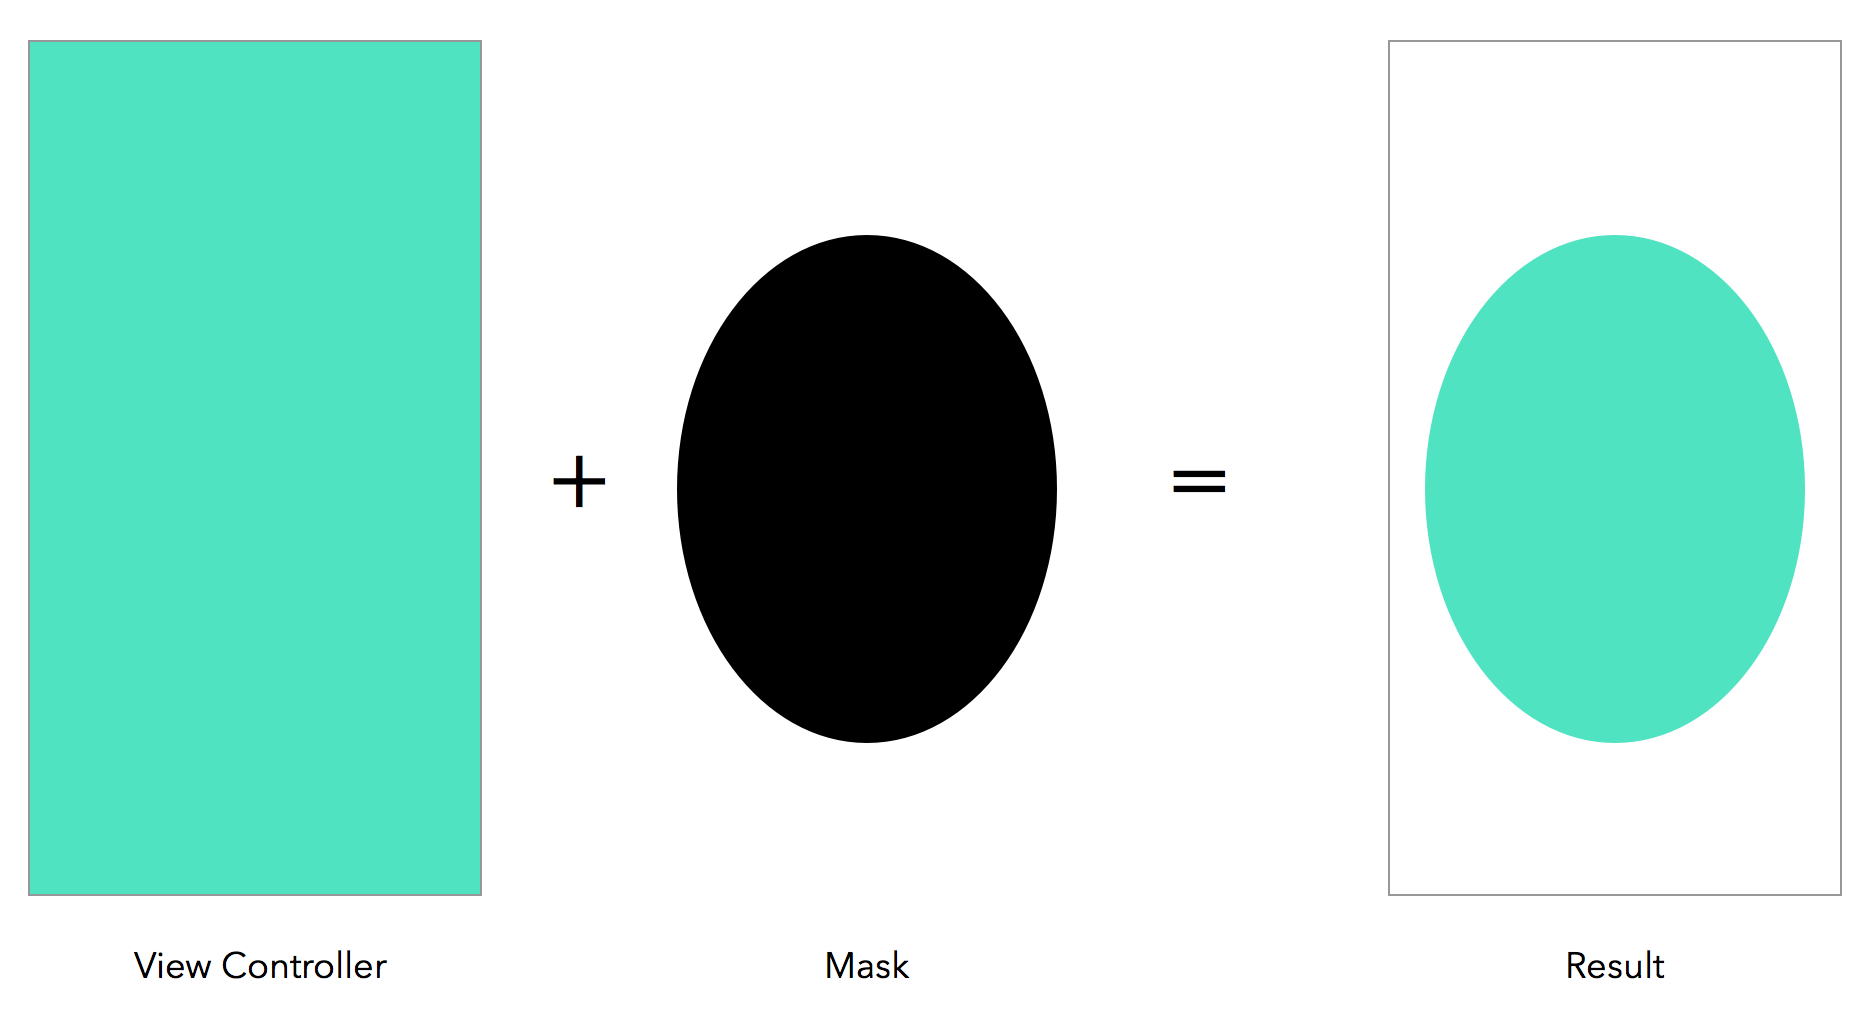
Basically, you can think of whatever shape you can see as being the shape that’ll be cut out so you can see things underneath. Everything else will end up being hidden. With these bezier paths, the pixels inside the circle have an alpha of 1.0 while the parts outside the bounds of the circle are clear, and therefore make it so you can’t see the masked view at those points.
Now that you’ve got all this set up, the only thing left to do is actually animate between the two circular masks. The tricky thing is, so far you’ve only done UIView animations, but those don’t work for CALayers.

Animations with Core Animation
In this situation, you’ve hit a point where the UIView animation abstraction can no longer help you and you need to drop back down a level.
This was bound to happen sooner or later, but don’t worry, the API is super straightforward. It’s also good to understand since UIView animations are really just CATransactions under the hood anyway.
In contrast to the closure based API of UIView animations, Core Animation animations use an object based approach. This too is an abstraction that breaks down into a CATransaction under the hood, which is actually true for pretty much any view-related thing you do.
Still in animate(toView:triggerButton:), create a CABasicAnimation object that will perform the animation.
let maskLayerAnimation = CABasicAnimation(keyPath: "path")
Here, you create an animation object and tell it that the property that will be animated is the path property. This means you’ll animate the rendered shape.
Next, set the from and to-values for this animation.
maskLayerAnimation.fromValue = circleMaskPathInitial.cgPath
maskLayerAnimation.toValue = circleMaskPathFinal.cgPath
Here, you’re using the two bezier paths you previously created to define the two states your layer should animate between.
The last thing you have to do to configure the animation is tell the object how long to run. Add the following line to do so:
maskLayerAnimation.duration = 0.15
In this case, the animation will run for 0.15 seconds.
Instead of using completion blocks like UIView animations, CAAnimations use a delegate with callbacks to signal completion. While you don’t technically require one for this animation, you’ll implement the delegate to better understand it.
Start by adding the following line:
maskLayerAnimation.delegate = self
This class is now the animation object’s delegate.
Go to the bottom of the file and add this class extension to conform to the CAAnimationDelegate protocol.
extension CircularTransition: CAAnimationDelegate {
  func animationDidStop(_ anim: CAAnimation, finished flag: Bool) {

  }
}
When this animation is complete, you can officially call this whole animation a success. In this callback you want to call completeTransition() on the context object you received at the beginning of the animation.
Unfortunately, this highlights one annoying thing about having to use this delegate callback. To get access to the context object you’ll have to save off a reference to it at the beginning of the main animation method.
First, go to the top of CircularTransition and add:
weak var context: UIViewControllerContextTransitioning?
Then, go to the line after the guard statement in animateTransition(transitionContext:) and save the incoming context for later.
context = transitionContext
Now, go back to animationDidStop(anim:finished:) in the extension and add the following line:
context?.completeTransition(true)
You’re now notifying the system when the animation completes successfully.
Now that you’ve got your animation object all set up, just add it to the maskLayer. Add the following line at the end of animate(toView:triggerButton:).
maskLayer.add(maskLayerAnimation, forKey: "path")
Once again you need to specify that you intend to animate the path of the maskLayer. Once you’ve added an animation to a layer, it will automatically start.
Build and run to see your almost completely finished transition!
