Unity 4.3 2D Tutorial: Animation Controllers
Learn how to use animation controllers to move between a state machine of animations in this Unity 4.3 2D tutorial! By Chris LaPollo.
Bonus: Animator View Extras
This tutorial couldn’t cover everything involved with animating in Unity. Unity’s animation system, known as Mecanim, is quite sophisticated and was originally built for creating complex 3D animations. However, as you’ve seen, it works very well for 2D animations, too.
This section includes a few notes that weren’t mentioned anywhere else in this tutorial, but that may be helpful when you’re creating your own animations.
Any State
In addition to the states you worked with in the Animator view, there was also a teal rectangle labeled Any State, as shown below:

This is not really a state at all. Instead it is a special endpoint for creating transitions that can occur at any time.
For example, imagine you were writing a game where the player always had the ability to shoot a weapon, no matter what animation might be playing at the time the player tries to fire. Call its shooting animation FireWeapon.
Rather than creating a transition to the FireWeapon state from every one of your other states, you could create a transition to it from Any State instead.
Then, if this transition’s condition is met – in this hypothetical case, maybe a FirePressed bool parameter is true – then this transition will trigger, regardless of which state the Animator Controller happened to be executing at the time.
Sub-state Machines
In addition to Animation Clips, states in an Animator Controller can be sub-state machines. Sub-state machines primarily help you keep complicated state machines organized by hiding branches of a state machine under a single state node.
For example, imagine a series of Animation Clips that make up an attack, such as aiming and firing a weapon. Rather than keep them all visible in your Animator Controller, you can combine that series of clips into a sub-state machine. The following image shows a hypothetical Animator Controller for the zombie, where it can transition from walking to attacking:

And the following image shows a simple set of states that might define an attack:

You connect transitions in and out of sub-state machines the same way you would regular states, except a popup menu appears that you use to choose the specific state to which to connect.
For a detailed look at sub-state machines, read this section of Unity’s manual.
Blend Trees
Blend Trees are special states you can add to an Animator Controller. They actually blend multiple animations together in order to create a new animation. For example, if you had a walking and a running animation you could use a Blend Tree to create a new animation in between those based on run speed.
Blend Trees are complicated enough to require their own tutorial. To get you started, Unity’s 2D character controller training session includes a great example of using a Blend Tree to choose the appropriate Sprite for a 2D character based on the character’s current velocity.
You can read more about Blend Trees in Unity’s manual.
Layers
In the upper-left corner of the Animator view is a section labeled Layers, as shown below:
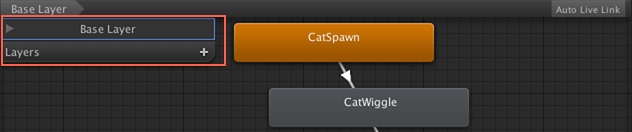
You can use layers to define complex animations that occur on a 3D character. For example, you might have one layer that controls a 3D character’s legs walking animation while another layer controls the character’s shooting animation, with rules for how to blend the animations.
I don’t know if you can use layers for 2D characters, but if you ever want to learn more about them, check out the documentation here. Please leave a comment if you know of a way they can be used in 2D games. Thanks!
Bonus: Scripting
The next part of this series will be mostly scripting, and one of the things you’ll learn is how to access from your scripts the parameters you defined in the Animator view.
However, I’m sure some readers won’t want to wait for the weeks it will probably take before that tutorial comes out. I’m not going to explain it here, but if you just can’t wait, here is some code that will let you access InConga from a script:
// Get the Animator component from your gameObject
Animator anim = GetComponent<Animator>();
// Sets the value
anim.SetBool("InConga", true);
// Gets the value
bool isInConga = anim.GetBool("InConga");
It’s best to cache the Animator component in a class variable rather than getting it every time you need it. Also, if speed is an issue, use Animator.StringToHash to generate an int from the string “InConga”, and then use the versions of these methods that take an int instead of a string.
Where To Go From Here?
This tutorial covered most of what you’ll need to know to make 2D animations in Unity. You can find the completed project here.
You’ll get much more practice scripting in the next, penultimate installment of this series, Unity 4.3 2D Tutorial: Physics and Screen Sizes. As its name implies, it introduces Unity’s new 2D physics engine and shows one technique for determining positions independent of screen sizes.
To learn more about building animations in Unity, take a look at these resources:
- Check out Unity’s Animation tutorial videos.
- Unity’s 2D character controller training session. In addition to the Blend Tree example mentioned earlier, this session goes over animating sprites while it demonstrates the creation of a 2D character controller.
- The Animation section of Unity’s manual.
- Unity’s reference to the various animation components.
Please let us know if this tutorial was helpful. Leave remarks or ask questions in the Comments section.