Unity 4.3 2D Tutorial: Animation Controllers
Learn how to use animation controllers to move between a state machine of animations in this Unity 4.3 2D tutorial! By Chris LaPollo.
Animating a Color
Switch to CatZombify in the Animation view and add a curve to edit the Sprite Renderer’s color.
[spoiler title=”Not sure how to add the Color curve?”]Select cat in the Hierarchy and choose CatZombify in the clip drop-down in the Animation view.
Click Add Curve in the Animation view, expand Sprite Renderer, and click the + next to Color.
[/spoiler]
When you add a new curve, Unity automatically adds keyframes at frames zero and 60. You can move between them like you’ve been doing so far, either using the frame field in the Animation view’s control bar, by selecting a keyframe within the timeline, or by dragging the scrubber to a specific frame. However, the Animation view’s control bar also includes two buttons for moving to the Previous and Next keyframes, as shown below:
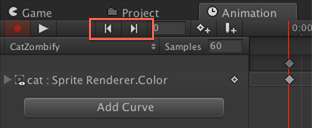
Click the Next Keyframe button (>|) to move to frame 60. With the cat : Sprite Renderer.Color curve expanded, change the values for Color.r and Color.b to 0, as shown below:

As you can see in the Scene or Game views, or in the Inspector‘s Preview pane (if you still have cat selected in the Hierarchy), your cat is a very bright green. You could tweak the color values to make the cat appear a more zombie-esque hue, but this will be fine for Zombie Conga.
Preview the clip by pressing the Play button in the Animation window. Uh oh, I think kitty is gonna be sick!

You now need to make the cat transition from CatWiggle to CatZombify. Select cat in the Hierarchy and switch to the Animator view.
Right click on CatWiggle, choose Make Transition, and then click CatZombify.
Play your scene and the cat appears, wiggles a bit, turns green, and then stops moving. However, after turning fully green it resets its color to white and transitions to green again, over and over.

You’ve seen this problem before. Try to solve it yourself, but if you get stuck, check out the Spoiler below for the answer.
[spoiler title=”Not sure how to keep a green cat green?”]Just like with CatSpawn, you want CatZombify to be a one-shot animation rather than use the default looping behavior. To fix this, select CatZombify in the Project browser and uncheck Loop Time in the Inspector.
[/spoiler]
Now when the turns green, it stays green. Purrfect. Get it? Because it’s perfect, but it’s a cat, and cats purr, so I used “purr” in place of “per”. I don’t want to brag, but I’m pretty sure I just invented that. :]
You have the transition from CatWiggle to CatZombify set up, but it occurs as soon as the cat starts wiggling. In the actual game, you’re going to want the cat to keep wiggling until the zombie touches it, and then you’ll want it to turn green. To do that, you need CatWiggle to loop until a specific condition triggers the transition.
Animation Parameters
Unity allows you to add to an Animator Controller any number of user-defined variables, called parameters. You can then reference these parameters in the conditions that trigger transitions.
With cat selected in the Hierarchy, open the Animator view. Click the + in the lower left of the window, where it says Parameters, and choose Bool from the popup that appears, as shown below:
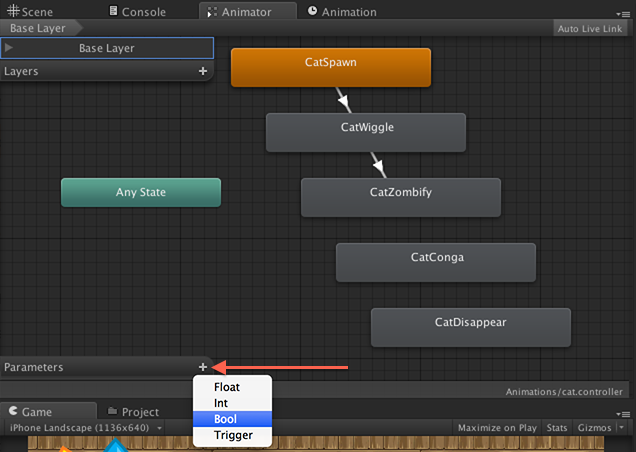
This parameter will be a flag you set to indicate whether or not a cat is a member of the conga line, so name it InConga.
Your Animator view’s Parameters should look like the following:

In the Animator view, select the transition you created earlier between CatWiggle and CatZombify.
In the Inspector, click the combo box under Conditions and you’ll see that there are now two options, Exit Time and InConga. Choose InConga, as shown below:

Be sure the combo box that appears to the right of the InConga condition is set to true, as shown below:

Now play your scene and notice how the cat appears and starts wiggling, but doesn’t turn green. In the Animator view, you can see how the cat continues looping in the CatWiggle state:

With the scene running and both the Animator and the Game views visible, click the empty checkbox next to InConga in the lower left corner of the Animator view. As soon as you do, you’ll see the animation state transition to CatZombify, and the cat in your Game view turns green and its wiggling smoothly comes to a halt.

Stop the scene. In the next part of this tutorial series, you’ll set the InConga flag from a script when the zombie touches the cat, but for now, you’ll just finish up the rest of the cat’s animations.
Trigger parameters are similar to bool ones, except when you set a trigger and it initiates a transition, the trigger automatically resets its value once the transition completes.
bool to trigger a state change, but you can add parameters of type float, int, and trigger, too. For example, you might have a float parameter named “Speed” and then set up your Animator Controller to transition from a walk to a run animation if Speed exceeds a certain value.
Practicing What You’ve Learned
Right now the cat can appear, wiggle, and turn into a zombie cat. These are all good things for a cat to do, but you still need it to hop along in the conga line and then go away.
CatConga Clip
The actual logic to move the cats in a line following the zombie will have to wait for the next part of this series, which focuses on finishing all the code to make this a playable game. For now, you’re only going to create the Animation Clip and set up the transitions.
First, add to the CatConga Animation Clip a curve that adjusts the cat’s Scale. The scale animation should start and end with values of 1, and be 1.1 at its midpoint. The clip should last for 0.5 seconds and should loop.
Now go. Animate.
[spoiler title=”Does animating on your own make you nervous?”]Select cat in the Hierarchy, then go to the Animation view and select CatConga from the clip drop-down menu.
Click Add Curve, expand Transform, and click the + to the right of Scale.
Move to frame 15 and set the Scale.x and Scale.y values to 1.1.
Drag the keyframe that is currently at frame 60 to the left to move it to frame 30.
You should now have three keyframes, one each at frames 0, 15 and 30. The x and y scales should be set to 1 at frames 0 and 30,
and set to 1.1 at frame 15. Your Animation view looks like this:

[/spoiler]
Preview your clip by pressing Play in the Animation view. If you animated the scale properly, you should see a throbbing cat, as shown below:

You’ll have to use your imagination to envision it moving forward in sync with the animation. It looks like it’s hopping, right? If not, imagine better.
Now create a transition between CatZombify and CatConga. Try doing it yourself, but check the spoiler if you need help.
[spoiler title=”Forget how to create a transition?”]To create the transition, select cat in the Hierarchy and open the Animator view.
Right-click on CatZombify in the Animator view, choose Make Transition and click CatConga.
[/spoiler]
Play the scene now. While it’s playing, click the InConga check box in the Animator view. Behold, the zombification of a cat! Almost. After turning green, the cat immediately turns white again, like some sort of demon kitty risen from the undead!

The cat turned white again because the CatConga animation doesn’t set a color for the Sprite Renderer, so Unity took it upon itself to change the color back to its default of white. I’m really not sure if that’s a bug or expected behavior, but either way, there’s an easy fix.
Add a curve to CatConga to edit the Sprite Renderer’s color. You should definitely know how to do this one.
[spoiler title=”Don’t definitely know how to do this one?”]Select cat in the Hierarchy and choose CatConga in the clip drop-down in the Animation view.
Click Add Curve in the Animation view, expand Sprite Renderer, and click the + next to Color.
[/spoiler]
Inside the Animation view, move the scrubber to frame 0 in CatConga and set the Color.r and Color.b values to 0. Then press the Next Keyframe button twice to move to the keyframe at frame 30. Remember, that’s the button in the Animator view’s control bar that looks like >|.
You need to delete this keyframe. You can do so by clicking the diamond for cat : Sprite Renderer.Color in the curves list and choosing Delete Key, as shown below:

Additionally, you can get to these menus by right-clicking on the name of the curve in the curves list, or by right-clicking directly on a keyframe’s diamond-shaped marker in the timeline.
Now you should have a curve with a single keyframe at frame zero. This sets the cat’s color to green as soon as the clip starts and then makes no changes. Your Animation view now looks something like this:
Play your scene again, click the InConga check box in the Animator view, and watch as the cat turns undead and then stays undead, just like nature intended.
