ReactiveCocoa Tutorial – The Definitive Introduction: Part 1/2
Get to grips with ReactiveCocoa in this 2-part tutorial series. Put the paradigms to one-side, and understand the practical value with work-through examples. By Colin Eberhardt.
A Little Cast
If you updated your code to split it into the various RACSignal components, now is the time to revert it back to the fluent syntax:
[[self.usernameTextField.rac_textSignal
  filter:^BOOL(id value) {
    NSString *text = value; // implicit cast
    return text.length > 3;
  }]
  subscribeNext:^(id x) {
    NSLog(@"%@", x);
  }];
The implicit cast from id to NSString, at the indicated location in the code above, is less than elegant. Fortunately, since the value passed to this block is always going to be an NSString, you can change the parameter type itself. Update your code as follows:
[[self.usernameTextField.rac_textSignal
  filter:^BOOL(NSString *text) {
    return text.length > 3;
  }]
  subscribeNext:^(id x) {
    NSLog(@"%@", x);
  }];
Build and run to confirm this works just as it did previously.
What’s An Event?
So far this tutorial has described the different event types, but hasn’t detailed the structure of these events. What’s interesting is that an event can contain absolutely anything!
As an illustration of this point, you’re going to add another operation to the pipeline. Update the code you added to viewDidLoad as follows:
[[[self.usernameTextField.rac_textSignal
  map:^id(NSString *text) {
    return @(text.length);
  }]
  filter:^BOOL(NSNumber *length) {
    return [length integerValue] > 3;
  }]
  subscribeNext:^(id x) {
    NSLog(@"%@", x);
  }];
If you build and run you’ll find the app now logs the length of the text instead of the contents:
2013-12-26 12:06:54.566 RWReactivePlayground[10079:a0b] 4
2013-12-26 12:06:54.725 RWReactivePlayground[10079:a0b] 5
2013-12-26 12:06:54.853 RWReactivePlayground[10079:a0b] 6
2013-12-26 12:06:55.061 RWReactivePlayground[10079:a0b] 7
2013-12-26 12:06:55.197 RWReactivePlayground[10079:a0b] 8
2013-12-26 12:06:55.300 RWReactivePlayground[10079:a0b] 9
2013-12-26 12:06:55.462 RWReactivePlayground[10079:a0b] 10
2013-12-26 12:06:55.558 RWReactivePlayground[10079:a0b] 11
2013-12-26 12:06:55.646 RWReactivePlayground[10079:a0b] 12
The newly added map operation transforms the event data using the supplied block. For each next event it receives, it runs the given block and emits the return value as a next event. In the code above, the map takes the NSString input and takes its length, which results in an NSNumber being returned.
For a stunning graphic depiction of how this works, take a look at this image:
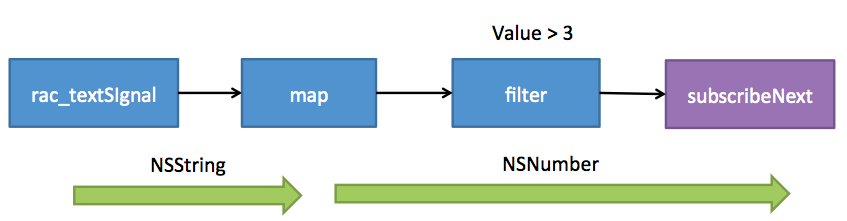
As you can see, all of the steps that follow the map operation now receive NSNumber instances. You can use the map operation to transform the received data into anything you like, as long as it’s an object.
text.length property returns an NSUInteger, which is a primitive type. In order to use it as the contents of an event, it must be boxed. Fortunately the Objective-C literal syntax provides and option to do this in a rather concise manner – @(text.length).
That’s enough playing! It’s time to update the ReactivePlayground app to use the concepts you’ve learned so far. You may remove all of the code you’ve added since you started this tutorial.
Creating Valid State Signals
The first thing you need to do is create a couple of signals that indicate whether the username and password text fields are valid. Add the following to the end of viewDidLoad in RWViewController.m:
RACSignal *validUsernameSignal =
  [self.usernameTextField.rac_textSignal
    map:^id(NSString *text) {
      return @([self isValidUsername:text]);
    }];

RACSignal *validPasswordSignal =
  [self.passwordTextField.rac_textSignal
    map:^id(NSString *text) {
      return @([self isValidPassword:text]);
    }];
As you can see, the above code applies a map transform to the rac_textSignal from each text field. The output is a boolean value boxed as a NSNumber.
The next step is to transform these signals so that they provide a nice background color to the text fields. Basically, you subscribe to this signal and use the result to update the text field background color. One viable option is as follows:
[[validPasswordSignal
  map:^id(NSNumber *passwordValid) {
    return [passwordValid boolValue] ? [UIColor clearColor] : [UIColor yellowColor];
  }]
  subscribeNext:^(UIColor *color) {
    self.passwordTextField.backgroundColor = color;
  }];
(Please don’t add this code, there’s a much more elegant solution coming!)
Conceptually you’re assigning the output of this signal to the backgroundColor property of the text field. However, the code above is a poor expression of this; it’s all backwards!
Fortunately, ReactiveCocoa has a macro that allows you to express this with grace and elegance. Add the following code directly beneath the two signals you added to viewDidLoad:
RAC(self.passwordTextField, backgroundColor) =
  [validPasswordSignal
    map:^id(NSNumber *passwordValid) {
      return [passwordValid boolValue] ? [UIColor clearColor] : [UIColor yellowColor];
    }];

RAC(self.usernameTextField, backgroundColor) =
  [validUsernameSignal
    map:^id(NSNumber *passwordValid) {
     return [passwordValid boolValue] ? [UIColor clearColor] : [UIColor yellowColor];
    }];
The RAC macro allows you to assign the output of a signal to the property of an object. It takes two arguments, the first is the object that contains the property to set and the second is the property name. Each time the signal emits a next event, the value that passes is assigned to the given property.
This is a very elegant solution, don’t you think?
One last thing before you build and run. Locate the updateUIState method and remove the first two lines:
self.usernameTextField.backgroundColor = self.usernameIsValid ? [UIColor clearColor] : [UIColor yellowColor];
self.passwordTextField.backgroundColor = self.passwordIsValid ? [UIColor clearColor] : [UIColor yellowColor];
That will clean up the non-reactive code.
Build and run the application. You should find that the text fields look highlighted when invalid, and clear when valid.
Visuals are nice, so here is a way to visualize the current logic. Here you can see two simple pipelines that take the text signals, map them to validity-indicating booleans, and then follow with a second mapping to a UIColor which is the part that binds to the background color of the text field.

Are you wondering why you created separate validPasswordSignal and validUsernameSignal signals, as opposed to a single fluent pipeline for each text field? Patience dear reader, the method behind this madness will become clear shortly!
Combining signals
In the current app, the Sign In button only works when both the username and password text fields have valid input. It’s time to do this reactive-style!
The current code already has signals that emit a boolean value to indicate if the username and password fields are valid; validUsernameSignal and validPasswordSignal. Your task is to combine these two signals to determine when it is okay to enable the button.
At the end of viewDidLoad add the following:
RACSignal *signUpActiveSignal =
  [RACSignal combineLatest:@[validUsernameSignal, validPasswordSignal]
                    reduce:^id(NSNumber *usernameValid, NSNumber *passwordValid) {
                      return @([usernameValid boolValue] && [passwordValid boolValue]);
                    }];
The above code uses the combineLatest:reduce: method to combine the latest values emitted by validUsernameSignal and validPasswordSignal into a shiny new signal. Each time either of the two source signals emits a new value, the reduce block executes, and the value it returns is sent as the next value of the combined signal.
RACSignal combine methods can combine any number of signals, and the arguments of the reduce block correspond to each of the source signals. ReactiveCocoa has a cunning little utility class, RACBlockTrampoline that handles the reduce block’s variable argument list internally. In fact, there are a lot of cunning tricks hidden within the ReactiveCocoa implementation, so it’s well worth pulling back the covers!
Now that you have a suitable signal, add the following to the end of viewDidLoad. This will wire it up to the enabled property on the button:
[signUpActiveSignal subscribeNext:^(NSNumber *signupActive) {
   self.signInButton.enabled = [signupActive boolValue];
 }];
Before running this code, it’s time to rip out the old implementation. Remove these two properties from the top of the file:
@property (nonatomic) BOOL passwordIsValid;
@property (nonatomic) BOOL usernameIsValid;
From near the top of viewDidLoad, remove the following:
// handle text changes for both text fields
[self.usernameTextField addTarget:self
                           action:@selector(usernameTextFieldChanged)
                 forControlEvents:UIControlEventEditingChanged];
[self.passwordTextField addTarget:self
                           action:@selector(passwordTextFieldChanged)
                 forControlEvents:UIControlEventEditingChanged];
Also remove the updateUIState, usernameTextFieldChanged and passwordTextFieldChanged methods. Whew! That’s a lot of non-reactive code you just disposed of! You’ll be thankful you did.
Finally, make sure to remove the call to updateUIState from viewDidLoad as well.
If you build and run, check the Sign In button. It should be enabled because the username and password text fields are valid, as they were before.
An update to the application logic diagram gives the following:

The above illustrates a couple of important concepts that allow you to perform some pretty powerful tasks with ReactiveCocoa;
- Splitting – signals can have multiple subscribers and serve as the source for more multiple subsequent pipeline steps. In the above diagram, note that the boolean signals that indicate password and username validity are split and used for a couple of different purposes.
- Combining – multiple signals may be combined to create new signals. In this case, two boolean signals were combined. However, you can combine signals that emit any value type.
The result of these changes is the application no longer has private properties that indicate the current valid state of the two text fields. This is one of the key differences you’ll find when you adopt a reactive style — you don’t need to use instance variables to track transient state.