Core Bluetooth Tutorial for iOS: Heart Rate Monitor
In this Core Bluetooth tutorial, you’ll learn how to discover, connect to, and retrieve data from compatible devices like a chest-worn heart rate sensor. By Jawwad Ahmad.
Given the proliferation of gadgets in today’s world, communication between those devices can lead to using those gadgets, and the information provided by those gadgets, in more effective ways. To this end, Apple has introduced the Core Bluetooth framework, which can communicate with many real-world devices such as heart rate sensors, digital thermostats, and workout equipment. If you can connect to it via BLE (Bluetooth Low Energy) wireless technology, the Core Bluetooth framework can connect to it.
In this tutorial, you’ll learn about the key concepts of the Core Bluetooth framework and how to discover, connect to, and retrieve data from compatible devices. You’ll use these skills to build a heart rate monitoring application that communicates with a Bluetooth heart rate sensor.
The heart rate sensor we use in this tutorial is the Polar H7 Bluetooth Heart Rate Sensor, but any other Bluetooth heart rate sensor should work as well.
First, let’s take a moment to go over a few Bluetooth-specific terms: centrals, peripherals, services, and characteristics.
Centrals and Peripherals
A Bluetooth device can be either a central or peripheral:
- Central: the object that receives the data from a Bluetooth device.
- Peripheral: the Bluetooth device that publishes data to be consumed by other devices.
In this tutorial, the iOS device will be the central, receiving heart rate data from the peripheral.
Advertising Packets
Bluetooth peripherals broadcast some of the data they have in the form of advertising packets. These packets can contain information such as the peripheral’s name and main functionality. They can also include extra information related to what kind of data the peripheral can provide.
The job of the central is to scan for these advertising packets, identify any peripherals it finds relevant, and connect to individual devices for more information.
Services and Characteristics
Advertising packets are very small and cannot contain a great deal of information. To share more data, a central needs to connect to a peripheral.
The peripheral’s data is organized into services and characteristics:
- Service: a collection of data and associated behaviors describing a specific function or feature of a peripheral. For example, a heart rate sensor has a Heart Rate service. A peripheral can have more than one service.
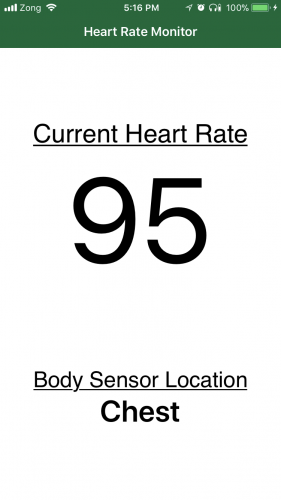
- Characteristic: provides further details about a peripheral’s service. For example, the Heart Rate service contains a Heart Rate Measurement characteristic that contains the beats per minute data. A service can have more than one characteristic. Another characteristic that the Heart Rate service may have is Body Sensor Location, which is simply a string that describes the intended body location of the sensor.
Each service and characteristic is represented by a UUID which can be either a 16-bit or a 128-bit value.
Getting Started
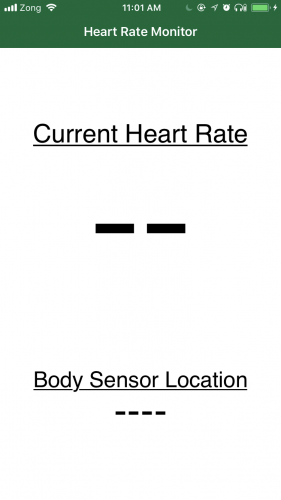
First, download the starter project for this tutorial. It’s a very simple app to display the intended body sensor location and heart rate. The starter project has placeholders for the data to be retrieved from the heart rate monitor.
Starter Project
Final Project
Before you start coding, you’ll need to set the Team for your project. Select the project root in the project navigator, select the HeartRateMonitor target, and in the General ▸ Signing section, set the Team to your Apple ID. (You might also need to set the bundle Identifier for the project to something else …)
Once that’s done, run the app. If you see an error, you need to navigate to the Settings app on your device, go to General ▸ Device Manangement, and Trust your Apple ID. After that, you will be able to run the app from Xcode on your iOS device.
Preparing for Core Bluetooth
You’ll first import the Core Bluetooth framework. Open HRMViewController.swift and add the following:
import CoreBluetooth
Most of the work in the Core Bluetooth framework will be done through delegate methods. The central is represented by CBCentralManager and its delegate is CBCentralManagerDelegate. CBPeripheral is the peripheral and its delegate is CBPeripheralDelegate.
You’ll lean on Xcode to help you add the required methods. The first thing you’ll do is add conformance to CBCentralManagerDelegate, but you’ll use Xcode’s fix-it feature to add the required protocol method.
Add the following extension to the end of HRMViewController.swift, outside the class:
extension HRMViewController: CBCentralManagerDelegate {

}
You should see an Xcode error appear shortly. Click on the red dot to expand the message and then click Fix to have Xcode add the required protocol method for you.
Would I like to add protocol stubs? Why of course I would, thank you for asking!

Xcode should have added centralManagerDidUpdateState(_:) for you. Add an empty switch statement to the method to handle the various states of the central manager:
switch central.state {

}
In a moment, you’ll see an error stating that switch must be exhaustive. Click on the red dot and click on Fix to have Xcode add all of the cases for you:
Xcode, you are too kind!

Xcode will helpfully add the following code:

You can replace the placeholders with appropriate values from the following code or just replace the whole switch statement if you prefer to cut and paste:
switch central.state {
  case .unknown:
    print("central.state is .unknown")
  case .resetting:
    print("central.state is .resetting")
  case .unsupported:
    print("central.state is .unsupported")
  case .unauthorized:
    print("central.state is .unauthorized")
  case .poweredOff:
    print("central.state is .poweredOff")
  case .poweredOn:
    print("central.state is .poweredOn")
}
If you build and run at this point, nothing will be printed to the console because you haven’t actually created the CBCentralManager.
Add the following instance variable right below the bodySensorLocationLabel outlet:
var centralManager: CBCentralManager!
Next, add the following to the beginning of viewDidLoad() to initialize the new variable:
centralManager = CBCentralManager(delegate: self, queue: nil)
Build and run, and you should see the following printed to the console:
central.state is .poweredOn
central.state is .poweredOff instead. In this case, turn on Bluetooth and run the app again.Now that the central has been powered on, the next step is for the central to discover the heart rate monitor. In Bluetooth-speak, the central will need to scan for peripherals.